Ads play an important part in business as it helps them to bring new products to the consumers. Yet, there are always people who find it annoying to see ads popping up on screen or obstructing their main focus in some way. The use of mobile devices is increasing rapidly, and advertisers along with publishers are targeting smartphones these days. As a result, ads are not only found on webpages, but also on individual mobile apps.
If you are a person who’s generally annoyed by advertisements, you’re less likely to open and view them intentionally. Thus, your ad clicks might be accidental in most cases. Accidental clicks are not good for advertising as a whole, and it’d be better if we stop displaying ads in such cases.
On the other hand, if you think that a particular app is really useful, the best way to remove ads is by upgrading it to its paid version. Since you find the app useful, you’d want it to be regularly updated. By purchasing the app, you’d be encouraging the developer to continue working on new features, updates and bug fixes.
But if you have already made up your mind about blocking ads on your smartphone, you might be ready to even jailbreak or root your device in order to make it possible. So, here are some simple methods which will help you to block ads on your iOS or Android device.
Block ads on iPhone, iPad or iPod Touch
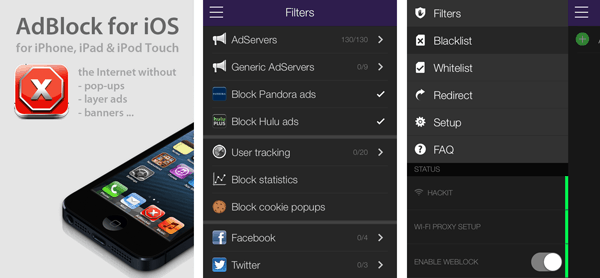
AdBlock for iOS
Due to their sandboxed behavior, apps cannot affect ad display (or the lack thereof) within other apps without jailbreaking iOS. Ad Block for iOS is an isolated web browser that blocks different types of ads on webpages when opened in the browser. It does not require jailbreaking, and so any iOS user can use it. AdBlock for iOS can block pop up ads, video ads, layer ads, banners and more. In order to block ads on a particular website, just open it inside AdBlock for iOS browser. The pro version provides additional features like Multi-tab browsing (up to eight tabs), app passcode protection, surf as PC, and more. The free app may be upgraded to the pro version through in-app purchase for $3.99. AdBlock for iOS is available for download from the App Store. To experience an ad-free web browsing experience, use the in-app browser to open websites.
Weblock – AdBlock for iOS
Weblock is a more versatile Ad blocking option available for iOS devices. Weblock can block ads not only from the native Safari browser, but also other third party browsers and apps! The best part is, in spite of being such a powerful ad blocker, Weblock does not require jailbreak to work. Instead, it acts as a proxy for specific ad servers and operates at the network level. But it doesn’t route your traffic through the proxy, so your browsing experience remains unaffected. It can block banner ads, pop ups, analytics, images, Javascript and more. Currently, Weblock only works with WiFi connections. It won’t block ads when you’re active on cellular data.
Configure Weblock for iOS
Before you can see Weblock in action, you need to set up the Weblock proxy with the WiFi network. Here is what you need to do.
- Download Weblock on your iPhone, iPad or iPod Touch.
- Make sure you’re connected to a WiFi network on your iOS device.
- Launch the app and open Menu >> Setup.
- Tap on the URL (proxy) provided on the screen to copy it.
- Now open iOS Settings >> WiFi and tap on the connected WiFi Network.
- Go to the HTTP Proxy section and tap on Auto. You will be asked to enter the proxy URL.
- Paste the copied URL and go back to the previous page.
- Now reopen Weblock and open the Menu.
- Turn on Enable Weblock switch.
You have successfully configured Weblock.
How to use Weblock – AdBlock for iOS
Weblock app can be used to control the pre-defined filters and also set up custom ones. It can block specific ads from services like Facebook, Twitter, Google Plus, Pinterest, etc. You may also choose to blacklist or whitelist custom domains to block or allow ads in them. And because it works at the network level, Weblock is also able to turn off ads from third party apps.
Block ads on Android
Firefox add-on for Android
If you wish to block website ads from your browser, AdBlock Plus add-on for Firefox is a handy tool. This Add-On blocks all ads inside the Firefox browser, making your browsing session simple and ad-free. To set up AdBlock Plus in Firefox:
- Download and install Mozilla Firefox for Android, if not already done.
- Get the AdBlock Plus Add-On for Firefox Mobile.
- Install the Add-On inside Firefox Browser.
That’s all! Browsing sessions inside Firefox will be free of ads on your Android phone.
AdBlock Plus for Android
For Android devices, popular AdBlock software, AdBlock Plus, is available on Google Play. To set up and use AdBlock Plus, first download and install the app on your Android device. You won’t need to configure anything if your phone is rooted. However, if you don’t have root access, you’ll need to manually configure the proxy settings. AdBlock Plus automatically uses suitable ad filters by default, but you may change it if you want. AdBlock Plus also works only with WiFi Networks and won’t be able to block ads while using a data connection.
Configure AdBlock Plus on non-rooted Android Phone
- Make sure you are connected to a WiFi Network.
- Run AdBlock Plus and swipe down Notifications to reveal the message from AdBlock Plus.
- Note the port number specified in the notification message.
- Go to Android Settings >> WiFi and press and hold the connected network.
- Choose Modify Network in the available menu.
- Scroll down and check on Show advanced options.
- Scroll further to Proxy settings and choose Manual.
- Under Proxy Settings, enter the following details:
- Proxy hostname – localhost.
- Proxy port – The port number from AdBlock notification message.
You have thus configured AdBlock Plus.
Configure AdBlock Plus on rooted Android Phone
AdBlock Plus set up process is pretty much automatic if your Android is already rooted. When launching AdBlock Plus on rooted Android phone, the app will ask you for Superuser access. Select Allow in the prompt and AdBlock Plus will be automatically configured.
There’s not many customization options available here. You can select from a list of pre-defined block lists. These lists get updated from time to time for including more sources to filter. AdBlock Plus can run in the background at Android startup.
Block ads via DNS
Some DNS servers readily block ad serving on pages routed through them. Once DNS settings have been correctly configured on your Android or iOS device, you’ll no longer see ads while browsing the internet on your smartphone. But in order to use a custom DNS, you need to be connected to a WiFi network.
Ad blocking DNS IP addresses
XDA Developers have provided the IP addresses of some DNS servers capable of blocking ads, in one of their posts.
Ad Barricade
Ad Barricade is dedicated to blocking ads from some of the major ad providers.
Website: http://www.adbarricade.com
DNS 1: 74.53.155.162
DNS 2: 69.93.216.138
Fool DNS
Fool DNS is dedicated to maintaining your privacy on the web. In addition to ad blocking, it also prevents third parties from tracking cookies and user profiling.
Website: http://www.fooldns.com/fooldns-community/english-version/
DNS 1: 87.118.111.215
DNS 2: 213.187.11.62
Open DNS
Open DNS is a special DNS based service that provides customizable IP filtering options. Although it’s not a dedicated ad blocker like the others mentioned here, it may easily be implemented to do so.
In order to use OpenDNS, you need to sign up for the service. There are different plans to choose from depending on your requirements. The free plan lets you to manually filter up to 25 different IPs. You can define these filters on your account management page via your web browser. Due to the worldwide distribution of their servers, OpenDNS is relatively faster than the other DNSs mentioned here.
Website: http://www.opendns.com/
DNS 1: 208.67.222.222
DNS 2: 208.67.220.220
Refer to this list for common ad providers. You may add them to your filter list in order to block most of the ads.
Configure DNS on Android and iOS
Both Android and iOS provide suitable options to set or change DNS settings.
Setup or modify DNS on iOS
- Connect to a WiFi network from your iPhone, iPad or iPod Touch.
- Open Settings and tap on WiFi to access its related options.
- Tap on the connected WiFi network to modify its parameters.
- Under DHCP tab, edit the DNS field to include the IP address of your preferred DNS server (Details below).
Setup or modify DNS on Android
- Connect to a WiFi network from your Android device.
- Go to Settings >> WiFi.
- Press and hold the connected WiFi network to reveal additional options.
- Tap on Modify network.
- Scroll down on the pop up menu and select the Show advanced options checkbox.
- Under IP settings, choose Static.
- Input the preferred values for DNS 1 and DNS 2 (DNS details below).
These are a few good options available for blocking ads on your Android or iOS device. We hope our readers will find this information helpful. Unfortunately though, we couldn’t find suitable ad blocking apps for Windows Phone. If you guys have any app in mind, do let us know in the comments below.