iOS 7 is arguably the most advanced mobile operating system not only because of its performance and design/UX, but also because of its security features. By enabling relevant options, you can turn your iPhone, iPod Touch or iPad into a virtual Fort Knox.
Some of the features discussed below are old, some are new and others have been modified in iOS 7. But together, these settings will make your iDevice nothing more than just a brick if it gets in the wrong hands.
Note: This article will protect your iOS 7 device (iPhone, iPad or iPod Touch) from being used by an unauthorized person in case it gets stolen. But this can also be used as a fair warning for second hand device buyers and sellers. Due to high level of security, a lot of apps, features and services may be integrated with the original owner’s credentials and be inaccessible to others.
Set Password on Lock Screen
Now this may seem a little silly to mention over here, but the lock screen password on an iDevice(with iOS 7) lays the foundation for a bulletproof security setup. The lock screen password protects your device against any attempts to alter your device’s data or settings. If this password is not known, an intruder cannot go beyond the lock screen.
To set a Lock Screen password, go to Settings >> General >> Passcode Lock >> Turn on Passcode and enter your password two times to save it.
Benefits of setting the Lock Screen password
Data and apps are protected on your device.
If the device is connected to a computer, the USB Media drive (Camera Roll) won’t be visible unless you authorize the computer from your iDevice, which requires you to unlock the device first.
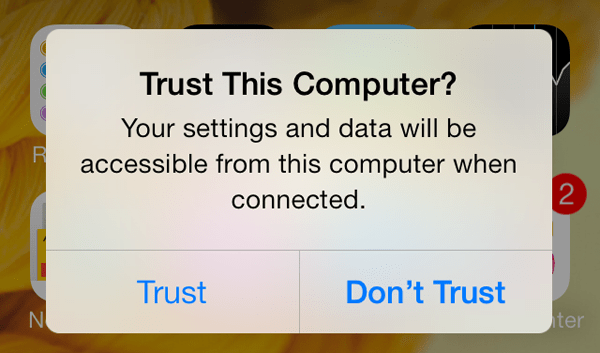
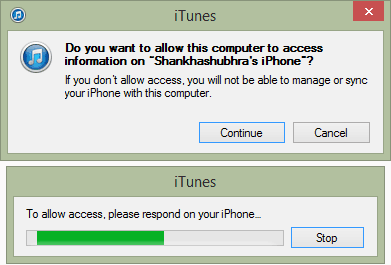
If the computer has iTunes installed on it, the data on the iDevice will still not be accessible unless the computer is authorized from the device (Trust This Computer?). If an intruder does not have the password to unlock your device, he / she won’t be able to authorize the computer; hence iTunes sync won’t be possible.
Additionally, you can even set the device to automatically erase all data if the wrong password is given 10 times.
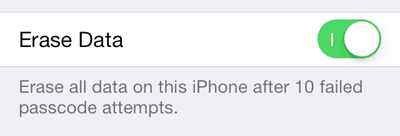
To set your iDevice to automatically wipe its data if 10 unsuccessful attempts are made to unlock the device, go to Settings >> General >> Passcode Lock >> Erase Data.
Henceforth, your lock screen will be password protected and you will need to provide the lock screen password every time you want to access the Passcode Lock settings.
Create a strong Passcode
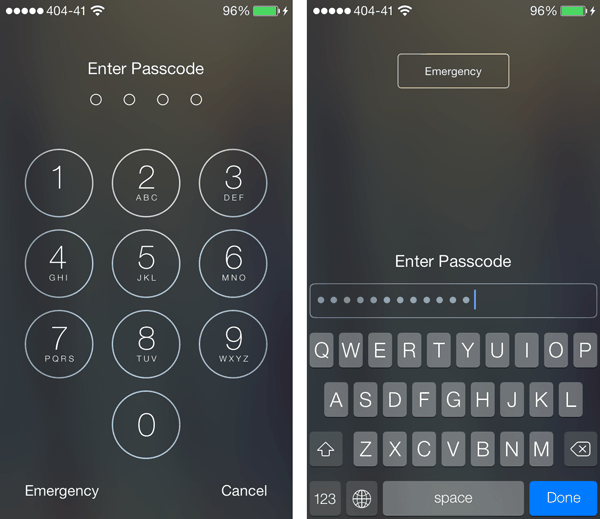
By default, Passcode Lock supports a 4 digit number. But if you want to make it real hard for someone to guess, just make it complex. To do that, go to Settings >> General >> Passcode Lock and Turn off Simple Passcode by providing the old one. Now, create and confirm your new complex password.
Disable features on Lock Screen
You can disable access to features like Notification Center, Siri and Control Center from the Lock Screen. That way, an intruder won’t be able to see app notifications or access the Control Center without unlocking the device.
To disable Notification Center on Lock Screen, go to Settings >> Notification Center. In the Access on Lock Screen section, turn off the option for Notifications view and Today view.
To disable Control Center on Lock Screen, go to Settings >> Control Center >> Turn off Access on Lock Screen.
To disable Siri on Lock Screen, go to Settings >> General >> Passcode Lock and turn off Siri in Allow Access When Locked section.
Enable Restrictions
If the intruder somehow manages to break through your Lock screen password, the second level of security is to turn on Restrictions.
Using the restrictions feature you can limit the usage of your iDevice in case an intruder gets hold of your phone. You can put restrictions to a number of operations and apps.
For instance, if you disable app install and uninstall option, you won’t be able to install new apps or remove existing ones from your device; even from iTunes.
The full list of available restrictions is present in the Restrictions menu. To turn on restrictions, go to Settings >> General >> Restrictions and choose what apps, data and operations you want to allow or disallow.
It is recommended that you keep a different restrictions Passcode than the Lock Screen Passcode. That way, Restrictions will provide an extra layer of security over the original lock screen password.
Find My iPhone/iPad
This is one of the older features provided by Apple to track your device remotely in case of theft. Find My iPhone enables several features. For this feature to work, location services must be enabled on your device and it should be connected to the Internet.
Location: You can track the location of your iDevice on the map and locate its position remotely via iCloud.com.
Play Sound: If you accidently left your phone somewhere nearby, you can remotely play a sound by logging into iCloud using another device.
Lost Mode: You may even leave a custom message on your device screen leaving your contact information so that anyone who finds your lost device can get back to you.
Erase iDevice: You can wipe your device remotely using this option. However erasing all data will affect Find My iPhone/iPad services and you will no longer be able to track your lost device.
Before using this option, make sure you have a full backup of your device created either using iTunes or via iCloud. Having a backup will help you to quickly restore the data in case you have wiped out the contents entirely.
Activation Lock
This is the new feature introduced in iOS 7 that literally makes your iDevice bulletproof in terms of security. By using this feature, your iDevice will permanently be linked with your iCloud Account.
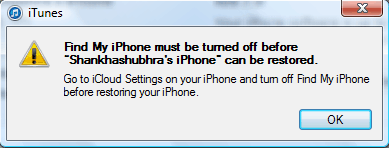
On an iOS 7 device, an intruder will not be able to turn off Find My iPhone without knowing the user’s Apple ID password. Similarly, restoring the device via iTunes won’t be possible as Find My iPhone needs to be turned off first in order to do it.
To turn on Activation Lock, just open the Find My iPhone app and log in with your Apple ID.
To verify whether Activation Lock is turned on, go to Settings >> iCloud >> Turn on sync for Find My iPhone/iPad.
Once turned on, you cannot turn it off without authenticating it with your Apple ID password. The Activation lock remains active even if Find My iPhone service is deactivated (logged out). This means, even if you can’t track your device, an intruder would still not be able to restore the device without knowing your Apple ID password.
A Typical Scenario
Let us take a practical example to conclude our post. Say you have an iPhone and you have taken all the above mentioned steps to protect your device. We’ll see how Apple’s Security features are foolproof in every way. Say, one fine morning, your iPhone gets stolen.
The thief tries to use the device, but it’s locked and he doesn’t know the password.
He takes it home and plugs it into his computer. The USB media drive doesn’t show up.
He fires up iTunes; but it asks him to Trust this Computer from the device. Since he can’t unlock, he’s helpless at the moment.
In the worst case scenario, our thief is somehow able to unlock the device. Now he can browse the apps present on the device, but he can’t install or uninstall apps, as Restrictions are turned on and protected with a different password.
The thief is clever; he turns off active network connections and location services. He also signs out from Find My iPhone. You are no longer able to track your phone. However, the thief won’t be able to restore / jailbreak the iPhone to use it for his own interests; because of Activation Lock, Restrictions or Passcode lock (if he’s still wondering…).
Hence, the iPhone is nothing but a useless device for our thief. Chances are that he’ll consider returning it to you in a day or two. And now that you know, share these concerns so that even potential iPhone burglars will reconsider stealing your iPhone!