Hardware crypto-wallets, like the Ledger Nano S, offer the ultimate cold storage solution for securing your private keys. And although these wallets support most of the popular cryptocurrencies (with new ones constantly being added), it’s difficult to provide support for all of them at a given time.

The Ethereum platform provides the foundation for issuing tokens to be used for smart contracts. Each of these tokens may also be considered as a distinct cryptocurrency for trading purposes. If you are a holder of any such Ethereum-based (ERC20) tokens, Ledger Wallet usually doesn’t officially provide the support for storing and managing them, even though it has a fully functioning Ethereum Wallet.
The good news is that there is a workaround to store and manage such ERC20 tokens in your Ledger Wallet, in addition to the list of cryptocurrencies that it officially supports. With this workaround, you’ll be able to add support for multiple tokens, as long as they are based on the ERC20 standard.
Setup Ledger Wallet for Ethereum Tokens
Like all other cryptocurrencies, you need a specific wallet to store any Ethereum-based token. If you already have an Ethereum wallet associated with your Ledger Wallet, you can use the same wallet address to store any ERC20 tokens. Do ensure that your wallet address starts with the characters “0x”, which is usually the case for all ERC20 compatible wallet addresses.
If you haven’t created an Ethereum wallet using your Ledger, you can do so by following the below steps:
- Download and install Ledger Manager and Ledger Wallet Ethereum Chrome apps.
- Connect your Ledger Wallet to your computer and provide the Wallet Pin to unlock it.
- Launch the Ledger Manager app and install the Ethereum app on your Ledger device, if not already installed.
- Open the Ethereum app on your Ledger device and launch the Ledger Wallet Ethereum app on your computer.
- Once the app identifies your Ledger device, proceed to create your Ethereum Wallet address.
A new Ethereum wallet address will be created. The wallet address should start with the characters “0x” indicating that it’s an ERC20 compatible wallet address.
Note: If the Ledger Wallet Ethereum app on your computer does not recognize the connected Ledger device, ensure that Browser Support is disabled in Ethereum Settings (Ethereum >> Settings >> Browser support >> No) on your Ledger device.
Now that you have associated an Ethereum wallet with your Ledger device, you can use the same wallet address to store Ethereum and other ERC20 tokens. But even so, the Ledger Wallet Ethereum app will only let you access and manage ETH associated with your address. Any third-party ERC20 tokens stored on your Ethereum wallet won’t be accessible using the official Ledger app.
The following section will guide you to access and manage such third-party Ethereum-based tokens associated with your Ethereum wallet.
For this, we’ll use a free, open-source web app called MyEtherWallet. It is a client-side app that performs all operations on your computer, and no data is sent to the server. Thus, your wallet information is still safe with you.
View Token Balances
The following steps will guide you to view the balance of any Ethereum-based token, associated with your Ethereum Wallet.
- Connect your Ledger device to your computer and provide the Wallet Pin to unlock it.
- Open the Ethereum app on the Ledger device and enable Browser support in Ethereum Settings (Ethereum >> Settings >> Browser support >> Yes).
- Open MyEtherWallet.com using a web browser on your computer to visit “View Wallet Info” tab of MyEtherWallet app.
- Select Ledger Wallet from the list of available options, and click on the “Connect to Ledger Wallet” button.
- Choose the wallet, you want to explore. If multiple addresses are available, preferably select the first one.
- Click on “Unlock your Wallet” button to access the selected wallet. Your Ethereum Wallet balance and transactions associated with the selected address will be available to view.
- Click on “Show Tokens” under the Token Balances section on the right side, to display all the popular ERC20 tokens list.
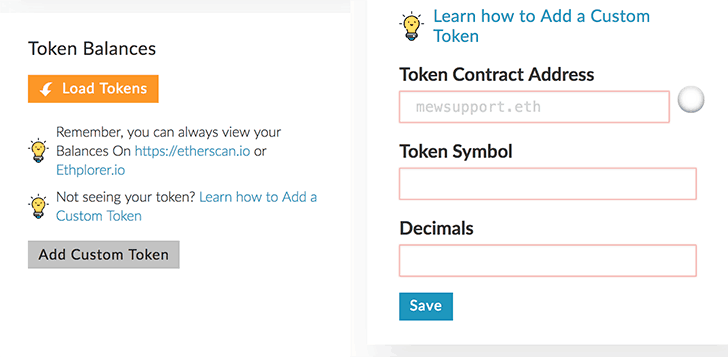
If a particular token that you’re looking for is not present in the predefined list, you may even add your own custom tokens and manage their respective balances using the app. For this, you’ll need to provide the contract address, the token symbol, and the number of supported decimal places, of the custom token that you want to add.
You can get this information by searching for the particular token on websites like Etherscan or even on the token’s official website. Once you have the details, follow the steps below to add the token to the list of supported tokens.
- Click on the “Add Custom Token” button under the Token Balances section on the right side.
- Enter the contract address of the new token in the “Address” field.
- Enter the respective token symbol in the “Token Symbol” field.
- Enter the number of supported decimal places in the “Decimal” field.
- Click on the Save button.
The new custom token should now be available in the Token Balances list. If you still don’t see the token click on the “Load Token Balances” button to refresh the list.
Send Tokens using Ledger Wallet
Follow the steps below to transfer your Ethereum-based tokens to other addresses:
- Connect your Ledger device to your computer and provide the Wallet Pin to unlock it.
- Open the Ethereum app on the Ledger device and enable Browser support in Ethereum Settings (Ethereum >> Settings >> Browser support >> Yes).
- Enable Contract data under Ethereum Settings (Ethereum >> Settings >> Contract data >> Yes), which is required for initiating transactions in the Ethereum blockchain.
- Open MyEtherWallet.com using a web browser on your computer to visit “Send Ether & Tokens” tab of MyEtherWallet app.
- Select Ledger Wallet from the list of available options, and click on the “Connect to Ledger Wallet” button.
- Once connected, click on the “Load Token Balances” button to refresh all your balances, included custom tokens that you may have manually added.
- On the left side, enter the receiver’s wallet address in “To Address” field.
- Enter the transfer amount in the “Amount to Send” field and choose the applicable token unit from the adjacent drop-down. The drop-down menu will only list the particular tokens for which you have a positive balance in your Ethereum wallet.
- Click on “Generate Transaction” button and authorize the same by confirming it on your Ledger device.
Once the transaction has been confirmed, the appropriate tokens will be transferred from your wallet to the receiver’s wallet.
Note: It is recommended that you disable both Browser support and Contract data under Ethereum app settings on your Ledger device, once you’re done.
Although this article is meant specifically for Ledger Wallet users, it should be mentioned here that the workaround is applicable for any other hardware HD wallet that MyEtherWallet supports.
MyEtherWallet is available on GitHub and can be configured on your own server. That way, you would have access to the app if the website goes offline for some reason.
If you don’t have your own server, you could even download the latest version of the “etherwallet-vX.zip” (where ‘X’ denotes the version number) and set it up on your localhost (WampServer, MAMP, etc.). Do note that you need to host MyEtherWallet via a secure (SSL/HTTPS) connection in order to let the app communicate with your Ledger device.