In today’s world, mobile devices such as smartphones or tablets help us to carry and access data on the go. With larger screens, nowadays they also prove to be good for watching HD videos and movies. But HD videos and other high quality media often take up significant storage space, a factor that is usually limited on smartphones and tablets. Thus, if you have a large media collection, you probably would have to make a choice about which ones to keep on your mobile devices.
Portable external hard drives, on the other hand, allow us to carry several gigabytes of data in our pockets. With such storage devices, you can carry your entire media collection along with you. Now, if you could access this data from your mobile device, it would considerably remove its storage limitation. In this article, we’ll explore different ways to expand the storage of Android tablets and smartphones, by connecting and accessing data stored on USB storage devices (such as external hard drives, flash drives, pen drives, etc.).
Here, we’ll be considering two different options for accessing data from USB drives on Android devices:
- Over a wired connection.
- Over a wireless connection.
Wired connection is suitable if you want to access from an external hard drive when there is not much movement involved, or if there is no suitable way to set up a wireless network. Wireless connection is more preferable if you need quick access to data on the go.
Connect USB drive to Android (Wired)
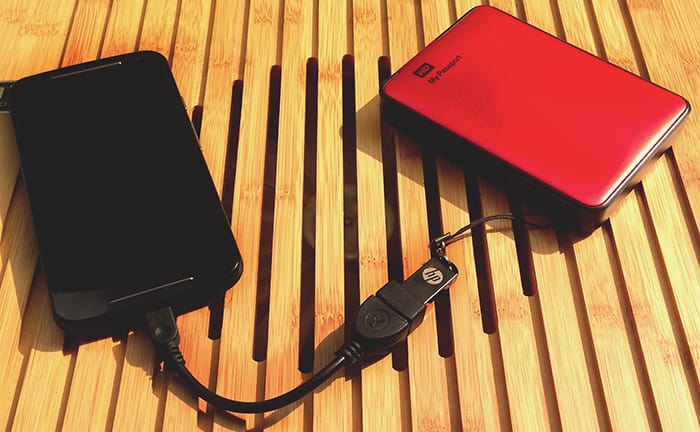
If you want to access an external hard drive from an Android device using a wired connection, the first thing you should ensure is whether your device supports USB OTG (On The Go) or not. USB OTG is a special feature available on some Android devices that allows you to mount a USB storage drive on an Android device using a USB OTG cable.
OTG cables have a female USB jack on one end, while on the other end, there is a microUSB connector. To connect to a phone or tablet, just plug in the USB connector of external drive to the female USB jack of the OTG cable, and connect the microUSB end of the cable to the phone/tablet.
Several factors determine whether an Android device is OTG-capable. First, the device needs to have suitable OS and drivers installed in order to identify and mount storage devices over OTG connection. Second, the device must be capable of providing sufficient power to the USB device in order to keep it active. Many external hard disks require external power to keep the disk running. If external power is provided (using a power USB hub, for example) in this case, the USB disk will draw less power from the smartphone battery.
Check OTG-capability of Android device
Some of the known Android devices that ship with OTG support include Nexus 7, Moto X, Moto G, etc. To know whether your particular device supports OTG, you may use a free app called USB OTG Checker. This app can effectively check your Android OS and hardware to determine whether a particular device supports OTG or not, without requiring to root the device. Besides using this app, you may also enquire your device manufacturer for detailed information about the product.
If your Android device does not support USB OTG, you can’t access your external hard drive from it over a wired USB OTG connection. You may directly skip to the section on the wireless method for accessing files on external hard disk from Android. For users who have OTG support on their devices, the following section will guide you to mount and access external hard drive on Android devices.
Access external hard drive on Android using USB OTG
Once you have an OTG supported device along with an OTG cable, you are almost ready to connect your external hard disk to your phone or tablet. At this point, you have three options to mount and access an external hard drive on Android depending on your preferable situation.
Format external hard drive to FAT32 / EXT4
By default, Android OS can natively recognize and access FAT32 and EXT4 formatted disks. Thus if you have an empty external hard drive that you want to use with your Android phone or tablet, the easiest way to do so would be to format your external drive in FAT32 or EXT4 filesystem. That way, you can directly plug in your external drive to the Android device using the OTG cable. Android OS will recognize the mounted partition and let you access files on the drive using file explorer apps (like ES File Explorer).
However, you can only format FAT32 partitions for storage devices with the capacity of less than 32GB. Still, if you want to force-format your external hard drive (which has more than 32GB of storage) to the FAT32 file system, an application called FAT32 format will help you to do so. But even then, the maximum volume size possible on a FAT32 formatted drive is up to 2TB. One other limitation of FAT32 formatted drives, is that you won’t be able to save files that are greater than 4GB, on them.
Convert NTFS to FAT32 without losing data
If you already have an NTFS formatted drive, you may also convert it to FAT32 while keeping the data intact. Macrorit Free NTFS to FAT32 Converter is one such desktop client for Windows that allow users to convert the file system of external drives from NTFS to FAT32 without losing data, so that smartphones or tablets can easily recognise them.
The above methods of formatting in FAT32 file system for storage devices greater than 32GB is not recommended, since it is not officially supported by Operating Systems like Windows. NTFS file systems have more advantage over FAT32 in terms of speed and storage limit. It’d be great to have direct support for NTFS formatted drives on Android devices. And with the help of suitable apps/drivers, NTFS support can also be brought to Android.
Read/Write NTFS partition on Android without root
It usually requires root access to enable support for NTFS formatted drives on Android. But here, we’ll show a way to read/write on NTFS formatted hard drives from Android phones and tablets that doesn’t require you to root the device. We’ll be using an app called Nexus Media Importer for this purpose.
For using Nexus Media Importer, your phone or tablet should be running Android 4.0 or above, along with USB OTG support. Nexus Media Importer is a paid application available for download on Google Play.
Nexus Media Importer app should launch automatically when a flash drive, pen drive, or external hard drive is connected to the Android device via OTG. The app then lets you access photos, videos, music and documents from the external drive on to the Android device. The Folders view lets you browse different available folders on the external USB drive. There is also a Advanced option for managing file transfer operations between the Android device and the external hard drive. A toggle button can switch between file transfer modes (Device -> USB drive or USB Drive -> Device). Read the app description in Google Play for more information on Nexus Media Importer.
If your device has OTG support but the above solutions have not worked for you, or if your Android device is already rooted, you can try the the below method to get access to a variety of file systems.
Paragon exFAT, NTFS & HFS+ (requires root access)
Paragon exFAT, NTFS & HFS+ helps you to mount almost any USB drive formatted in any file system. Paragon app supports mounting of exFAT (Windows / Mac), NTFS (Windows) and HFS (Mac) formatted partitions on your Android device. Once Paragon app has mounted the exFAT, NTFS or HFS+ formatted drive, you can access it using any file manager app like ES File Explorer.
If you need a suitable solution to access data on the go, or if your Android device does not support USB OTG, you can still access your external hard drive from an Android phone or tablet over a wireless (WiFi) network.
Connect external hard drive to Android (Wireless)
For this method, you need a wireless external hard drive that can share data over WiFi, or even a wireless router that supports USB data sharing. You can then connect your Android phone or tablet to the shared WiFi network and stream data from the external drive to the device.
Typically, the wireless external drive is accessible to all WiFi enabled devices connected to the particular WiFi network. You can also set up a network password to prevent unauthorized access. Some wireless external drives provide dedicated Android apps to access data, while others allow you to navigate to a specific address on the local network to access the data on the external drive. We have already covered this topic in a previous article. For more details, check out the article.
So now you know how to access, stream and transfer files between your external hard drive an an Android device, be it rooted or not. If you know of any better alternatives to do the same, let us know in the comments below.