After successfully setting up WordPress, you need to play around WordPress to make yourself comfortable with it. You can log into your website’s admin panel by launching the URL example.com/wp-admin/ or example.com/wp-login.php on your web browser (Here, example.com represents your website’s domain). Sign in using the WordPress credentials that you previously configured during the setup process.
After successfully signing in, you will get access to the Dashboard where you can view and manage your website’s content. We recommend you to explore the available features and make yourself feel at home with the environment. There are several options you can configure: Manage your blog posts, change the look and feel of your website, add or remove widgets depending on the theme being used, and much more. You can access and configure all these options on the left hand side panel of your screen. The options are all categorized into different menus.
WordPress Settings Menu
Most importantly, you need to familiarize yourself with the Settings menu. The Settings menu helps you to configure the website’s access policies and other security features. Without proper configuration of these settings, your website setup will not be complete. This article gives a quick take on the Settings menu along with some recommendations on how to configure these options.
General
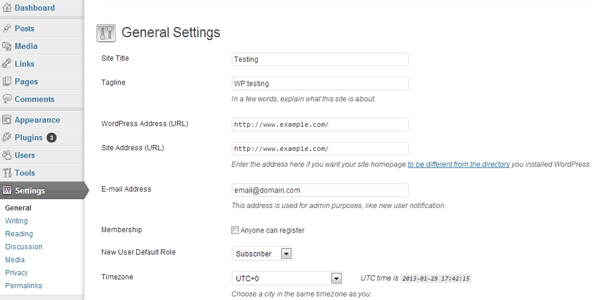
This is the first item within the Settings Menu. You can access this page by clicking on Settings >> General. This page lets you configure the following options.
Site Title: Enter the name of your blog. It should be relevant to the blog’s subject.
Tagline (Optional): A short description of the subject. Most WordPress themes show the tagline below the blog’s title. Try to make it simple and catchy.
WordPress address (URL): The URL (location) of the WordPress folder on your server.
Site address (URL): This is the URL address by which people can access your website in the browser. Generally, this is the same as the WordPress folder but you can also keep it different to enhance security if you want to. But as beginners, we recommend you not to change it.
Email address: Enter the email address for receiving administrative notifications. For instance, if you let other users to sign up on your website or allow comments on your blog posts, an email will be sent to this email address whenever a new use signs up or comments on a post according to what you have configured.
Membership: If you want to add multiple authors in your blog who can edit and add new posts, check the Anyone can Register option to enable user registration. If this option is checked, a new Register Now link appears on the login page.
New User Default Role: This option is used to define the default role given to a newly registered user. The default role assigns privileges or grants specific level of access to the registered users.
Time zone, Date and time format: Set the time according to your location. Choose a city from the dropdown that matches, or is near to your current location. This information will reflect the date and time of your blog posts. Similarly select in which format to display date and time of publishing of your posts.
Week starts on: Set which day to represent the starting of the week on the WordPress calendar. This setting reflects on the calendar widget if you choose toad it to your site.
Finally click on Save Changes button to save your settings permanently.
Writing
This submenu lets you configure the post editor where you add or edit posts. This submenu can be accessed from Settings >> Writing on the left side of the screen.
This section deals with editor settings, default formatting, post categories and other similar settings. Click on Save Changes to update your configured settings once you are done.
Reading
This submenu defines options that determine how the blog is viewed by the users. Access this page from Settings >> Reading and configure the following options.
Front page display: Set your blog’s home page to display either all your latest posts or a static (fixed) page that you can add using the editor. When you choose a static page as your homepage, you need to define your front page and posts page separately (select from dropdown among available pages).
Blog posts shown at most: This is the maximum number of posts shown on your website per page.
Syndication feeds show the most recent: Set the number of posts displayed when people subscribe to the website’s RSS feeds.
For each article in a feed, show: Select whether to include the entire post or just a summary on an RSS feed.
Search Engine Visibility: Select whether you want to let search engines to index your website or not. We recommend keeping it on if you want to attract visitors from search results.
Click on Save Changes to update your configured settings.
Discussion
The discussion submenu helps you to control user comments, pingbacks or trackbacks on your website. Discussion page is accessible through Settings >> Discussion.
Various options are available to control who can post comments, pingbacks or trackbacks on your blog. These options help to reduce spamming via unauthorized comments or trackbacks. Comments can also be disabled altogether or deactivated after a specific time period from the day of publishing.
This page also deals with moderating options and notifications. You can define what action would trigger email responses and which of them would not. You can also set your custom avatar here.
Save Changes after you are done.
Permalinks
This page contains one of the most important settings. A permalink defines the URL structure of your posts. Depending on the nature of blog posts, permalinks may differ from website to website. Go to Settings >> Permalinks to access this page.
Default: This setting sets the URL structure like http://www.example.com/?p=123 for the posts.
Day and name: This setting will create the URL structure similar to the following: http://www.example.com/2008/03/31/title/. Most news blogs use this kind of URL structure. You can use this structure if date of publishing is a priority for you.
Month and Name: This is similar to the day and name format. An example of such a permalink is http://www.example.com/2008/03/title/
Numeric: Numeric permalinks generate an URL structure similar to one given below: http://www.example.com/archives/123
Post name: This is a good way to represent the URL structure of your posts. One example of such an URL structure is http://www.example.com/title/.
Custom: You can also set a custom URL structure for your blog posts. Different people have different ways to represent permalinks; it is up to you to decide which permalink suits you best. In the articles to come, we’ll discuss more on permalinks.
In our upcoming articles in this series, we’ll deal with the common issues that developers generally face in hosting and maintaining their website. Explore WordPress and familiarize yourselves with it’s features. Otherwise, it may be difficult for you to follow up on our upcoming articles. Of course, if you do have queries, please let us know via comments.
Liked this article? Also check out the other articles in our Web Development archives.