When it comes to video processing software, we find a variety of options available on the Internet. Programs like Adobe Premiere Pro provide pro-level tools that allow you to create, edit and modify videos for film production and other professional purposes.

But these programs usually require you to go through a steep learning curve and are expensive too. Most users generally look for simple video editing and conversion software that’s easy to use, pocket-friendly, and yet has the essential tools that you would need to edit your videos. VideoProc is one such software that belongs to this category.
VideoProc Features at a glance
The software consists of four main modules that cover different aspects of video-based media.
- Video: For conversion, editing and modification of video files on your local disk in various formats.
- DVD: For backing up and ripping full DVDs, and storing them on your local disk in 180+ different formats.
- Video Downloader: For downloading online videos from various popular video streaming sites.
- Recorder: Which allows Mac, PC and iOS screen recording with support for system sounds as well as microphone input. (iOS screen recording is only supported on the Mac version of VideoProc).
One of the prominent features of VideoProc is that it allows full GPU-accelerated video processing for faster conversion times. This means, if your computer has a supported GPU, you can take full advantage of it for processor-intensive tasks like 4K video conversion, conversion to HEVC format (H.264 to H.265 conversion), etc.
VidoeProc can automatically detect the CPU and GPU hardware available on your computer and use optimal settings for video processing tasks.
Depending on your output video and audio setting, VideoProc can compress large videos by up to 90% with minimal loss of quality.
Video processing capabilities of VideoProc
With VideoProc, you can process a video in several ways:
Cut, Crop or Merge Videos
With easy-to-use video editing tools, you can trim videos, remove unwanted segments, rearrange clips, add subtitles & effects, rotate videos, merge multiple videos, adjust video length, playback speed, resolution and more; all without having to worry about A/V sync issues.
While converting your final edits to a preferred output format, you can even optimize them for uploading them to streaming services and social media platforms.
Video Editing Toolbox
VideoProc provides powerful editing tools to streamline your workflow and help you get more productive.
- Stabilize videos: This tool helps you to stabilize shaky video footage from iPhone, GoPro, etc.
- Fix fisheye: This helps correct fisheye lens distortion from smartphone or action cam footage.
- Noise reduction: This one helps to remove or reduce background noise (e.g., wind noise) from videos easily.
- GIF creator: This tool can convert video clips into GIF. You can also extract and resize images from videos.
- Add watermark: This tool helps to watermark your video with text, logo, image or timecode.
- MakeMKV: With this, you can convert video streams to MKV without any additional encoding.
- Create M3U8: This helps you build M3U8 playlist with single or multiple .ts files for HTTP streaming.
- Other video enhancements: You can force A/V sync, adjust playback speed, control audio volume and more.
High-speed 4K/HD media conversion with minimal quality loss
VideoProc supports around 370 input codecs and 420+ output codecs to provide a one-stop solution for all your transcoding needs — H.264 to H.265, MKV to MP4, AVI to MP4, etc. For multitrack audio/video files, it lets you choose the tracks that you want to keep in the converted video.
You can convert footage from just about any video-capable device, including smartphones (iPhone, Google Pixel), action cams (GoPro, DJI), drones, camcorders, PCs, tablets and more.
The full list of supported video formats can be found on the official VideoProc website.
VideoProc’s video transcoding algorithms provide efficient compression while converting videos. This means you can upscale, downscale or adjust the quality of a video with minimal quality loss.
The software makes it possible to easily upscale an HD (720p or 1080p) video to a 4K UHD (2160p) video without the presence of blurry pixel blocks.
There’s also a fast Auto Copy mode that enables over 1000 FPS, quality lossless video passthrough for conversions such as MKV to iPhone MP4, without re-encoding.
Convert Video with VideoProc Video Converter
The following are a few of the basic steps to convert your videos from one format to another.
- Download and install VideoProc for Mac or PC from the official website.
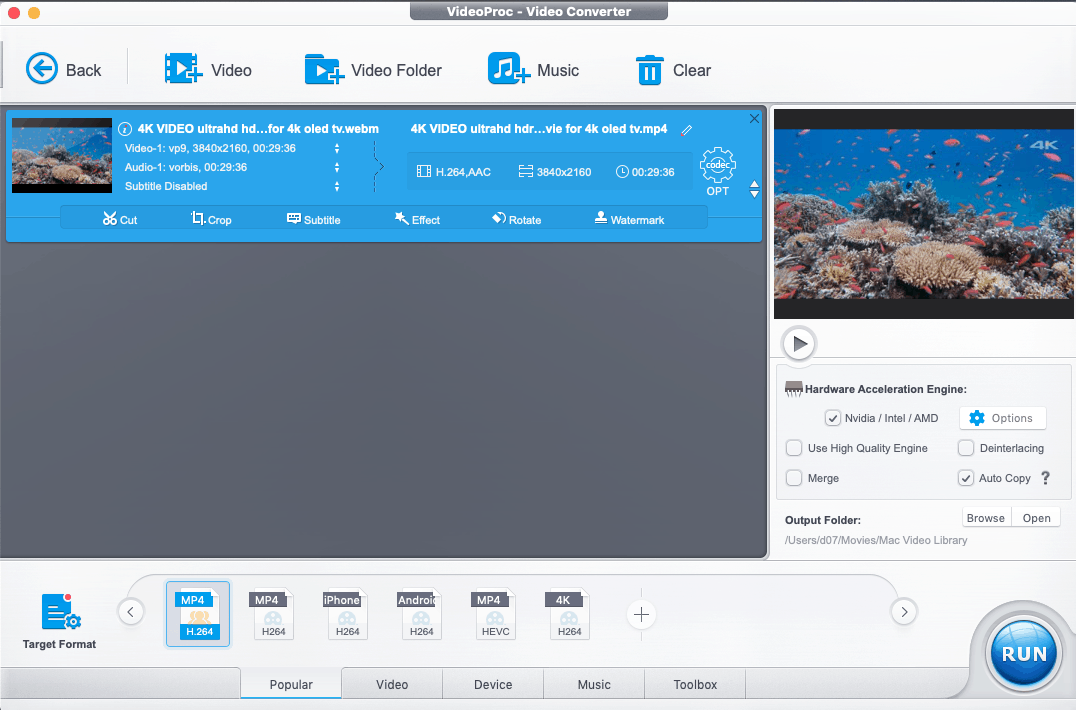
- Launch the software and click on the Video module.
- Add the video or audio files you want to convert, by selecting the suitable option from Video, Video Folder, or Music at the top of the application window.
- After the selected video is loaded, you can choose to cut, crop, rotate or add subtitles, effects, watermark, etc. by selecting the suitable option. Each option takes you to a different screen where you have the necessary tools to complete the selected activity. Click Done to get back to the main screen and save your changes.
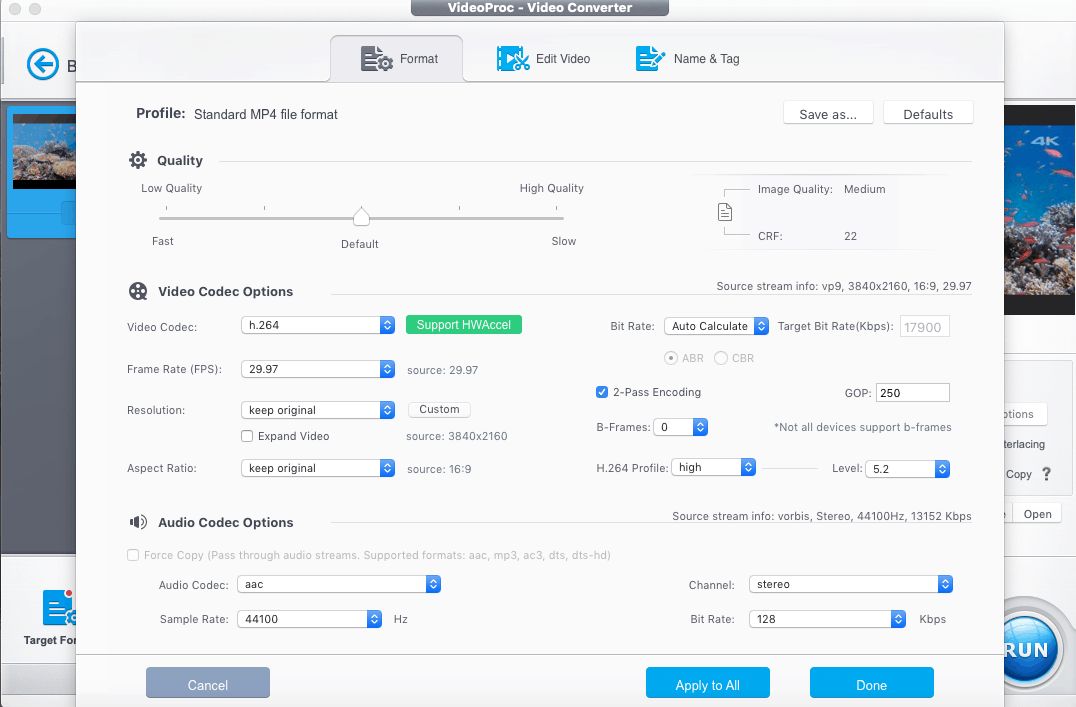
- Next, you can further select your preferred audio and video codecs for transcoding, choose the transcoding quality, resolution, aspect ratio, bitrate, etc., by clicking the OPT button on the right side of the added video. Click Done to save your changes.
- Next, you can choose your preferred Target Format from the bottom-left portion of the screen, and select a suitable output profile.
- On the right pane, select the suitable options from Hardware Acceleration Engine, Use High-Quality Engine, Deinterlacing, Merge and Auto Copy. You can also select the output folder to save your converted video.
- Finally, click on the Run button to begin the conversion.
On completion, the converted video will be available in the selected output folder.
Convert, Copy or Rip DVD using VideoProc
The following steps will guide you to convert/copy a DVD to your local disk.
- Download and install VideoProc for Mac or PC from the official website.
- Launch the software and click on the DVD module.
- Add the DVD files you want to convert, by selecting the suitable option from Disc, Folder, or ISO at the top of the application window.
- On the next screen, select the suitable source and click on Done.
The software will automatically scan the DVD and list the available video files. From here, you can choose among any of the video editing and conversion options available for normal video files.
Download videos from the Internet using VideoProc
The following steps will guide you to download audio and video streams from the Internet.
- Download and install VideoProc for Mac or PC from the official website.
- Open your web browser and copy the URL of the audio or video stream that you want to capture.
- Launch the software and click on the Downloader module.
- Add the DVD files you want to convert, by selecting the suitable option from Add Video or Add Music at the top of the application window.
- Click on Paste & Analyze and wait for the application to fetch the available video streams from the provided URL.
- Select the suitable stream that you want to save, and click on Done. If you want to download all the streams, click on Download All.
- On the right pane, select the output folder where you want to save the downloaded file.
- Finally, click on the Download Now button to begin the download.
VideoProc will download the selected audio/video stream(s) and save it to the preferred output folder.
Record Mac, PC or iPhone screen using VideoProc
The following steps will guide you to record your Mac, PC or iPhone screen using VideoProc.
- Download and install VideoProc for Mac or PC from the official website.
- Open your web browser and copy the URL of the audio or video stream that you want to capture.
- Launch the software and click on the Recorder module.
- Choose the suitable source of recording from the available options: Desktop (for computer screen recording), Camera (for recording your webcam footage), iPhone (available only on the Mac version).
- Click Options and set your recording preferences. Here, you can set the recording quality, maximum frame rate, video device and whether you want to capture mouse clicks. Click on Done to save your preferences.
- At the bottom, you can crop the recording screen resolution, enable or disable system sounds and choose the preferred audio input device to record from.
- On the right pane, choose the output folder where you want to save your recording.
- Finally, click on the REC button to start the recording. When done, click the Stop button on the Mac menubar or Windows notification tray to stop recording.
The recording will be saved in the preferred output folder.
A detailed step-by-step guide for each of VideoProc’s main features is also available on the product’s official website.
VideoProc Pricing
If you want to try out VideoProc and take a deep dive into all of its features, you can grab a full-version copy of the software without any feature limitations, for free, from the official website. However, the free license will not let you upgrade the software to the next release version.
You can opt for a one year license, which will get you free updates for a year, for $29.95 for one computer. Alternatively, a lifetime free upgrade license for a single computer costs $35.95.
Get VideoProc 4K Editor [*Giveaway & Discount]
VideoProc is a decent video processing software, ideal for people who work on video editing with several video formats, yet don’t want to go too deep into customization and avoid complexity. It offers powerful editing tools but is also quite affordable at the same time.