Do you want to add one of those “Shot On” watermarks while sharing a photo or video from your iPhone? Or perhaps you’re a photographer and want to add your personalized logo as a watermark to your photos or videos on your iPhone to protect your work.
In this article, we’ll explore different ways to add a watermark to photos and videos on the iPhone.
How to add the “Shot On iPhone” watermark to your Photos & Videos
You can add the Shot On iPhone banner to your photos & videos using third-party apps available on the App Store. Here, we’ll use an app called Shot On Watermark for iPhone.
Shot On Watermark for iPhone is a simple app that provides you with various options to change the look and feel of the “Shot On” watermark, from the font, icon, position, and more.
The below steps will guide you to set up and use the Shot On watermark in your photos (and videos) using the app.
- Download and install the Shot On app from the App Store.
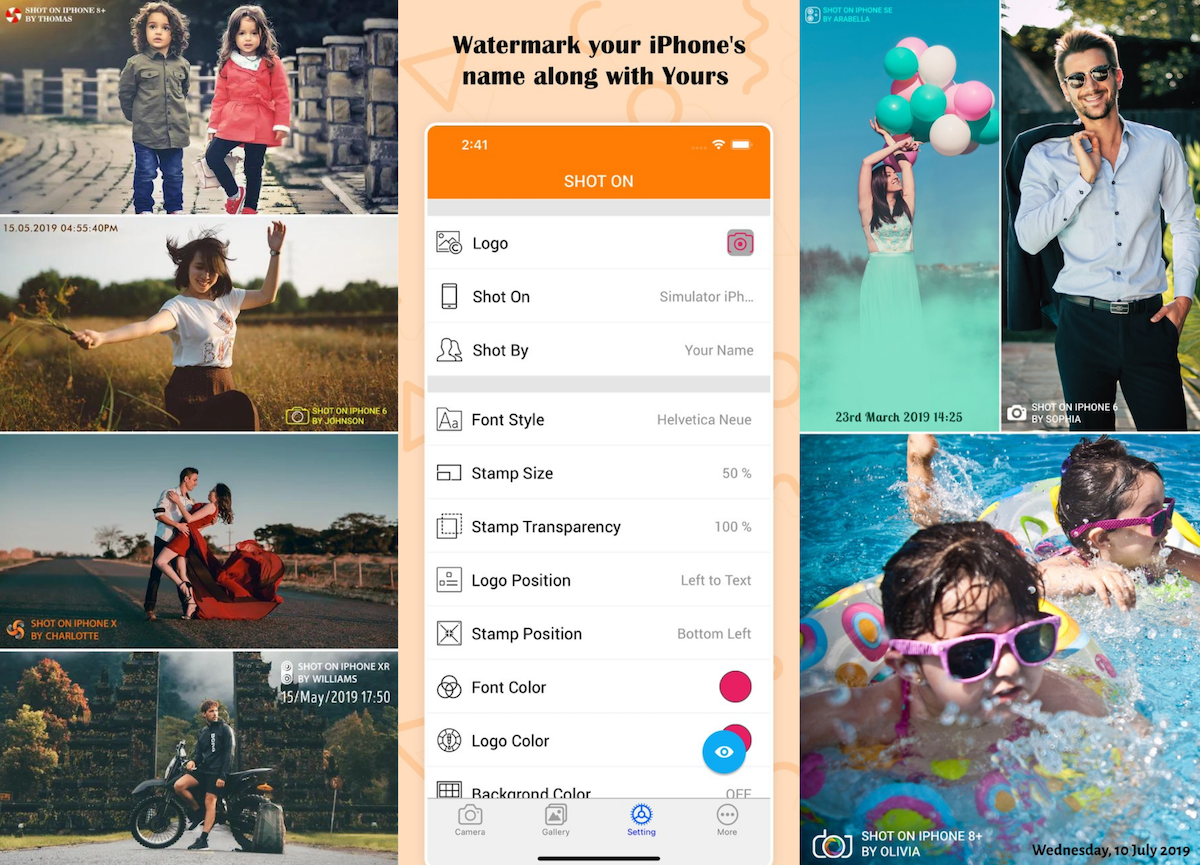
- Open the app and go to the Setting screen.
- Choose or configure the Logo, Shot On (Device Name), Shot By (User Name), Font Size, Stamp (Watermark) Size, Transparency, etc.
- Once configured, tap on the Eye icon from the bottom-right corner to see the Preview of the watermark on a sample photo.
- To apply the watermark to an existing photo, go to the Gallery tab and choose a photo from your library on which you want to apply the watermark.
Alternatively, to capture a new photo with the watermark, go to the Camera tab and snap a photo. Then tap Use Photo to apply the watermark to it.
Note: Similar to photos, you can even add the Shot On watermark to your videos using the same app. Just choose an existing video from the Gallery tab to add the watermark to, or choose Video from the Camera tab to add the watermark to a new video.
Shot On is free to download from the App Store, but it does have limited customization options in the free version. To unlock all features and remove ads, you can upgrade to the Pro version through a one-time, in-app purchase.
Create Shot on iPhone frames for your photos
You may have seen the famous Shot on iPhone billboards that Apple launched as a part of one of its promotional schemes. As a part of the campaign, there were large billboards with picturesque photos framed with the caption “Shot on iPhone”.

If you want a similar Shot on iPhone frame for your photos, you can use an app such as iShot. Follow the steps below to add the Shot On iPhone frame to your photos using iShot app:
- Install the iShot app on your iPhone from the App Store.
- Open the app and tap on the Shot On button to customize the “Shot On” text. You can add your device name here. This will appear at the bottom of your photo frame.
- Next, tap the Shot By button to customize the “Shot By” text. Typically, here you can put the photographer’s name. This text appears at the bottom-right corner of your photo frame.
- Finally, to apply the custom frame, tap on the Camera or Photos button.
The Camera option opens up the camera and lets you add a frame to a photo you want to snap right now. Alternatively, the Photos button brings up your Photos Library, and you can choose a previous photo of your choice to apply the frame.
How to add a custom logo, signature as watermark to a photo or video
Instead of the Shot On iPhone caption, if you want to just add a custom logo to your photos and videos, you can do so with the Shot On Watermark for iPhone app, although you need to unlock its full version via an in-app purchase.
For this, you need to ensure that you have your custom logo or signature with transparent background ready to apply to your photo or video. You can create custom logos using any photo editing software. To keep it professional, consider creating your logo in a transparent background, saved as a PNG.
Once you have your logo or signature ready, the below steps will guide you to add it as a watermark to a photo or video using the Shot On app.
- Install the Shot On app on your iPhone from the App Store, if not done already.
- Ensure the full version of the app is unlocked. If you have purchased it earlier but don’t see the full version, go to the Premium tab and tap Restore Purchases.
- Ensure you save your custom logo file in the Photos Library. To import a photo from the Files app, open the file in Files, then tap Share, and tap Save Image.
- Tap Setting, then tap Logo.
- Tap the “+” button below Add Custom Logo and pick your custom logo from your photos.
- Tap the Check Mark (✓) icon from the top-right corner.
- Ensure the Shot On and Shot By texts are turned off.
- Adjust the Stamp Size, Stamp Transparency, Logo Position, and other settings as required.
- When ready to apply the custom logo watermark to an existing photo, go to the Gallery tab and choose a photo from your library on which you want to apply the watermark.
Alternatively, to capture a new photo with the watermark, go to the Camera tab and snap a photo. Then tap Use Photo to apply the watermark to it.
The custom logo will be embedded in the photo or video as a watermark.
In our tests, we found that the results with the Shot On app may vary based on the resolution and quality of the photo or video that you’re trying to add a watermark to.
You can use professional photo editing software like Photoshop to achieve similar effects on a computer. But if you’re looking for a simple and easy-to-use alternative directly on the iPhone, Shot On is one of the most popular apps with decent ratings capable of doing it.
Bonus: How to add your signature to a photo in the Photos app
The built-in photo editor in the Photos app on iPhone is perhaps an underrated but powerful tool for photography enthusiasts. It has many options for quickly editing your photos without having to export them to your computer.
One such underrated feature is possibly the ability to create and add signatures to your photos right on your iPhone. The below steps will guide you to add a signature to your photo using the Photos editor.
- Open the Photos app and tap the photo to which you want to add your signature.
- Tap Edit from the top-right corner.
- Tap the Markup icon from the top-right corner.
- Tap the “+” button from the bottom-right corner, and select Signature.
- If an existing signature is available, and you want to add the same, skip to Step #7. Alternatively, if you have no signatures on file, tap Add or Remove Signature, and tap the “+” button from the top-left corner.
- Use your finger to create a new signature. When done, tap Done from the top-right corner. The new signature should be added to the list of available signatures on file.
- Now tap the Signature that you want to add.
Once the signature is added, you can further customize its look and feel, like adjusting its size, and angle, even changing the color, by tapping the color button from the bottom-right corner while the signature is selected.
Here, you may also adjust the opacity of your signature. Finally, when you’re satisfied with the signature, tap the Done button from the top-right corner to save your edit.
So, now you know of different ways to add the Shot On iPhone watermark, your signature, custom logo, or any custom watermark to your iPhone photos.