Over the years, the iPhone camera has developed to eventually become one of the best in the smartphone industry. The camera hardware and software on iPhone works seamlessly together to automatically capture the best possible photos under almost any condition. Still, there may be some shutterbugs out there who want to play with manual controls to adjust the different camera settings. In a previous article, we have already discussed about editing and removing different photo attributes. Here, we’ll demonstrate how to manually tweak these settings while capturing photos using iPhone.
Most camera apps on the App Store use automatic settings to simplify the photography experience. These apps work like point-and-shoot cameras, where most of the settings are automatically adjusted by the camera. And all the user needs to do is to point the iPhone’s camera towards the subject and snap a photo of it. But for more advanced users, there are apps that provide manual (SLR type) controls for a number of camera settings.
Camera settings on iPhone
Before we move in to the specific apps that help you to manually control different camera settings, here are a few of the settings that may be manually tweaked in a similar way as DSLR cameras:
Manual Focus
Due to the optical properties of camera lens, it can only produce sharp images of objects at a certain distance from it. The distance from the lens at which a sharp image of an object can be produced is known as the camera lens’ focal length, and a plane containing all possible points at which a sharp image may be obtained is called the focal plane. The iPhone camera lens has a fixed focal length, but it uses an electric motor to change the position of the lens, so that the focal plane may be varied (almost similar to the mechanism used by DSLR cameras with prime lens).
White Balance (WB)
White balance determines how colors in a scene are reproduced in a digital photo. You might have seen that photos often have an overall blue, orange or yellow tone in them. This is because light sources cast a general color temperature to the scene. We usually don’t notice much difference in color temperature because our eyes automatically adjust to it. Different light sources produces different color tones. For example, fluorescent lighting adds a bluish cast to photos whereas tungsten lights add a yellowish tinge to them. White balance may be manually controlled in SLR cameras to normalize the color temperature of digital photos.
Exposure (EV)
Exposure is the amount of light per unit area that reaches the camera’s sensor. Exposure may affect the color tone and brightness of individual objects in a photograph. It is represented by a number called Exposure Value (EV) and can be controlled by the following parameters:
Aperture (f/x)
It is the opening of the lens through which light travels. By adjusting the size of the lens aperture, the amount of exposure can be controlled.
Shutter Speed (S)
It is the amount of time that the camera shutter remains open to allow light to reach the sensor. Longer the shutter speed, more the exposure will be.
ISO
This factor determines how much the camera’s image sensor is sensitive to light. In low light conditions, the ISO value may be suitably adjusted to get better exposure.
The iPhone camera has a fixed aperture, so it can’t be adjusted to change the exposure value. But the shutter speed and ISO settings of iPhone camera can be altered manually with the help of third party camera apps.
DSLR-like controls for iPhone camera
To get manual camera controls like DSLR, you can try 645 PRO Mk III on your iPhone.
645 PRO Mk III
645 PRO Mk III has every setting that a professional photographer would look for in a DSLR camera. It includes automatic and manual exposure control as well as individual (semi-automatic) settings for shutter speed and ISO. Automatic and semi-automatic exposure modes also include an exposure compensation of ± 3 EV, while an on-screen meter indicates manual exposure settings. Additionally, it includes a host of white balance presets and manual focus (focal plane) control.
Capture RAW / TIFF photo using iPhone
A RAW file is the original unprocessed file created from the camera’s sensor immediately after a photo is captured. Most DSLR cameras have the option to save photos in RAW format. But RAW files may be huge in size, so they are usually processed and stored in the camera’s storage. Many photo enthusiasts are interested to get the RAW image as it is the original image captured by the camera.
The iPhone saves the compressed version of an image by default to save storage space. However, 645 PRO Mk III allows you to save photos in TIFF format. Though not as original as the RAW format, TIFF is an uncompressed version of the image without any quality loss. To save a photo in TIFF format using 645 PRO Mk III, follow the steps below:
- Download 645 PRO Mk III from the App Store and launch it.
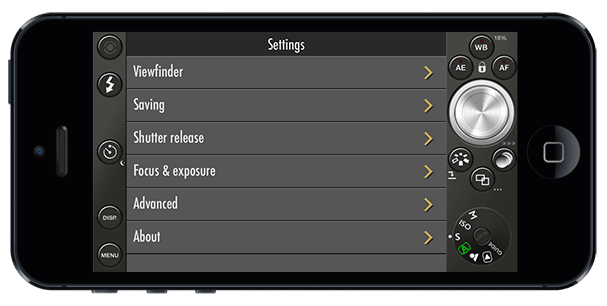
- Tap the Menu button in the bottom left corner to bring up the Settings menu.
- Go to Saving >> Film Mode Image quality and select TIFF.
- Go back to Saving menu and select Unprocessed image quality >> dRAW TIFF.
The captured photos will now be stored in high quality TIFF Format.
Though the app contains many features, its UI is less intuitive and can be a bit difficult to understand. The app is thus not recommended for users who aren’t familiar with the various settings and their functions. If you need an alternative app with similar manual control features but an easy to use interface, you can try Manual.
List of iOS Apps with manual camera controls
Here are some other iPhone apps that allow you to manually control various camera settings:
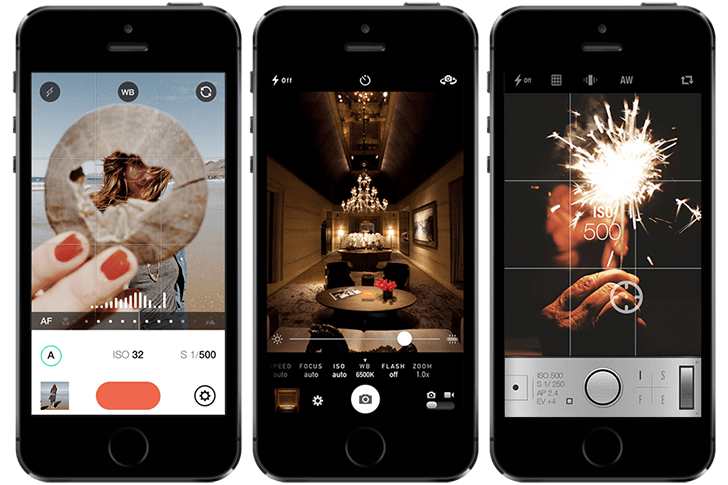
Manual – Manual basically lets you to set custom exposure levels on your iPhone camera. To control the exposure, you can change multiple settings like ISO, Shutter speed, White Balance, Focus and Exposure Compensation. Similar to 645 PRO Mk III, Manual also provides additional features like Live monitor automatic exposure values, Live Histogram, EXIF viewer, etc. The app’s UI is intuitive and experience is good too.
Manual Camera – This app lets you control the focus, exposure, ISO, shutter speed, white balance, and flash level, giving you DSLR-like controls with an intuitive interface. Other notable features include realtime histogram, slo-mo video support, photos and videos filters, cinematic video stabilization, geo-tagging, etc.
Manual Photo Camera – Provides slider based controls for focus, exposure, ISO, shutter speed, white balance, and flash level.
Manually – Provides manual focus control and custom exposure to your iPhone camera.
ProCam2 – Provides manual focus, exposure compensation, shutter speed, ISO, and white balance controls. Comes with other useful features like Night Mode, Anti-shake, burst photo mode, etc.
Manual Cam – Provides manual controls for various features like white balance, exposure compensation, focus, ISO, shutter speed, etc.
These were some of the apps that provide manual controls for different camera settings. Even though these apps provide manual controls for your iPhone camera, the quality of photos might still differ from original DSLR cameras. There are many more factors that make a perfect DSLR shot. Some of these factors are still not adjustable with the iPhone camera. Do let us know via comments if you have come across any better manual camera control app.