It’s no denying that a smartphone is an inevitable tool we can’t imagine living without these days. But it can also be a cause of distraction, especially for kids and teenagers.
We often lend our smartphones to our kids to keep them busy while we’re held up with “important” stuff. But sometimes, we need to be a little cautious about how much time they spend on our smartphones and what content they consume. The Internet is a great place for our kids to learn, educate, and entertain themselves. But if left unchecked, it can also become an addictive hub of ill influence.
Screen Time on iOS is a great tool for tracking the time spent on your iPhone and other Apple devices. But it can also help one to set up certain restrictions to ensure their safe use. So, you can hand over your iPhone to your kids rest assured that they wouldn’t use it to access any content or data that they aren’t supposed to.
In this article, we’ll explore the top iOS Screen Time features and tips that help make your iPhone or iPad a kid-friendly device.
Note: If your child has their own iPhone or iPad along with an Apple ID, you can add their Apple ID to your Family Sharing group, and set up Screen Time through Family Sharing. This will allow you to control the Screen Time settings of your child’s device and monitor its usage remotely from your own Apple device.
Turn on Screen Time on iPhone or iPad
The first step to start using Screen Time on your iPhone or iPad is to turn on Screen Time from your device Settings. Here’s how to enable Screen Time on your iPhone, iPad.
- Go to Settings >> Screen Time on an iPhone or iPad.
- Tap Turn On Screen Time.
- Tap Continue.
- Select This is My [device] or This is My Child’s [device].
If you choose “This is My Child’s [device]”, follow the on-screen instructions to complete the setup on your child’s iPhone or iPad, with all the desired restrictions. Alternatively, if you select “This is My [device]”, you can follow along with this article to know how to set up restrictions on your iPhone or iPad before handing it over to your kids.
Enable a Screen Time Passcode on iPhone, iPad
The Screen Time Passcode is different from your device passcode and is required for changing the Screen Time Settings. This way, even if you hand over your iPhone or iPad to your child or any minor, they won’t be able to change the Screen Time settings to their preference without knowing the Screen Time Passcode.
To set up Screen Time Passcode, do the following:
- Go to Settings >> Screen Time on your iPhone or iPad.
- Scroll down and tap Use Screen Time Passcode.
- Set a Screen Time Passcode, and re-enter the same to confirm.
- Optionally, provide your Apple ID credentials for Screen Time Passcode Recovery and tap OK.
You’re now ready to use Screen Time on your iPhone or iPad.
Parental Control Settings in Screen Time (iPhone, iPad)
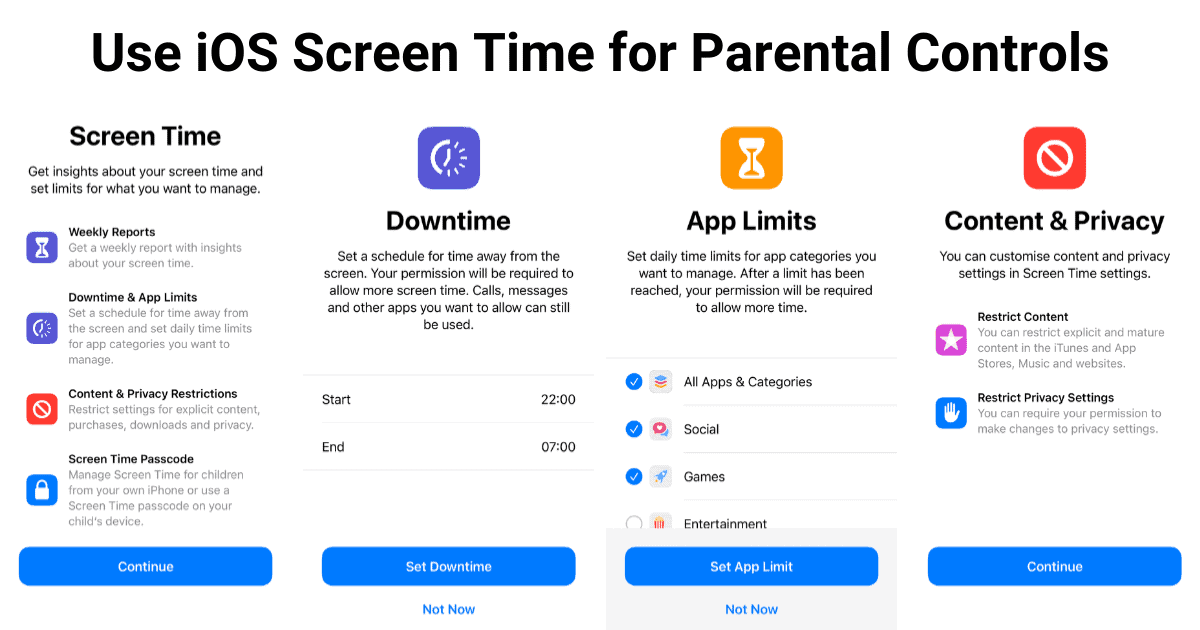
Screen Time for Kids #1 – Downtime
Downtime lets you schedule specific times of the day when only phone calls and specific apps that you allow are available. When Downtime is scheduled, you’ll be notified 5 minutes before the schedule starts.
To schedule Downtime on your iPhone or iPad, do the following:
- Go to Settings >> Screen Time >> Downtime.
- Provide your Screen Time Passcode, if prompted.
- Enable the toggle on Downtime.
- Customize the Downtime schedule to select the days and time when Downtime will be active.
Once set, Downtime will automatically be triggered as per your schedule. During Downtime, only whitelisted apps and content will be allowed to open. However, if a non-whitelisted app or content is opened during the Downtime, your kids (or you if Family Sharing is enabled) receive a notification, which they can tap to get more time, or ignore the restriction and continue using for the rest of the day.
To restrict app and content usage during Downtime, you need to go to Settings >> Screen Time >> Downtime, enter the Screen Time Passcode if prompted, and enable “Block at Downtime”.
Screen Time for Kids #2 – App Limits
You can set daily usage limits for specific apps or app categories to block their usage once a particular time limit is exceeded. For example, using this setting, you might want to limit access to games, or social media apps to no longer than 1 hour a day. App Limits allow you to define such limits on app usage.

To set a limit to particular apps, or app categories, do the following:
- Go to Settings >> Screen Time >> App Limits.
- Tap on Add Limit.
- Provide your Screen Time Passcode, if prompted.
- From the “Choose Apps” menu, select the app category you want to set a limit to. Alternatively, if you’d like to select a particular app from a category, tap on the specific category and then select the particular app.
- Once the apps or app categories are selected, tap on Next from the top right corner.
- On the next screen, choose the time limit for your selected apps or app categories, and tap on Set.
You can add multiple App Limits for multiple groups of apps or app categories, and turn them on or off individually.
By default, the “Block at End of Limit” setting is turned on, which restricts the usage of the selected apps or app categories once the daily limit is exceeded. If you turn this setting off, you will get a notification after you exceed an app limit; however, you can tap on the notification to ask for more time, or ignore it for the rest of the day without any usage restriction.
Screen Time for Kids #3 – Communication Limits
Communication Limits let you specify who your kids can communicate with during Downtime and throughout the day. These limits only apply to Phone, Facetime, Messages, and iCloud contacts. If third-party messaging apps (like WhatsApp) are allowed, they can still communicate with everyone who is reachable on those apps.
To set Communication Limits, do the following:
- Go to Settings >> Screen Time >> Communication Limits.
- Choose During Screen Time or During Downtime.
- Provide your Screen Time Passcode, if prompted.
- Under During Screen Time, you can limit communications to Contacts Only, Contacts & Contact Groups, or Everyone in your iCloud contacts.
- Under Downtime, you can limit communications to either Specific Contacts or Everyone.
- You can optionally restrict editing contacts by disabling the “Allow Contact Editing” option.
Screen Time for Kids #4 – Content & Privacy Restrictions
Content & Privacy Restrictions restrict usage of your iOS or iPadOS device by the type of content or privacy setting. Using these settings, you can block inappropriate content, purchases, and downloads, and configure privacy restrictions applied to the overall usage of the device.
To configure content and privacy restrictions, do the following:
- Open Settings >> Screen Time >> Content & Privacy Restrictions.
- Enable “Content & Privacy Restrictions”.
- Provide your Screen Time Passcode, if prompted.
- Change any Content Restriction or Privacy setting from the available options.
How to block websites on iPhone, iPad
Using Screen Time Content Restrictions, you can block specific websites from being opened on your iPhone. The following steps will guide you to block specific websites on your iPhone or iPad without any third-party app, from Screen Time Settings:
- Open Settings >> Screen Time >> Content & Privacy Restrictions.
- Enable “Content & Privacy Restrictions”.
- Provide your Screen Time Passcode, if prompted.
- Tap on Content Restrictions >> Web Content.
- To block a specific website, choose Limit Adult Websites, and add the specific websites that you want to block by tapping Add Website under the “Never Allow” section.
Alternatively, to allow only a specific set of websites to be opened on your iPhone or iPad, choose Allowed Websites Only on the same screen, and tap Add Website to add your preferred websites to the whitelist.
Note: You can whitelist specific apps to be Always Allowed, regardless of your Screen Time or Downtime settings. To whitelist a particular app, go to Settings >> Screen Time >> Always Allowed and tap the ”+” button adjacent to your preferred app to add it to the “Allowed Apps” list. Allowed Apps can be used at any time without and any App Limits or Downtime restrictions.
Bonus: Restrict actions within a particular app with Guided Access mode
Let’s say you want to restrict your children’s actions and limit them to a specific set of interactions within a particular app, you can use a feature called Guided Access mode. Guided Access is separate from Screen Time, but sometimes it can be a valuable tool to restrict your kids’ actions on your iPhone or iPad.
To turn on Guided Access mode on your iPhone or iPad, go to Settings >> Accessibility >> Guided Access. Optionally, you can also enable Guided Access passcode, use Touch ID or Face ID to exit Guided Access mode, or set time limits. You may even configure it as the Accessibility Shortcut.
Note: The Accessibility Shortcut on your iPhone can be invoked by triple-clicking the Side button, on models without the Home button. If your iPhone has a Home button, the Accessibility Shortcut can be invoked by triple-clicking the Home button.
To start a Guided Access session, do the following:
- Open the app within which you want to restrict interactions.
- On iPhone models with Face ID, triple-click the Side button. On other iPhone models, triple-click the Home button. The Guided Access Editor will be displayed.
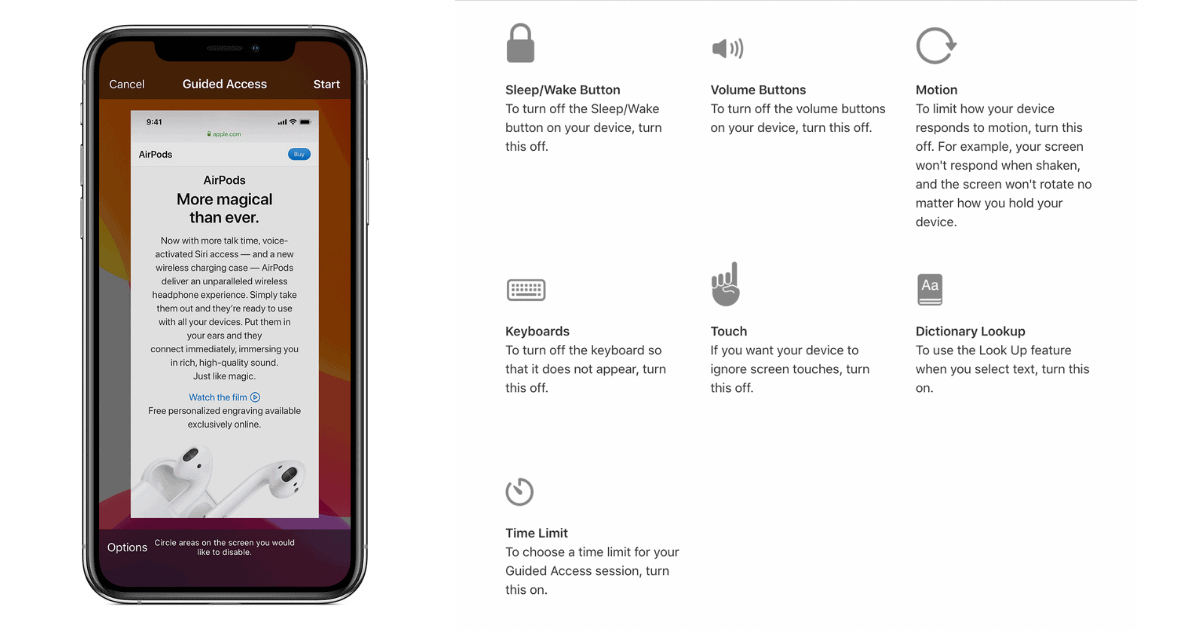
- If you want parts of your screen to stop responding to touch, use one finger to circle those areas. You can move or resize the circle, or tap the “X” to remove it.
- Tap on Options from the bottom left and configure restrictions to optional interactive elements, like “Sleep/Wake Button”, “Volume Buttons”, “Motion”, “Keyboards”, “Touch”, or “Time Limit”.
- Tap Done and then tap the Start button to begin Guided Access mode. If you have enabled Guided Access Passcode, you’ll be prompted to set up the passcode during the first time if not set up already.
To change the Guided Access Settings during a Guided Access session, triple-click the Side or Home button and provide the Guided Access passcode. The Guided Access Editor will be displayed again from where you can change the Options, and then Resume or End the Guided Access session.
To end a session, triple-click the Side or Home button, enter your Guided Access passcode, then tap End. Alternatively, if you turned on Touch ID or Face ID for Guided Access, double-click the Side or Home button, and authenticate using your biometrics.
The above settings will help you to set kid-friendly restrictions on your iPhone or iPad. If there are any other native parental control features within iOS and iPadOS that we may have missed, let us know in the comments below.