If you own an iOS device, it is probable that you spend quite a lot of time using the photos app and that you love playing with your Photos and Videos. You would also want to transfer your photos and videos between your computer and your iOS device. This article gives you step by step instruction about possible ways of transferring photos and videos from your computer to your iOS device.
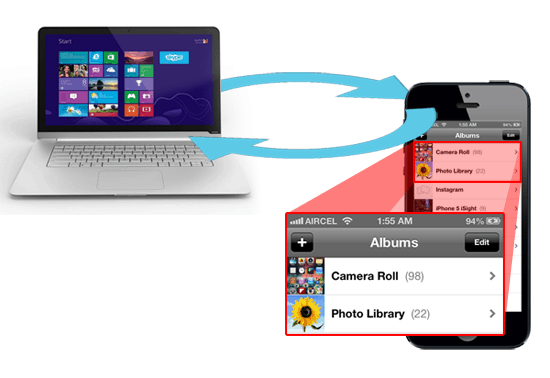
Transfer Photos, Videos from Computer to iPhone, iPad or iPod Touch
General Method
You can transfer photos and videos from computer to your iOS device easily using iTunes. The following steps will guide you through the process.
1. Make sure you have the latest version of iTunes installed on your computer. You can download it from here.
2. Connect your iPhone, iPad or iPod Touch to your computer via USB.
3. When your device is detected on the computer, launch iTunes. Wait for iTunes to finish the initial syncing process.
4. Your device should now be displayed in the top right corner inside iTunes (shown either as iPhone, iPad or iPod Touch). Click on the device icon within iTunes to access your device specific menu.
5 Click on the Photos tab on top.
6. For Sync Photos from option, click on the drop down and select Choose folder…
7. Browse a folder from which to sync your photos.
8. You can choose either all or specific subfolders to include.
9. If you want to sync videos too, check the Include videos option.
10. Finally, click on Sync to import the selected photos and videos to your iPhone, iPad or iPod Touch (whichever is connected).
After photo and video sync is complete, you can access these files in the Photos App on your iOS device. It will create a new folder called Photo Library inside the app and put your synced files in it.
Transfer photos, videos from PC to iPhone Camera Roll
Camera Roll is a default folder located inside the Photos app that contains pictures and videos taken by the camera on your iOS device. You might want to import photos and videos from your computer to iPhone, iPad or iPod Touch to the Camera Roll folder. iTunes Sync won’t allow you to do that. However, we have found a workaround that lets you do so.
Secret Photo and Video Manager to the rescue
Secret Photo and Video Manager is a file protection app for iOS which allows you to privately store and access media files on your iPhone. It lets you to password protect your files and keep them safe. However, we do not have any interest in locking down our precious photos and videos with a password here (though you are most welcome to do it). Rather, we are going to use the app’s ability to import and export media files to get them into the iPhone’s Camera Roll location from computer. In fact, the app can also import files from your computer using USB or Wi-Fi and also share them if the user wants to. So before reading any further, head on to the App Store and install Secret Photo and Video Manager.
After installation, the app will appear on your iOS device by the name of Folder. Similarly, iTunes also recognizes it by the same name. Here’s how you can use the app for importing photos and videos from computer to the Camera Roll folder in your device.
>> Open the Folder app on your iOS iPhone, iPad or iPod Touch.
>> Being a file protection app, it will ask you to set a password during first time use.
>> The app will now open an Albums folder. A subfolder called Camera Roll will already be present.
>> You can use the + symbol to add a new folder in this location if you like. We will use the default Camera Roll folder here.
>> Click on the Camera Roll folder to access its contents.
>> Now, we want to import photos and videos from our computer to this location. Click on the Sync ![]() icon.
icon.
A pop-up prompts you to choose between two transferring options: USB or Wi-Fi. We recommend the USB option because it has a faster transfer rate.
>> Choose the USB option in the pop-up.
>> Leaving the screen as it is, connect your iPhone, iPad or iPod Touch to your computer.
>> Open iTunes on your computer and let it sync with your device. For best results, make sure you have the latest version.
>> iTunes displays your connected device in the top right corner. Click on it to access the device specific menu.
>> Click on the Apps tab on top. Here, you can see all the installed apps on your device.
>> Scroll down the page till you find the File Sharing section. Select Folder (app) from the app list.
>> On the right side, you’ll see another list where you can add app-specific files (Documents).
>> Click the Add button to add files from your computer to the list. You will only be able to add photos or videos.
>> On your iOS device, the Available Items (Folder app>>Camera Roll>>USB Sync>>Available Items) page should be displayed. If the app prompts you to refresh the contents, do so by tapping the Refresh button.
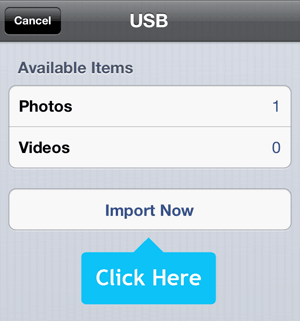
>> Tap on Import Now to import the photos and videos in the app’s Camera Roll folder. The Documents list shown in iTunes should be empty now.
We have thus successfully imported photos and videos from our computer to the iOS device within the “Folder” app (Secret Photo and Video Manager). Once this is done, it is very easy to transfer these files to the device’s default Camera location (Camera Roll).
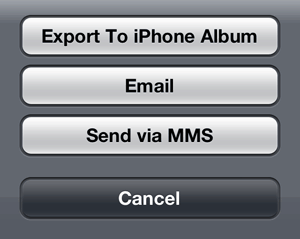
>> Click on the Share ![]() icon and select the files you want to transfer to Camera Roll.
icon and select the files you want to transfer to Camera Roll.
>> Click on Share ![]() >> Export to Device Album. (Here, Device implies iPhone, iPad or iPod Touch, whichever device you own).
>> Export to Device Album. (Here, Device implies iPhone, iPad or iPod Touch, whichever device you own).
Congratulations! The selected photos and videos have been transferred to the Camera Roll folder of your device.
Note: The app is available both in free (Lite) and paid (Full) versions. The free version only allows you to protect 12 files at a time. So, if you plan to utilize its full potential, buy the full version of Secret Photo and Video Manager. But you can also use the lite version to import and export unlimited number of photos and videos by exporting 12 photos to Camera Roll, deleting these files from the app, and again transfer another 12 items and so on. This is because the app does not limit the number of times you can use it.