If you have ever tried to resize a digital image, you might have noticed that they usually get blurred or lose their clarity when you enlarge them beyond a certain limit. But, did you know that it’s also possible to enlarge digital images with minimum or no loss of quality? In this article, we’ll explore some of these image enlargement techniques.

Before jumping into that topic, it is important to know how digital images are formed in the first place. There are basically two different techniques of creating a typical digital image.
Raster (Bitmap): A Bitmap (Raster) consists of a grid of individual pixels, each defined by a specific color in the form of binary bits (hence the name). Popular image formats like JPEG, GIF and PNG save images as bitmap graphics.
Vector: In vector graphics, a set of mathematical expressions is used to define line segments, curves and other geometrical shapes that combine together to form a complete image. Drawings made in vector-based applications like Adobe Illustrator or Corel Draw are usually in vector graphics.
As vector graphics are mathematical representations, they can be resized or enlarged to any extent without any loss of quality (distortion-free scaling). However once the scaling is done, you need to export it to bitmap form in order to use it. Nowadays though, several vector formats, such as SVG, are directly supported in web browsers.
Why bitmap images get blurred on enlargement?
The answer to this might be best explained with the Egyptian Pyramid analogy. The Pyramids of Egypt are ancient pyramid shaped structures built using huge stone blocks. When we see the Pyramids from a distance, they seem to be smooth pyramidal structures with straight edges. But if we look closer, we can start noticing significant roughness in the structure. Up close, you can clearly differentiate the stone blocks making up the edges of the Pyramids, which are, in fact, not straight at all.
On a similar note, when you gradually zoom into a bitmap image using an image viewer, at first the image may appear to be grainy. On further zooming, the edges in the picture become pixellated. At the highest level of zoom, you can clearly distinguish individual pixels based on their color, and the overall appearance of the image becomes blurred.
Usually, you can zoom an image up to 100 percent without distortion. In such cases, one pixel of the image corresponds to less than (or equal to) one pixel of the display screen.
But when the image is enlarged beyond 100 percent, one pixel of the image is represented by more than one pixel on the display screen. That’s when you begin to distinguish individual pixels in the image (the grains). On zooming more, the pixels become more prominent (especially at the edges) and you can actually see the image comprising of square boxes of different colors. Thus, the overall image gets blurrier with more zoom.
Enlarge images without losing quality (Lossless)
Vector Graphics is the only form of image that can preserve its quality while enlarging it. If you want to enlarge bitmap images without losing quality, one way of doing so is to generate the vector form, enlarge, and then export them in bitmaps.
The process of converting bitmap images into vector is known as tracing. In the following section, we have used an application called Vector Magic for lossless enlargement of images.
Resize image without losing quality – software
Vector Magic is a bitmap to vector conversion tool that works well with logos, clipart and other forms of simple artwork. it is available as an online tool as well as a desktop application. Supported bitmap formats include JPEG, GIF, PNG, BMP, TIFF, PSD, etc. while supported vector formats include EPS, SVG, PDF, AI, DXF, EMF, etc.
The desktop application provides offline access to all Vector Magic features on your Mac or PC. The software includes an unlimited trial version, which has all the features of the full version enabled (including full preview) except for the Save feature. To activate the Save feature, you need to purchase the software ($295 per license).
The following table gives you a complete feature comparison between Online and the Desktop Editions of Vector Magic.
Enlarge photo without losing quality online
The online version of Vector Magic allows you to upload bitmap images and convert them to vector form using automatic settings or manual settings. You can preview the result of the conversion and adjust the individual settings in the online editor if you like. But for downloading the vector graphics, you need a paid subscription.
In order to download vectorized images online, you need to either subscribe to Vector Magic Unlimited ($7.95 per month) or pay 1 token per download. A free sign up gives you two free tokens, which means you can download a maximum of two images for free. You can buy token packs containing 5, 10 or 20 tokens.
Free online photo enlarger
Besides Vector Magic, there are some free online tools available that allow you to vectorize bitmap images and download them. Some of these free online conversion tools include Autotracer, Vectorization, RapidResizer, etc.
Advantages of Vector Magic
Even though there are a few other free alternatives available for bitmap to vector image conversion, for professional use, it is recommended to go for the paid version of Vector Magic. Here is why you should prefer the paid solution over free ones.
Better accuracy: Vector Magic usually produces vectors that more closely resemble the input bitmap image, compared to free vector tracing applications.
Cleaner output: Usually, vector converted image results are affected by factors such as noise. Vector Magic results are usually cleaner, while still extracting more detail from the bitmap original.
Easier to use: Free bitmap tracing tools usually have a lot of settings that often confuse users. With Vector Magic, the automatically selected settings usually give the best results. If you’re not happy with it, there’s even an “Improve Result” feature to help you tweak the result.
Resize images with minimal quality loss
The conversion of bitmap to vector graphics is a complicated process and may not have desired results for all image types. Simple images comprising basic geometrical shapes like logos can be easily converted to vector form. On the other hand, images containing shadow effects, color shades and other complex forms of graphics (such as camera photographs) are difficult to vectorize.
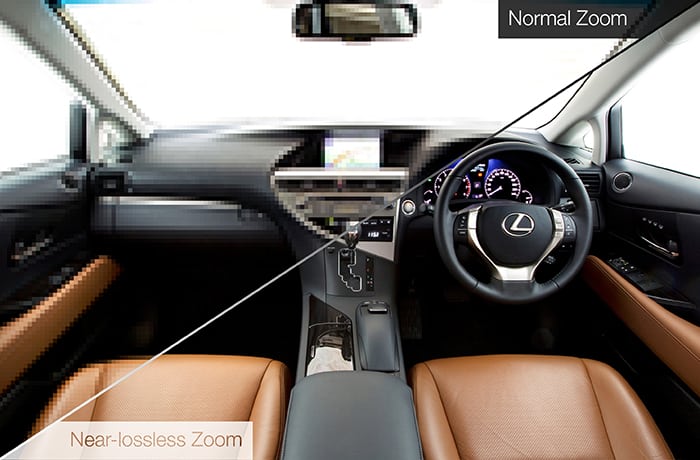
Image credit: NRMA (Edited)
If you have a complex image that you need to enlarge, converting it to vector form won’t be feasible. In such cases, appropriate pixel approximation algorithms can help produce near-accurate results.
The method of approximating new pixel values based on a discrete set of known pixel values is known as interpolation. In this section, we have provided image enlargement solutions using some image editing tools that implement different interpolation techniques to predict the color of new pixels.
Resize image with Perfect Resize (Paid/Free Trial)
Perfect Resize is a paid photo resizing tool that uses Genuine Fractals powered algorithms to provide the best, near-lossless quality enlarged images. Perfect Resize can help you resize photos up to 10 times their original size, without any noticeable loss in quality. It is available as a standalone app and also has an optional Adobe Photoshop Plugin. If you have the Photoshop Plugin installed, you can directly use it to launch Perfect Resize from within Photoshop. The following steps will guide you through the process of enlarging photos using the Photoshop plugin for Perfect Resize.
- Download and install Perfect Resize.
- Launch Photoshop and open an image that you want to enlarge.
- Go to File >> Automate >> Perfect Resize. This will open the Perfect Resize application with the previously opened image.
- On the right side, you can choose from a Preset setting or manually enter the image size.
- Finally go to File >> Save in Perfect Resize to save your changes. The enlarged photo will be saved to disk.
The software includes a free trial of 30 days and costs $79.95 for the standalone app. You can also buy the whole Perfect Photo Premium Suite (which includes Perfect Resize and 6 other apps) for $129.95.
Resize image with Photoshop (Paid/Free Trial)
When it comes to image editing, Photoshop is perhaps the most popular software. As expected, it has an Image Resample feature that helps to enlarge images without noticeable quality loss, though Perfect Resize still gives better results. A brisk way to enlarge an image, though, is to resample it by gradual 10 percent increments. Here’s how to use the resampling feature in Photoshop.
- Download and install Adobe Photoshop on Windows or Mac.
- Open the image you want to enlarge using Photoshop.
- From the application menu, choose Image >> Image Resize.
- In the Pixel Dimensions section, change the unit to “percent”. Ensure that Constrain Proportions option has been checked and provide the width value as 110. The height should automatically be set to 110 too. In this step you are enlarging the image by 10 percent.
- From the resampling options, choose Bicubic (Smoother). This method of resampling is recommended for image enlargement as it tries to guess the color of new pixels by taking into account the color of surrounding pixels, as well as from the ones surrounding each of them. This method is a bit time consuming but produces smoother shifts from one color to another; hence giving a better output than most other resampling techniques.
- Click on OK to apply the enlargement. You can continue enlarging the image by 10 percent increments (Steps 3 through 7) until the optimum size is achieved.
- Finally save the image to disk in your preferred format.
Resize image with Gimp (Free)
Gimp is a free Photoshop alternative for Windows, Mac and Linux users. It also includes decent image resizing features that help you to enlarge photos with minimal quality loss, although results are not as good as Perfect Resize. The following steps will guide you to enlarge images in Gimp without considerable loss in quality.
- Download and install Gimp on your Mac, PC or Linux.
- Open the image that you want to enlarge using Gimp.
- From the application menu, go to Image >> Scale Image.
- In the Scale Image window, click on the chain link icon to ensure image proportions are maintained. Enter the image width, the height value should automatically adjust according to the width value.
- Under the Quality section, choose the Interpolation value as Sinc (Lanczos3).
- Click on the Scale button. The enlarged image will be displayed now.
- To save the current image, go to File >> Export as and choose the appropriate location and format.
The enlarged image will be saved to the disk.
Note: For better results, try to increase the image size by gradual 10 percent increments until the optimum size is achieved.
Vector Graphics are ideal for scaling images without quality loss. However, they are only ideal for simple images which are easy to represent mathematically. On the other hand, enlarging photographs and other complex images can be tricky and might not always produce expected results. Overall, Perfect Resize will give you the best, near-lossless results when it comes to up sampling images. Though it’s a costly piece of software, it’s the recommended solution if you are a professional.
If you already have Photoshop installed and don’t want to invest anymore, Photoshop’s built-in image resizing options produce decent results. If you are looking for a free solution, Gimp provides a decent alternative, with very little to differentiate between the results of Photoshop’s Bicubic resampling and Gimp’s Lanczos based resampling solution.
If you found this article useful, subscribe to our newsletter for more tech-tips.