You can configure your localhost to have a customized domain. You might want to do it to demonstrate a web application you might have developed on your local system. Or maybe you would like to maintain your own website on your computer. (Just for fun!)
Set up your own custom domain on Localhost
Step 1: Download and install Server Stack.
To run your web application, you need to set up a web server. We are going to use WAMP in this tutorial (Download WAMP). After downloading the package, install it in your system. After the installation is complete, go to Start >> All Programs >> WampServer >> start WampServer. A new icon (Wamp) appears in the notification area. Wait for it to turn green.
Open up your browser and type in “localhost” in the address bar and hit Enter. If your installation was correct, you will see Wamp’s root webpage.
Step 2: Configure files to change localhost’s domain
For this part, you need to dig deep into the Windows directory and modify the “hosts” file. In the last line you need add the following:
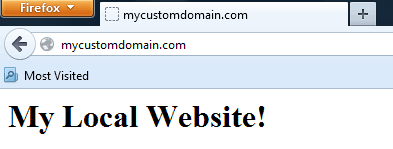
127.0.0.1 mycustomdomain.com
This renames your localhost domain to “mycustomdomain.com”. Similarly, you can add your own custom domain name in place of “mycustomdomain.com”. Now, if you open mycustomdomain.com (or whatever domain name you set) on your browser, it launches Wamp server’s root webpage. For more information on how to modify the “hosts” file, see below.
Note: If your custom domain name matches with an existing website, your browser will open the localhost instead of the website while your local server is running.
Step 3: Preparing the Website to launch on your browser
Now you need to configure the home page for your custom domain. Left click on the WAMP icon in the notification area and click on “www directory”. This will take you to the local server’s root. Find the “index.php” file here and back it up in another location. This is Wamp’s default root webpage. Now copy the files of your own website and make sure you replace the default index.php file with your own index.php (or index.html).
Your website is now fully configured to run on localhost. Whenever you type your custom domain name on the browser’s address bar, you should see your own website running on localhost. (Keep WAMP Server on while browsing your website.)
How to modify / change the Windows Hosts file
The hosts file is a system configuration file that resides inside the Windows directory. The full path of the file is:
C:\Windows\System32\Drivers\etc\hosts
[It is assumed here that Windows is installed in Drive C]This file is write-protected and hence you cannot edit or modify it directly. First you need to copy the file into another folder (not inside Windows directory). Open the copied file with Notepad. Make any changes you need to do and save the file. After changes have been saved, you can head back to the file’s original location (C:\Windows\System32\Drivers\etc\) and replace the old hosts file with the modified one.