External hard drives are known for their portability and disk space. In fact, with terabytes of memory space available, external drives often become a public storage vault. Being portable, it helps you to carry data and easily copy from other locations. But your portable drive often ends up being a shared resource, which might be a serious blow to your privacy. It also becomes vulnerable to security threats as other people using your hard drive may possibly infect it with viruses from their computers.
It is probably one of these reasons that you refrain from keeping any personal or confidential data on your external drive. But hey! It’s your drive and you have every right to have your personal space on it. Today, we’ll show you how to keep your personal data on your hard drive securely and protect them from others’ eyes.
Partition your drive
You know that your hard drive will be accessed by your friends very frequently. The first step to ensure that your personal data is protected and secure is to have separate volumes for public and private access. By limiting the amount of publicly accessible drive space, you can create a virtual barrier between your personal and shared data.
We can use Windows’ own Disk Management tool to create, edit or delete partitions of your external hard drive. Your external drive may connect via USB but Windows will detect it as a local hard drive (It will be listed under the Hard Drives section in My Computer). So, you can do everything with it that you would do with an internal drive.
How to partition an external hard drive on Windows
- Connect your external hard drive to your computer.
- Open Windows Disk Management Utility (Right click on My Computer >> Manage >> Disk Management Node). The utility will display information about all the disks connected to your computer along with information about disk partitions.

- The external hard drive will be automatically assigned a drive letter will appear in Disk Management as a separate hard drive at the bottom (marked as online).
- Select the rectangular box signifying your external hard drive. Right click on it and choose Shrink Volume.
- A new window will pop up for you to provide the parameters for the shrink operation. In the field labeled “Enter the amount of space to shrink in MB”, enter the amount of space you want to allocate (in MegaBytes) for your private partition. For example, assuming you want to allocate 100 GB for your private partition, enter the value 102400.
- Click on Shrink and wait for the process to complete.
- Once the shrink process is completed, Disk Management will now show two partitions on your external hard drive: An allocated volume with lesser capacity and a new unallocated region of the desired capacity (according to the provided shrink size).
- Your first partition is now ready for use. To access your new partition, you must first create a new volume from the unallocated space.
- In Disk Management, right click on the box signifying the unallocated region of your external drive.
- Select “New Simple Volume” option.
- The default value for the size parameter reflects the entire allocable space of the volume. You may reduce the value if you want to leave room for more future partitions.
- Assign a new drive letter to the partition and follow the wizard to set up the new partition.
Problems with drive shrinking
If you create multiple partitions on your hard drive, it might happen that you might not be able to shrink your disk further even if there is enough free space on it. This usually happens due to fragmentation of data on the disk. Defragmenting your drive could let you shrink more volume.
How to increase available shrink space
However, if the above attempt fails, you can use any third party software to resize and create more partitions. Paragon Partition Manager is a free tool which can be used for this purpose. Now suppose you have a 1 TB hard disk partitioned into two volumes of 512 GB each. Say you want to create a volume of 100 GB by shrinking the first volume; and you are not able to do it using the Disk Management Utility (Windows). Here is how you do it using Paragon Partition Manager.
- Download and install Paragon Partition Manager.
- On launching the “Move/Resize Partition” utility, you will notice a scale at the bottom.
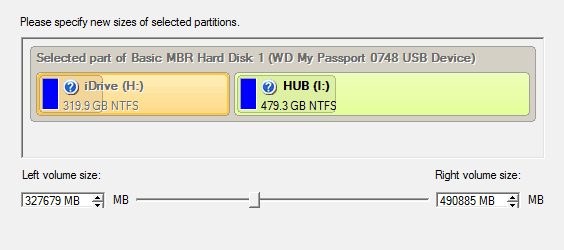
- Select the first volume and push the slider to the left by 100 GB. Thus drive space of the first volume will be reduced and that space will be added to the second volume.
- Follow the partition wizard and commit the changes.
- Now open the Windows Disk Management Utility and shrink the second volume by 100 GB.
- Create a new partition from the unallocated space just created.
Note: Even though the 100 GB partition is actually created from the second volume rather than the first, the desired result is achieved since the excess disk space was actually contributed by the first volume.
Securing your private partition
Now that you have created multiple partitions on your external hard drive, select one as your private space. The next step is to protect the data inside it. There are quite a few good hard drive encryption programs but if you are willing to spend some money to secure your data, you can go for Storage Crypt.
The price of the software is nominal when you compare that with what it can do. StorageCrypt can prevent access to your private files by encrypting disk drives and keeping them hidden. There are a lot of options available to enhance data protection on your hard drive.
- Download and install Storage Crypt on your computer.
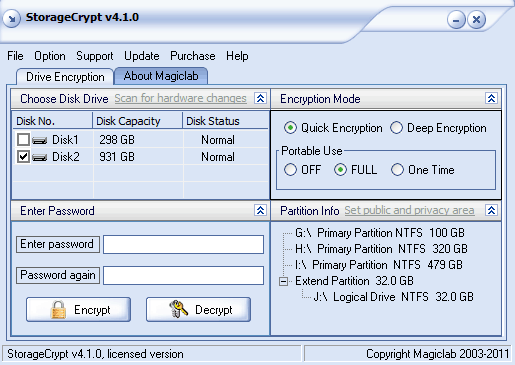
- The program home screen is divided into four sections (Drive Encryption tab).
- Choose Disk Drive lets you to select the drive you want to encrypt or decrypt. Select the disk you wish to encrypt.
- Encryption mode lets you to select from either Quick or Deep encryption modes. While Quick Encryption is a lot faster, it only encrypts the drive’s outer layer and not the entire drive, but it should be secure enough for home and personal use.
- Portable use: Turn OFF if you plan to unlock your drive only on computers where StorageCrypt is installed. Select the FULL option if you wish to encrypt and decrypt files on any Windows computer. The One Time option will make your drive ready to be used on any computer but only for once.
- The Partition Info section gives you some details about the individual volumes available on the disk selected in the Choose Disk Drive option.
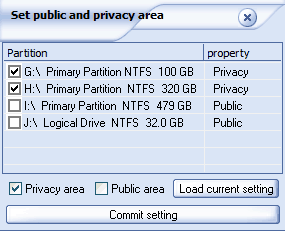
- Set Public and Private Areas option helps you to define which drive you wish to grant public access and which ones to keep protected. Clicking on the option opens up a new window listing the disk drives in the currently selected disk. Here you can set them as public or private.
- Finally, the Enter Password section lets you to encrypt or decrypt the selected drives by providing a password.
Once your drive(s) are encrypted, they will disappear from My Computer. If you have encrypted in portable mode, a small application called SCLite will be created in a new folder SCLite in the public partition of your disk. Run it and you will be asked to enter your unlock Password. If not encrypted in portable mode, you need to have the StorageCrypt application installed in order to unlock your drive.
Having a private partition hence limits public access to your data as well as prevents it from virus attacks. Thus you can easily share your portable hard drive with your friends without having to worry about the privacy of your data.