Sometimes, you might have thought about capturing the audio stream from your Mac’s system audio. This can be handy in a number of situations, such as, recording your Mac or iOS device screen with audio, or capturing the audio from a live podcast.
Sure, macOS is often praised by critics for offering several creator-friendly tools like GarageBand, iMovie, Final Cut Pro, etc. But a common feature/limitation in all of these apps is that they all let you record sounds from the built-in microphone or other external sound recording devices, but not Mac’s system audio itself. Even QuickTime, which features a native screen recorder, only lets you record sounds from the built-in microphone by default.
In this article, we’ll demonstrate how you can capture the system audio on Mac, in a variety of situations.
Record your Mac screen with audio
In order to record system audio from any audio device, you need to essentially feed the output audio stream as an input for another recording device or app. In the days of analog equipment, such as tape recorders, this was achieved through an auxiliary cable connecting the LINE-OUT of the cassette player to the LINE-IN of the recorder.
Things are much simple now. On Mac, redirecting the audio stream can easily be done with the help of an app. And though there are multiple solutions available, we’re going to focus on a free and open source one.
Soundflower is a kernel extension for macOS designed to create a virtual audio output device, which can then be used to capture the output audio stream as an input channel in other apps. In other words, Soundflower lets you route your Mac’s system audio output, as an input for a sound recording app installed on the same computer.
The following steps will guide you to record your Mac’s screen with system audio using Soundflower and QuickTime Player.
- Download and install Soundflower app from the official GitHub repository. Depending on the version of macOS, the installation steps might slightly vary. Refer to the installation instructions provided in the description for more information.
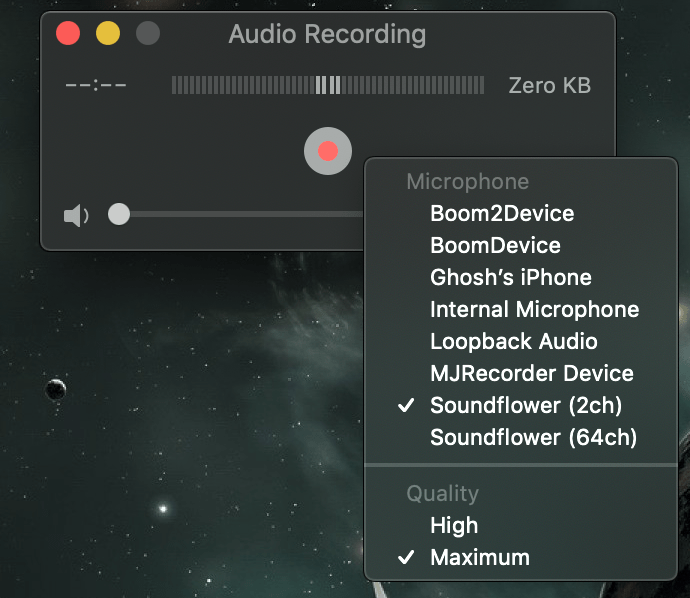
- Click on the Volume menu bar icon and select Soundflower (2ch) as the output device. You may also do the same by going to System Preferences >> Sound >> Output tab and selecting Soundflower (2ch). At this point, your Mac will go mute, but this is expected.
- Now, launch QuickTime Player and go to File >> New Screen Recording.
- Click on the little down-arrow next to the Record button and ensure that Soundflower (2ch) is selected under Microphone options.
- Verify that the recording volume bar is set to full. This will ensure that you get the maximum volume in your recording.
Now, you’re all set to record your Mac’s screen with audio. Click on the Record button, and drag the area of the screen you want to record or simply click to start recording the whole screen immediately.
With the recording in progress, perform the intended operations. If you play media and don’t hear any sound, it’s simply because your audio output is being directly fed into QuickTime Player’s recorder and not to your speakers.
Finally, click on the Stop button from the icon in the Menu Bar to finish the recording, and save it to the disk as a QuickTime MOV file. As intended, the recorded movie would have captured the system audio along with on-screen activities.
Once the recording is completed, go back to System Preferences >> Sound >> Output tab once again to switch your audio output back to Internal Speakers or other default setting that you had earlier. Now play your recording using your preferred media player and verify that the system audio was recorded.
Record system audio on Mac without video
If you’re interested in capturing only the Mac’s system audio stream without recording the on-screen activities, that’s also possible with the help of Soundflower. You just need to use a separate audio recording app to capture the output stream redirected by Soundflower.
In QuickTime Player, you can essentially follow the similar steps as provided for screen recording with system audio, to record system audio from your Mac. Only, in place of selecting New Screen Recording in QuickTime menu, you need to choose File >> New Audio Recording instead.
But in this demonstration, we’ll consider using a third party open-source app called Audacity. The app gives you better post-processing options after the recording is completed. For instance, you could trim out the non-essential parts by referring to the waveform, before you export the audio file.
The exporting options, too, are more superior in Audacity compared to QuickTime Player. In QuickTime, you only get to export the audio as an M4A file. Audacity supports a wide range of audio formats that you can export to.
The following steps will guide you to record your Mac’s system audio using Soundflower and Audacity.
- Download and install Soundflower and Audacity apps, if not already done. Refer to the installation instructions on Soundflower’s GitHub page for the specific installation steps.
- Click on the Volume menu bar icon and select Soundflower (2ch) as the output device. You may also do the same by going to System Preferences >> Sound >> Output tab and selecting Soundflower (2ch). At this point, your Mac will go mute, but this is expected.
- Open Audacity and choose input device (the Microphone icon) as Soundflower (2ch).
- Next, click on the red Record button. Audacity starts recording immediately.
- Play the media from which you want to record audio. If you don’t hear anything, it’s simply because your audio output is being directly fed into Audacity’s recorder and not to your speakers.
- Click on the Stop button to end the recording once you’re done.
- Trim or remove parts of the recorded audio if and as required, by referring the audio waveform.
- Finally, go to File >> Export Audio… in Audacity and choose the appropriate file name, location, and type to save the recording.
Note: Audacity needs an external encoder to export audio into MP3 format. Refer to the instructions on this page to install the LAME MP3 encoder on Mac.
Once the recording is done, go back to System Preferences >> Sound >> Output tab once again to switch your audio output back to Internal Speakers or other default setting that you had earlier. Now play your recording using your preferred media player and verify that the system audio was recorded.
Record your iPhone, iPad screen with audio
iOS 11 introduced a built-in screen recorder that lets you capture the screen of your iPhone or iPad, as a video file. However, by default, the feature only records your iOS device’s screen.
You can optionally add voiceover to the recording too. Just hard press or long press (on non-3D Touch-enabled devices) on the Screen Recorder button in the Control Centre and tap on the Microphone to enable voice recording along with the screen.
But unless your iOS device is jailbroken, there’s no provision in iOS to record your iPhone’s or iPad’s system audio while recording the screen. You can do this with the help of QuickTime Player on Mac.
- Connect your iPhone or iPad to your Mac via USB, and launch QuickTime Player on your Mac.
- Now, launch QuickTime Player and go to File >> New Movie Recording.
- Click on the little down-arrow next to the Record button and choose your iPhone or iPad under both Camera and Microphone options.
- Verify that the recording volume bar is set to full. This will ensure that you get the maximum volume in your recording.
- Click on the red Record button to start recording, and click Stop when you finish.
- Save the video (MOV) file in a preferred location on your Mac, and you’re done!
So that’s how you can record your Mac’s (and iOS device’s) system audio directly from your Mac’s audio driver.