One of the first things we do after getting a new phone is to set a custom ringtone for calls and messages. On Android, the method for selecting ringtones vary across different devices. Generally (as regular Android users might already know), a suitable file manager can be used to browse a particular music file and set it as ringtone.

But depending on the manufacturer or carrier service, some Android devices (like Moto G, Moto X, etc.) may not ship with a built-in file manager. On these devices, ringtone selection is only limited to the preloaded ones, unless third party file managers are installed. Users who are new to Android may not be familiar with file managers and often complain about not being able to set custom ringtones on such devices (there are multiple forum threads about this issue). This article is especially meant for newcomers with devices like Moto G, where custom ringtones cannot be set directly.
Set custom ringtones using computer
Ringtones on Android are stored in a system folder, but it doesn’t allow users to save custom ringtones to that folder (/home/system/media/audio/ringtones) by default. But you can create (if not already present) a folder named “Ringtones” inside the default sdcard directory (/home/storage/emulated/legacy/) and place your custom tones there.
- Connect your Android phone to your computer via USB.
- Access the device drive on your computer and create (if not present) a folder named Ringtones in the root directory.
- Now copy all your custom tones to that new folder.
- Disconnect the Android device and access its ringtone settings by opening Settings >> Sound >> Phone Ringtone.
- The recently copied tones should be available in the selection list. Tap on one of them to set it as your ringtone.
Set custom ringtones from device
Using file managers
If you want to set a custom ringtone from the device itself, and you don’t have a file manager installed, first of all, you need to grab a suitable file manager app from Google Play. Also note that all file manager apps won’t support ringtone selection (Ex. OI File Manager). We tried out multiple file managers but ultimately stuck with ES File Explorer, because the app is easy to use and offers a number of additional features. Here’s how you can set up a custom ringtone using ES File Explorer:
- Download and install ES File Explorer from Google Play.
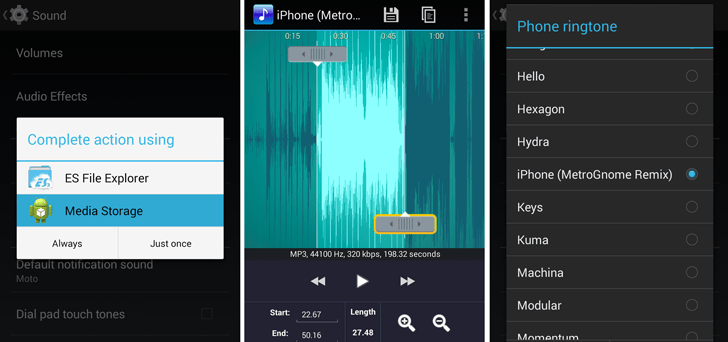
- Go to Settings >> Sound >> Phone Ringtone. Now, instead of the usual ringtone selection menu, Android prompts you to select a suitable app.
- Select ES File Explorer on this list and choose “Just Once” or “Always”.
ES File Explorer will list all the stored files and folders, and you can browse them and select your preferred track as ringtone.
Using ringtone maker apps
If you want to set your favorite song as ringtone, it is recommended that you extract the best part of the track using ringtone maker apps. There are several of these apps available on Google Play, but here, we’ll be using an app named Ringtone Maker. Ringtone Maker helps you to create custom ringtones from a music track of your choice. It also lets you to trim the music file so that you can set your favorite part of the track as ringtone. Here’s how you can create custom ringtones using Ringtone Maker:
- Download and install Ringtone Maker from Google Play Store.
- Launch the app and tap on Menu >> Browse and select the music file for your ringtone.
- Once the file is selected, it opens in an editor where the track can be trimmed.
Note: Usually, phone rings don’t last more than 40 seconds. So for best results, it is recommended that you crop the best part of the music track but also limit it to 40 seconds long. - Once editing is done, tap on the Save icon on top to save your ringtone. The app will automatically place the cropped track inside the Ringtones folder.
- Finally, go to Settings >> Sound >> Phone Ringtones and select the newly created ringtone. It will be available along with the list of default tones.
These are a few convenient ways of setting up custom ringtones on your Android device, when the ringtone selection menu doesn’t show custom ringtones by default. If our readers are familiar with any other suitable method, sound off in the comments below and we’ll add them here.