Not enough storage on your iCloud? Here are a few things you can try to regain some of that space.
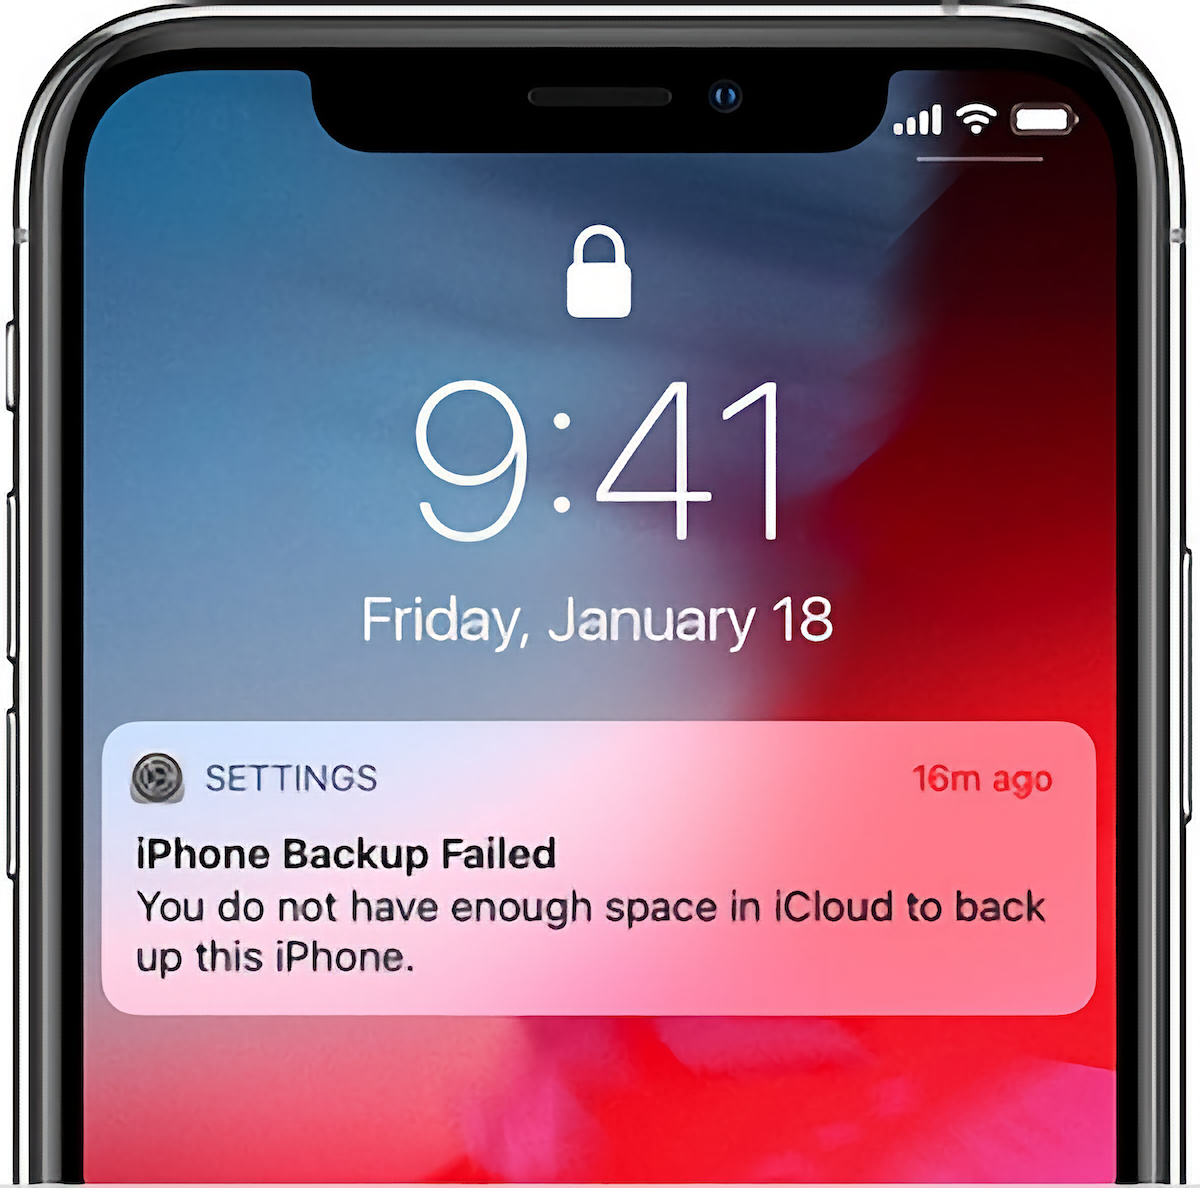
iCloud is a great backup solution for your iPhone, iPad, and Mac that just works most of the time. But sometimes, you might get a notification saying there’s not enough storage, even though there is (or at least seems to be). Here are a few tricks and workarounds to regain space and fix your iCloud storage issue.
Why is there not enough space in my iCloud storage?
When you get a “Not enough iCloud storage” notification on your iPhone, iPad, or Mac, it generally indicates that your current iCloud storage quota has insufficient space to hold whatever data is being uploaded from your devices. Contrary to a common misconception, this has nothing to do with the amount of free space on your iPhone, iPad, or Mac.
When iCloud Sync is turned on, your devices automatically upload certain types of data to Apple’s servers that count against your iCloud storage quota.
If you have an Apple ID that you have used to sign in to your Apple devices, you automatically get 5 GB of free iCloud storage that Apple uses to keep a copy of your data. This data usually includes the following:
- iCloud Photo Library
- Files in iCloud Drive
- Contacts
- Calendars
- Notes
- Reminders
- Backups
- Third-party app data (like WhatsApp) and more
Apple does provide you with suitable options to manage your iCloud data. And in case your iCloud storage quota has exceeded the amount of data you’re trying to sync, there are broadly three options available to you:
- Revisit your iCloud Settings to ensure only the intended data is synced with iCloud
- Delete some of the unintended/unimportant data stored on iCloud
- If you need more storage, upgrade your iCloud Storage Quota
In this article, we’ll explore these options in detail.
Review iCloud Settings
When setting up a new Apple device, many users usually keep the default settings and start using it without reviewing the settings. Interestingly, many of these default settings may cause unintentional iCloud uploads, filling up your iCloud storage. Thus, you can review these settings to ensure you’re only updating to iCloud what’s necessary.
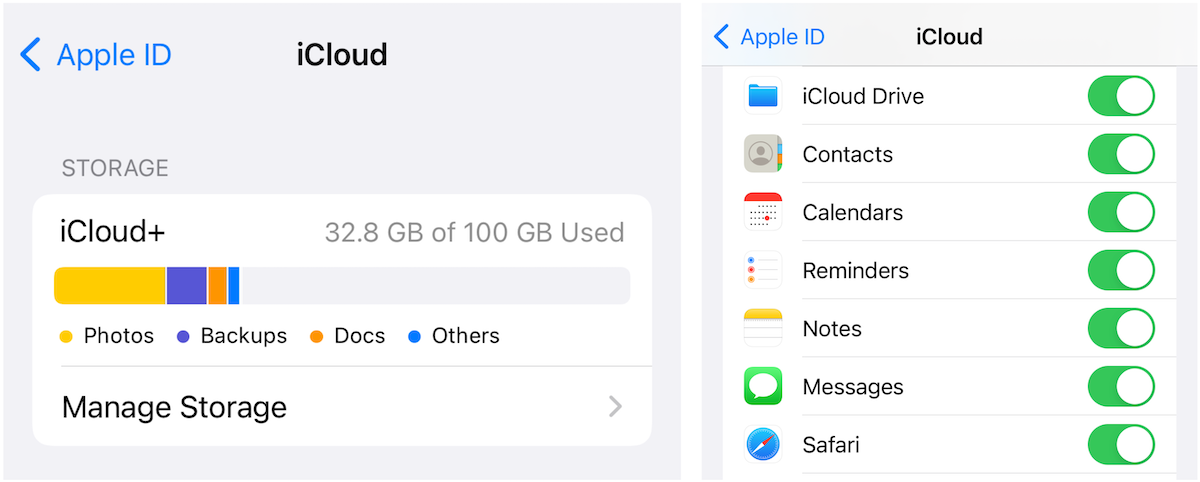
On iPhone or iPad:
- Open the Settings app.
- Tap on your Name Card on top of the Settings screen.
- Tap on iCloud. Here, you should see what apps and services are actively using iCloud Storage, i.e., whether iCloud status is turned on or off.
- Scroll through the list, verify that iCloud is turned on only for the apps and services you want, and turn it off for the rest.
Note: To further get a breakdown of how much iCloud storage each app occupies, tap Manage Storage. The apps occupying the most space will show up on top.
On Mac:
- Open the Settings or System Preferences app, depending on your installed macOS version.
- Tap Apple ID from the top-right corner. Here, you should see what apps and services are actively using iCloud Storage, i.e., iCloud is checked or unchecked.
- Scroll through the list, verify that iCloud is turned on only for the apps and services you want, and turn it off for the rest.
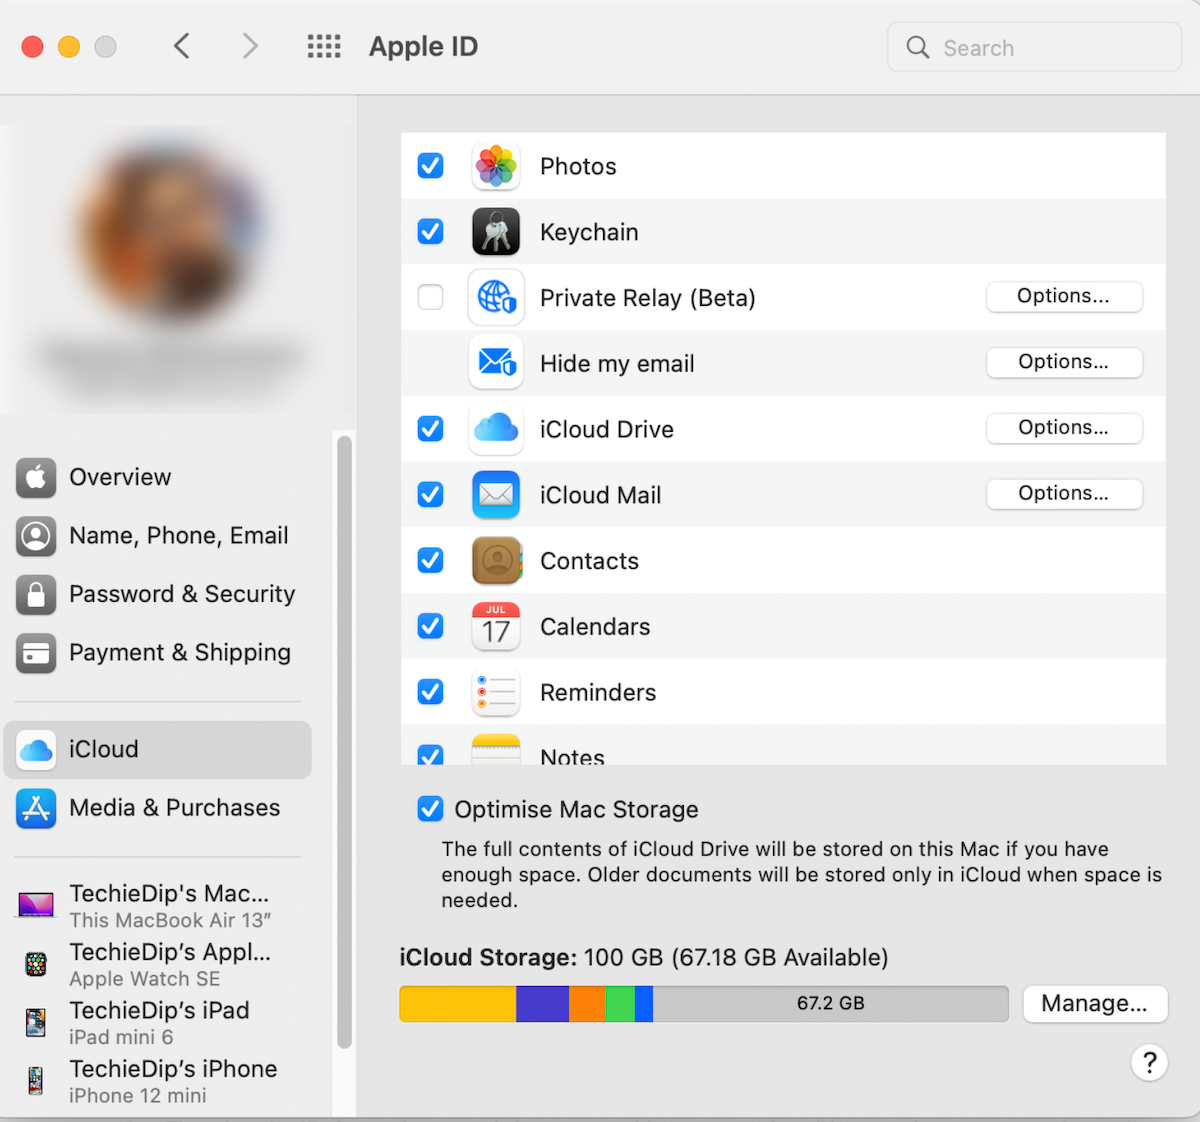
Note: To further get a breakdown of how much iCloud storage each app occupies, tap Manage… The apps occupying the most space will show up on top.
Once you’ve ensured that only the intended apps and services are using iCloud storage, now it’s time to clear some unwanted data already uploaded to iCloud.
Delete unimportant data from iCloud
Below are some of the primary apps that usually use the most iCloud Storage:
- iCloud Photo Library
- Device Backups
- Messages Attachments
- Documents on iCloud Drive
- WhatsApp Backups or other first-party/third-party app data
Now that you’ve narrowed down the prime suspects for the Not enough iCloud storage available issue, here’s what you need to reduce your storage consumption.
Delete unwanted photos from iCloud Photo Library
If iCloud Photo Library is turned on, your iPhone, iPad, or Mac will automatically backup all the photos and videos in the Photos app to your iCloud, which will count against your storage quota.
To streamline your Photos Library, you can go into the Photos app on your iPhone, iPad, or Mac and manually delete duplicates, screenshots, and other unwanted media. If you want to speed up the process, try a third-party photo cleaner app like Gemini Photos.
You may also check Videos under Media Types (in the Albums tab) to ensure any accidental videos aren’t using up your storage (both iCloud and local device storage).
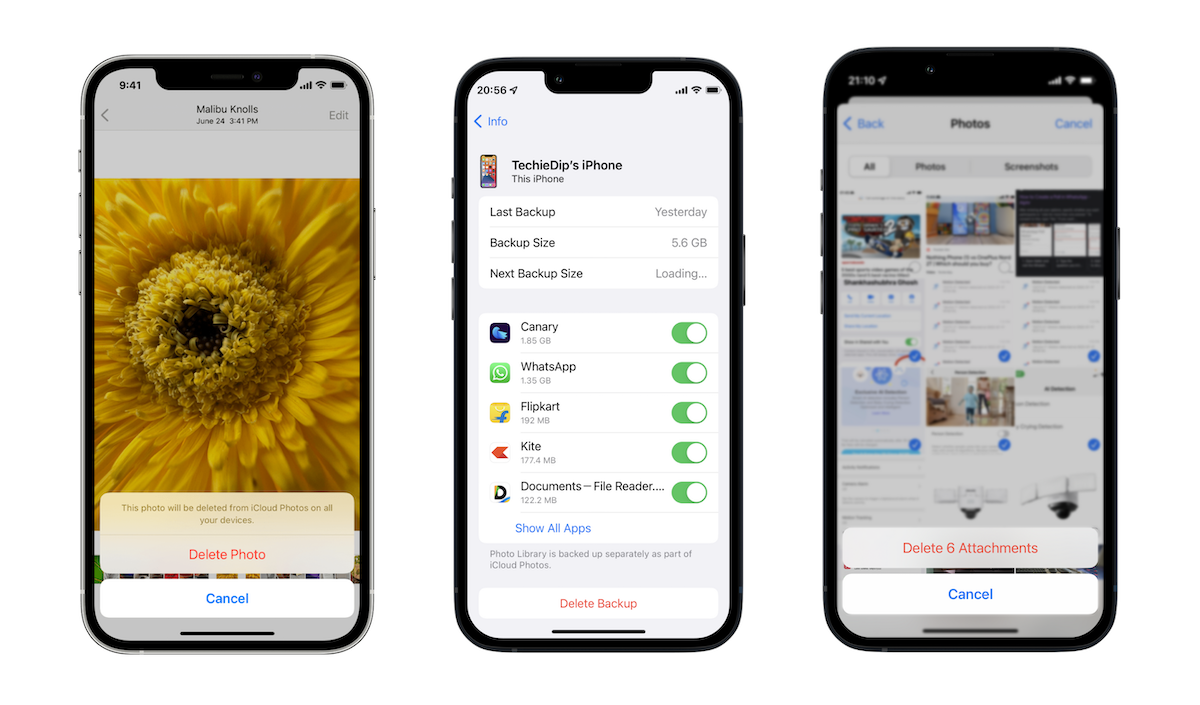
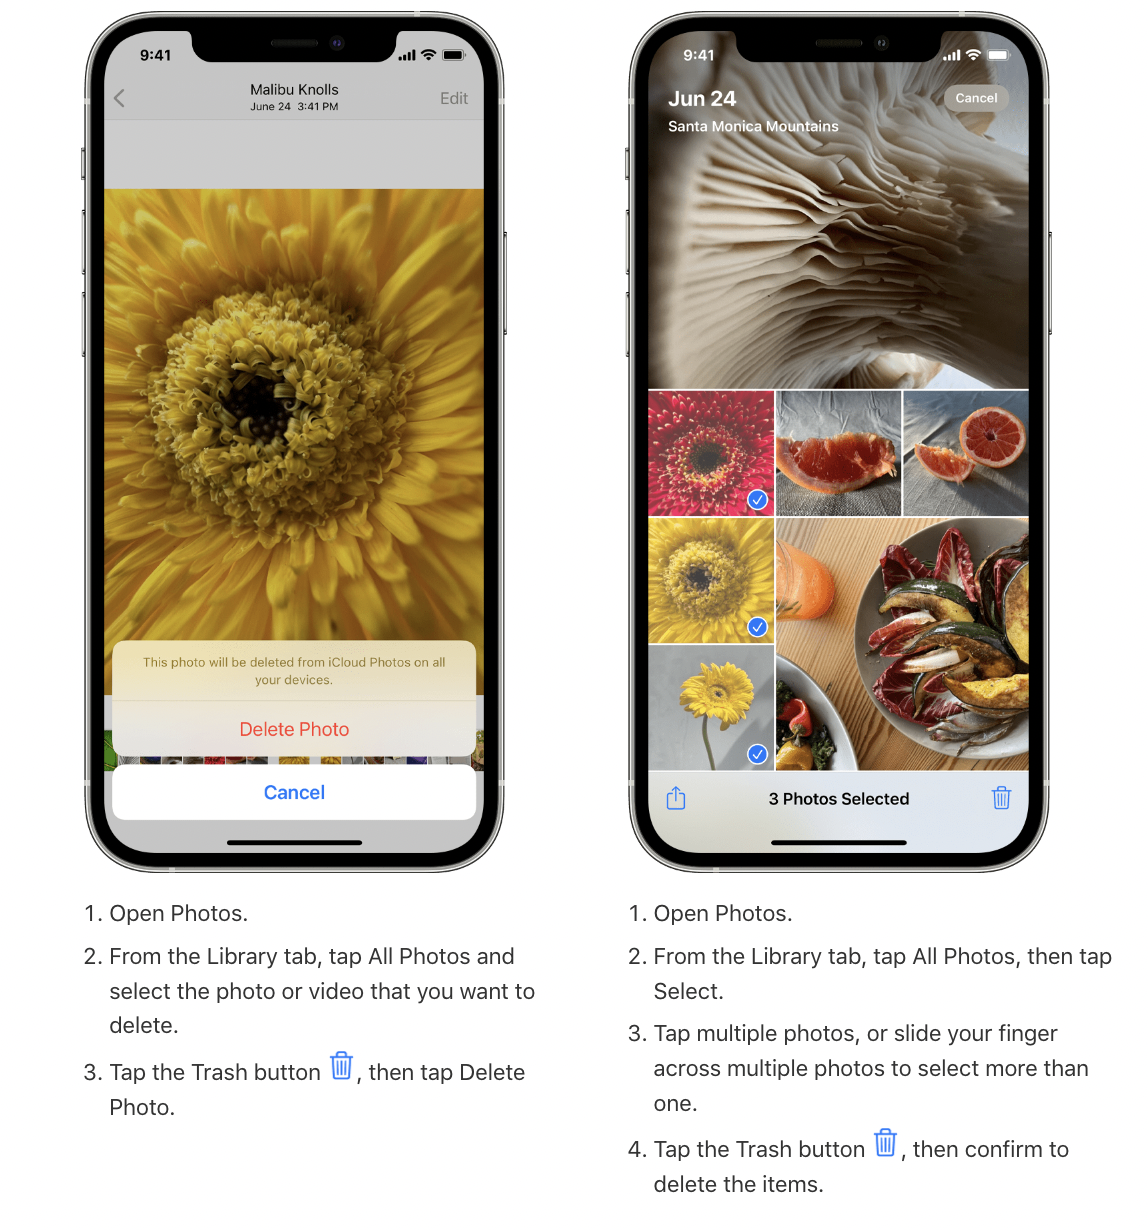
Do the following to delete specific photos and videos from the Photos app on iPhone, iPad, or Mac.
- Open the Photos app.
- Click or tap on the Library tab.
- Select the All Photos view.
- On iPhone or iPad, tap Select from the top-right corner, and select the photos and videos you want to delete.
On Mac, select one photo or video, then hold the Cmd or Shift key while clicking on another, to select multiple items at once. - On iPhone or iPad, with the items selected, tap the Delete icon from the bottom-right corner, and confirm Delete Photos again.
On Mac, with the items selected, right-click and choose Delete Photos, then click on Delete again to confirm.
Note: If you’re a Windows user, you can manage your iCloud Photos using iCloud for Windows or the iCloud.com web app. Learn more from the support article.
Alternatively, you can disable iCloud Photo Library altogether and switch to backing up your photos offline manually, either via device backup or manually exporting your photo albums to an external drive.
To disable iCloud Photo Library, do the following:
On iPhone or iPad:
- Open the Settings app.
- Scroll down and tap Photos.
- Turn Off iCloud Photos.
On Mac:
- Open the Photos app.
- Click on the Photos menu from the top-right corner and select Preferences…
- Click iCloud.
- Uncheck iCloud Photos.
Delete unwanted device backups
You can delete backups stored on iCloud that you no longer need directly from your Apple device.
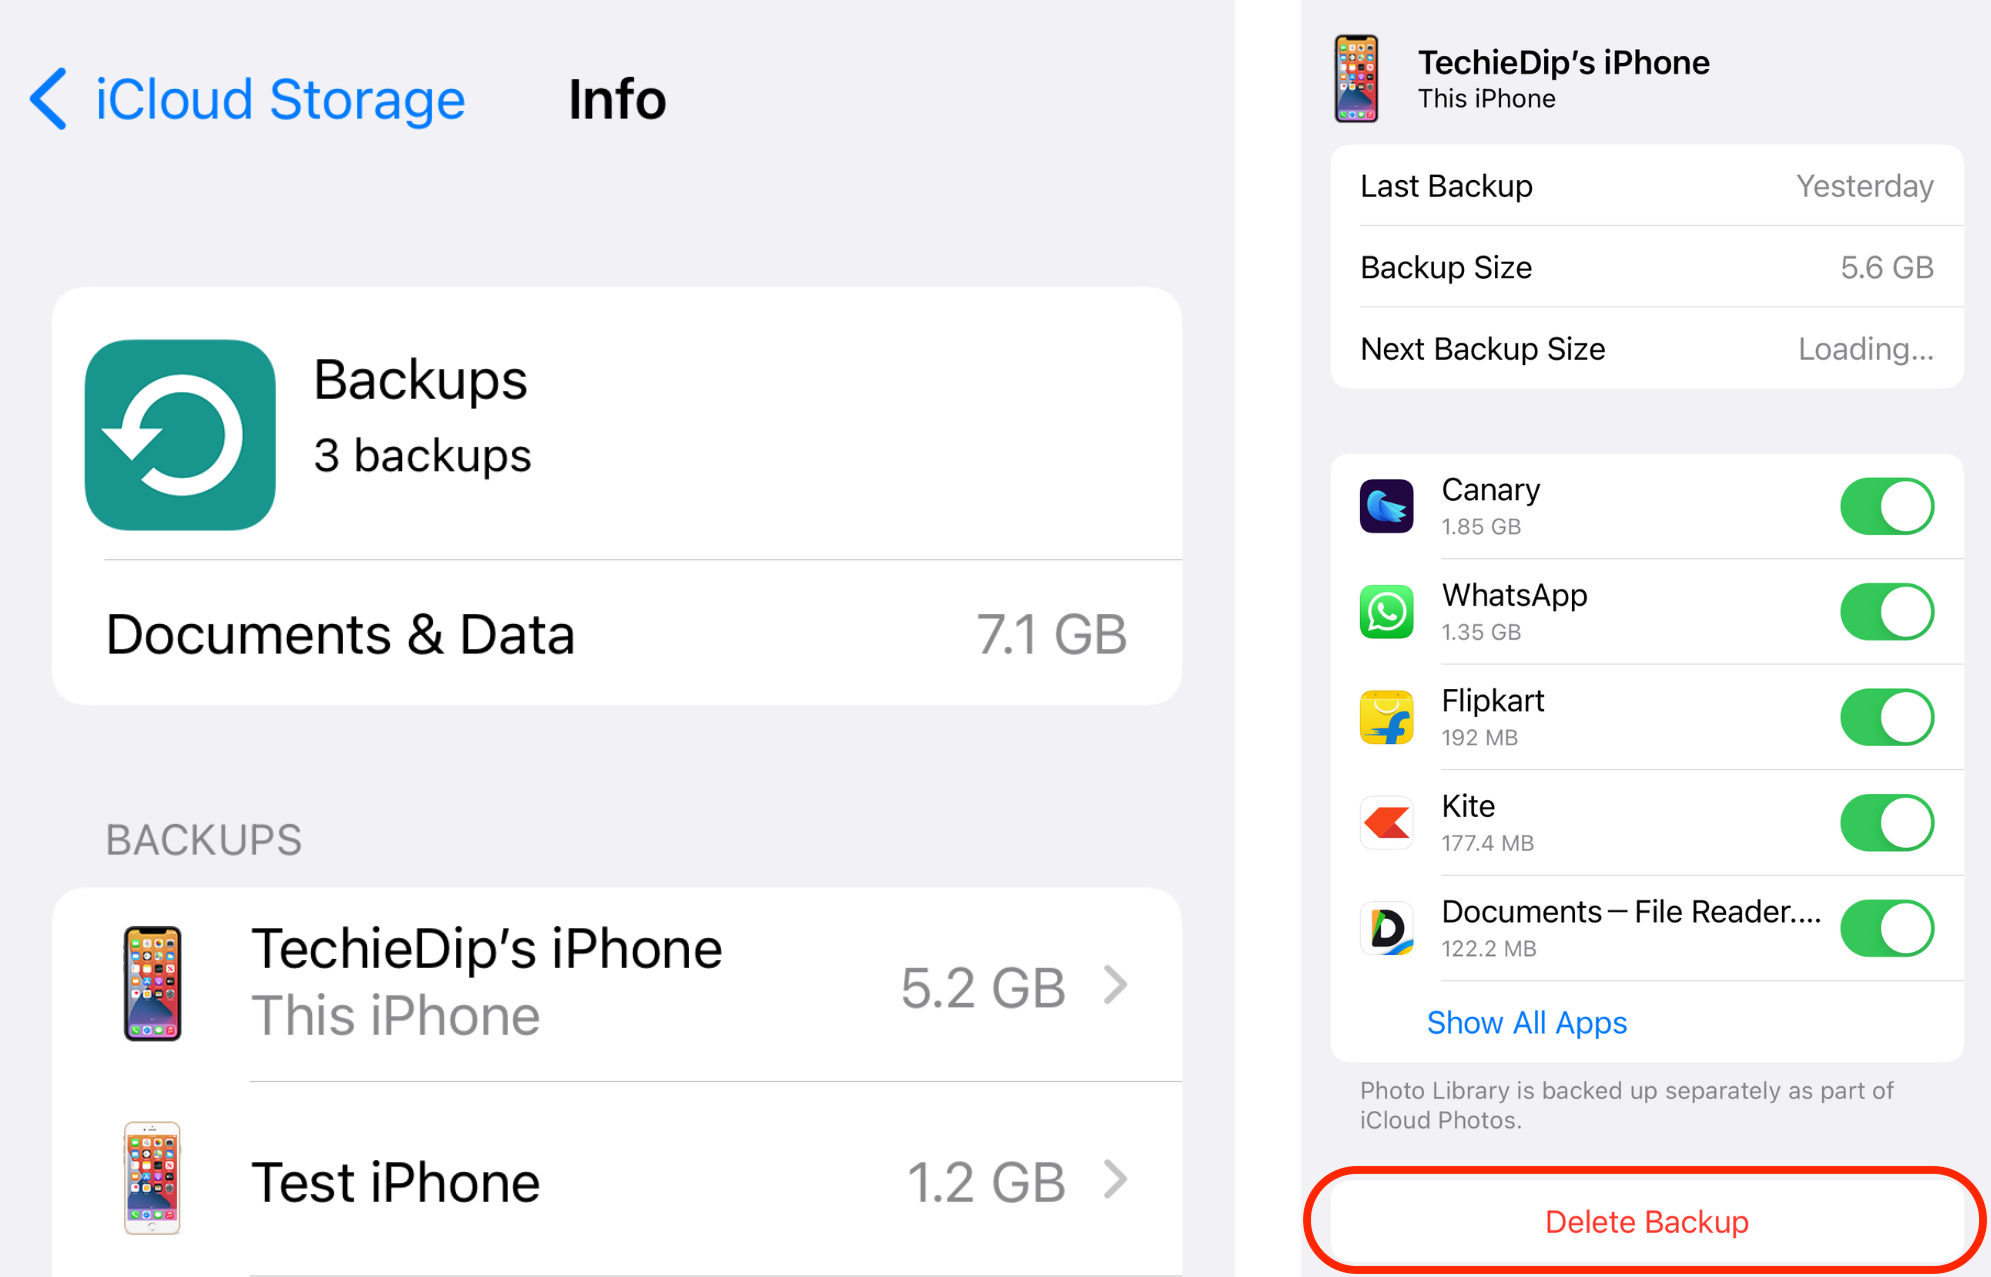
On iPhone or iPad:
- Go to Settings >> [Your Name] >> iCloud >> Manage Storage >> Backups.
- To delete a backup, tap the name of a device, then tap Delete Backup.
On Mac:
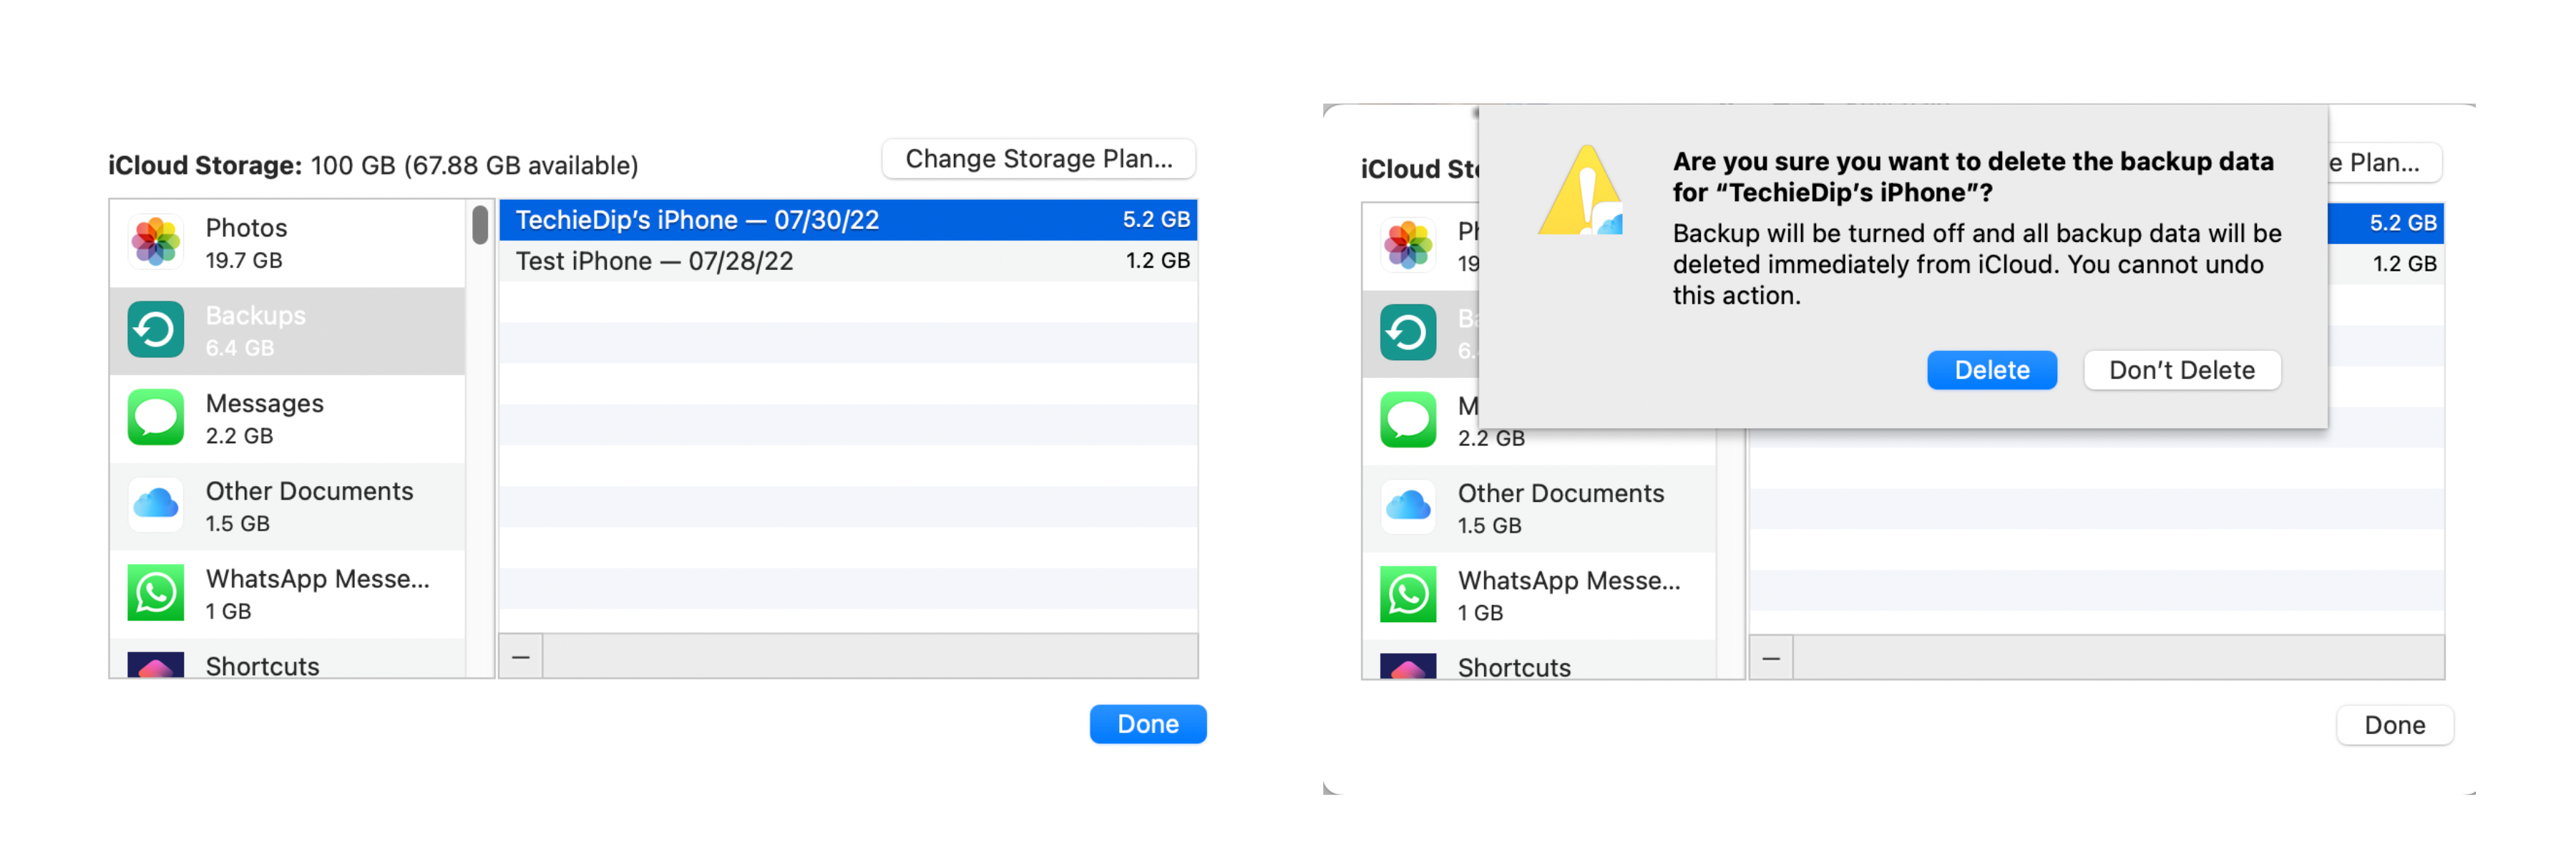
- Click on the Apple menu >> System Preferences >> Apple ID >> iCloud.
- Click Manage, then click Backups on the left. On the right, you see devices with iCloud Backup turned on.
- To delete a backup, select a device and the “-” button.
- Click Delete.
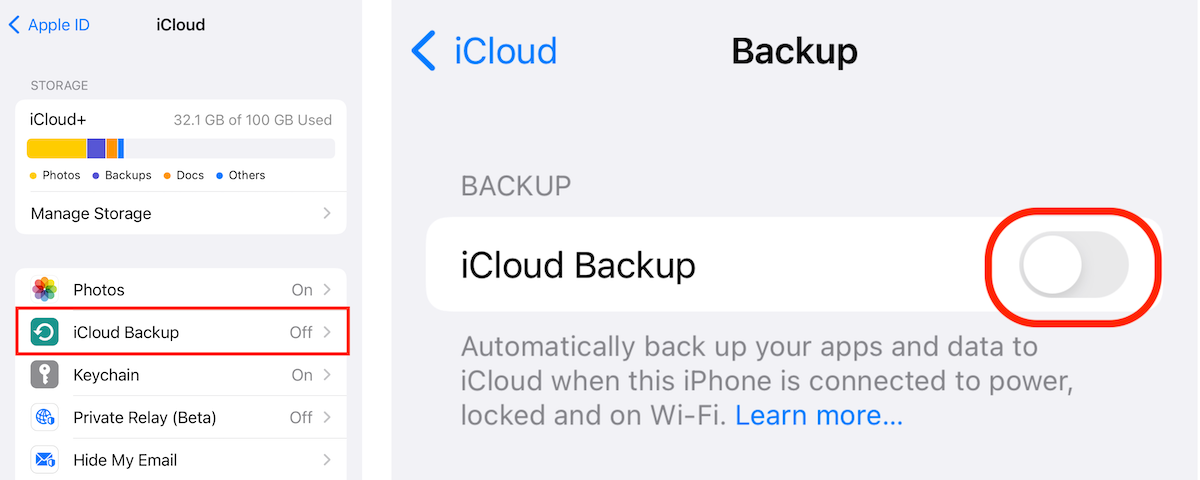
Once deleted, you can create a fresh backup of your iPhone or iPad by going to Settings >> [Your Name] >> iCloud >> iCloud Backup on your respective device and tapping Back Up Now.
Alternatively, you can save more iCloud storage by manually maintaining your device backups offline. To do this:
- Plug in your iPhone or iPad to your Mac or Windows computer.
- Open Finder on Mac or iTunes on Windows, and select your device.
- Choose Back up all the data on your [device] to this Mac/computer.
- Check Encrypt local backup option if you want a secured backup.
- Click Back Up Now and wait for the process to complete.
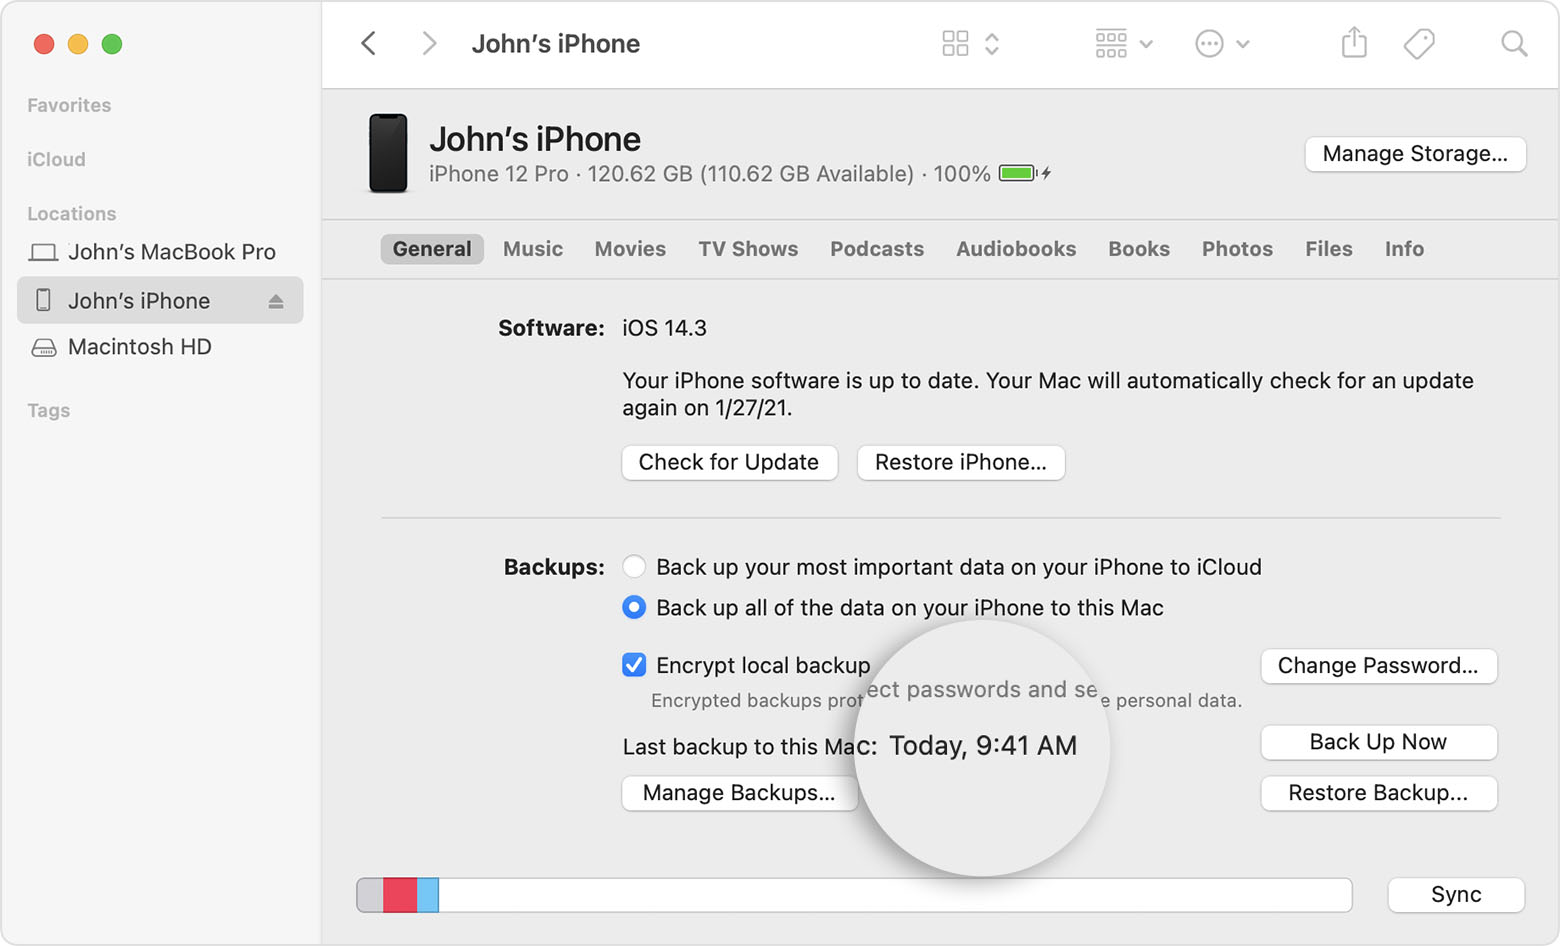
Once done, you can unplug the iPhone or iPad. To ensure automatic iCloud backups are turned off, go to Settings >> [Your Name] >> iCloud >> iCloud Backup and Turn Off iCloud Backup.
Review & Delete iMessage Attachments
Even if you aren’t an active user of iCloud services and only have the basic free iCloud plan, you might want to keep an eye on the iCloud storage occupied by the Messages app.
If you have contacts on iMessage you frequently chat with, the photos, videos, and documents shared in the chats also count against your iCloud Storage.
Thus, you can recover some iCloud storage by deleting particularly large attachments.
- Open Messages on iPhone, iPad, or Mac.
- Tap on the conversation where you have large attachments like photos, videos, or documents.
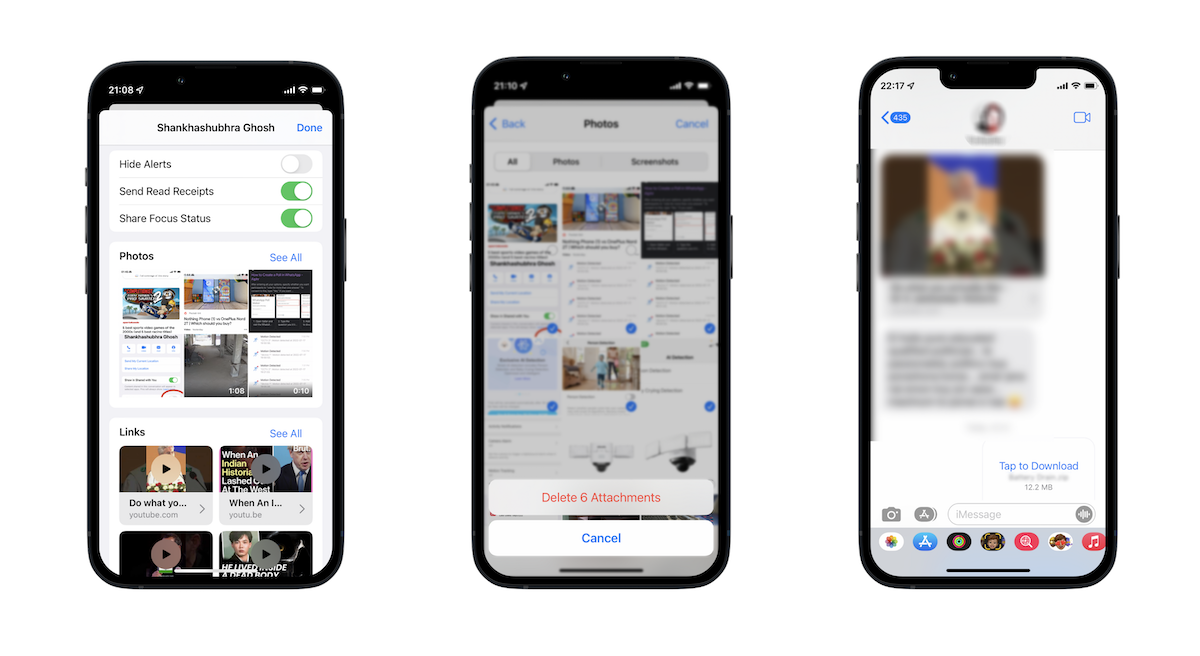
- On iPhone or iPad, tap the contact picture from the top. On Mac, tap the “i” icon from the top-right corner. The attachments shared in the chat will be listed in categories, e.g., Photos, Documents, Links, etc.
- Tap or click See All or Show More on a particular category with large files.
- Select the items you want to delete. On iPhone and iPad, tap Select, and then tap the items you want to delete. On Mac, use Cmd or Shift to select multiple items together.
- On iPhone and iPad, tap Delete from the bottom-right corner, and choose Delete again to confirm.
On Mac, right-click on the item(s), choose Delete, and then click Delete again to confirm.
Repeat these steps for all the iMessage conversations in which attachments are frequently shared. Once you have deleted large attachments from your chats, you should see an equivalent amount of space freed up in your iCloud storage.
Review & Delete iCloud Documents
iCloud Drive is the equivalent of Google Drive for the Apple ecosystem. You can upload and store useful documents in the cloud and have them safely backed up on Apple servers. iCloud Drive shares storage space with other iCloud data (such as Photos, Backups, Messages, etc.), all collectively contributing to your storage quota.
To ensure you’re not using up iCloud storage unintentionally, you can review and delete data on iCloud Drive from your iPhone, iPad, Mac, or Windows computer or iCloud.com on the web. For more details, refer to the support article.
Note: If you have a Mac, you may also want to stop iCloud from automatically syncing your Documents and Desktop folders on the Mac. To do so, open System Preferences or Settings on your Mac, click on Apple ID from the top-right corner, click on Options… next to iCloud Drive, uncheck Desktop & Documents Folders, and click Done.
Delete other app data
Sometimes, first-party & third-party apps like Notes, Mail, WhatsApp, etc., might also store data and backups on iCloud, occupying significant space. You may be surprised to note that some apps that you might have stopped using and uninstalled from your device a while back still occupy storage space on iCloud. You can delete these to free up some of your iCloud storage.
To delete app data from iCloud, do the following:
On iPhone or iPad:
- Open the Settings app.
- Tap on your Name Card on top of the Settings screen.
- Tap iCloud.
- Tap Manage Storage.
- Choose the app for which you want to remove data from iCloud.
- Tap Delete Data… and then Delete again to confirm.
If you’ve successfully deleted unimportant data from iCloud and made enough room to retain your essential data, congratulations!
Upgrade iCloud Storage Plan (iCloud+)
But, if after deleting data, there’s still not enough space on your iCloud, perhaps it’s time to upgrade your iCloud storage to a paid iCloud+ plan. Before choosing a subscription, review your iCloud data and ensure your chosen plan is sufficient to hold all the data you want to store on iCloud, including Photos, Backups, Documents, Messages, attachments, Mail, and more.
If you use multiple Apple products, iCloud+ enables certain perks on your Apple ID account, such as iCloud Private Relay, Hide My Email, and more.
Once you’re ready, you can upgrade to iCloud+ from any Apple device signed in with your Apple ID. For detailed instructions, check the support article.
Bought more iCloud Storage but still getting not enough storage pop up
If you bought a sufficient iCloud+ plan but are still seeing the pop-up, there might be an issue with your upgrade.
Check whether the upgraded iCloud storage plan is added to your Apple ID.
On iPhone and iPad:
- Open the Settings app.
- Tap on your Name Card on top of the Settings screen.
- Tap iCloud.
- Under the Storage section, verify whether your upgraded plan is reflected.
On Mac:
- Open the Settings or System Preferences app, depending on your installed macOS version.
- Tap Apple ID from the top-right corner.
- Verify your iCloud Storage from the bottom, and verify whether your upgraded plan is reflecting
On the Web:
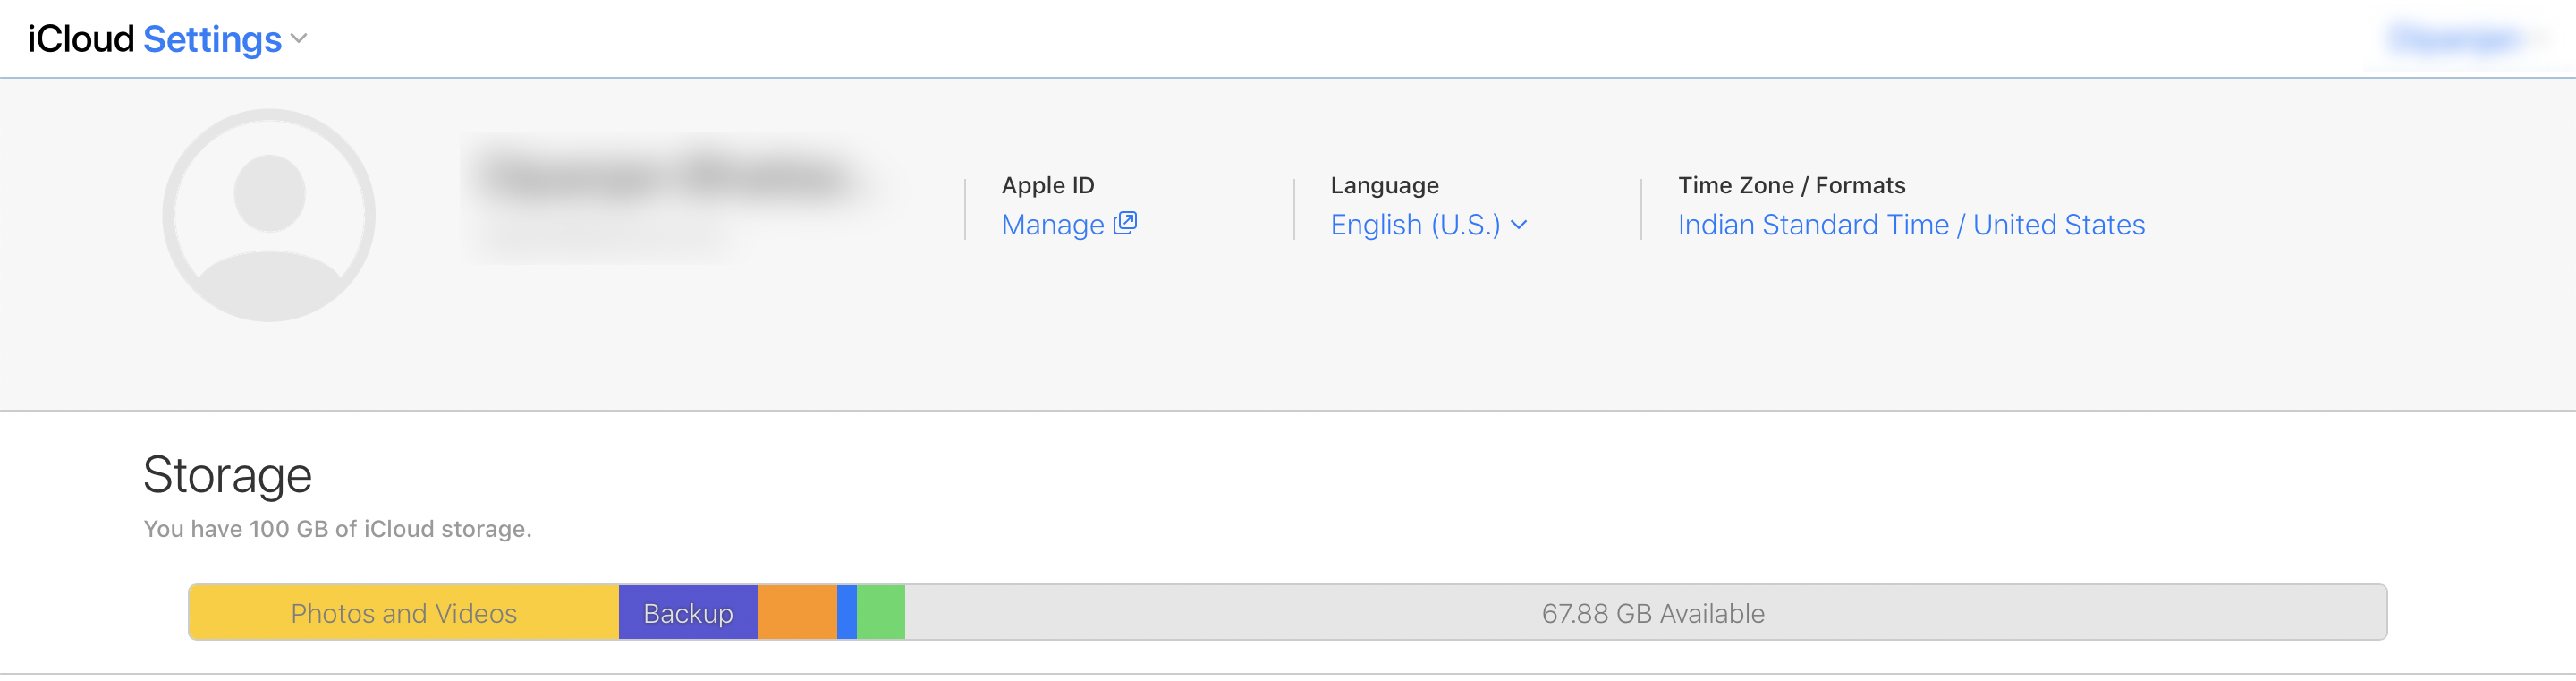
- Launch your favorite web browser (Safari or Chrome recommended) and navigate to the Account Settings on iCloud.com.
- Authenticate yourself on the website with the 2FA prompt or Face ID/Touch ID.
- Once authenticated, verify whether your upgraded plan reflects under the Storage section.
If your upgraded storage plan is reflecting, but you still get the insufficient storage pop-up, you might have to go back and manage your storage, as per the instructions in the previous section of this article.
However, if your new plan isn’t reflected, you might want to contact Apple Support for your issue resolution. There may be two possibilities here:
- There was an issue with the iCloud+ purchase, or
- There is an intermittent issue on Apple’s end
In either case, try to find the invoice for your purchase in your Apple ID email inbox. If the purchase was successful, you should have an invoice, which you can present to the Apple Support executive in case they need to verify.
If you don’t find the invoice, your purchase might not have been successful. In such cases, any money deducted from your account should usually be refunded within 5-7 business days. Speak to the support executive to understand your situation and clarify the steps for issue resolution (if necessary).