Apple doesn’t allow users to record system audio natively on macOS. So, if you try to screen record using built-in tools like QuickTime, you’ll get visuals, and maybe your microphone, but not the actual internal audio from your Mac.
To solve this, you need a third-party virtual audio driver that can route your Mac’s internal sound to a virtual input device. This allows screen recording apps like QuickTime or OBS Studio to capture system audio.
In this guide, we’ll show you how to record internal audio on Mac while screen recording, without using outdated tools like Soundflower. Instead, we’ll use modern solutions like BlackHole to get crisp, synced internal audio alongside your screen recordings.
🛠 Use BlackHole to Record Internal Audio on Mac
BlackHole is a free, open-source virtual audio driver that lets you route internal audio for recording. It works perfectly on modern versions of macOS (including Sonoma and Ventura).

Step 1: Install BlackHole
- Visit BlackHole by Existential Audio.
- Choose the 2-channel version.
- Follow installation instructions (you may need to allow extensions in System Settings > Privacy & Security).
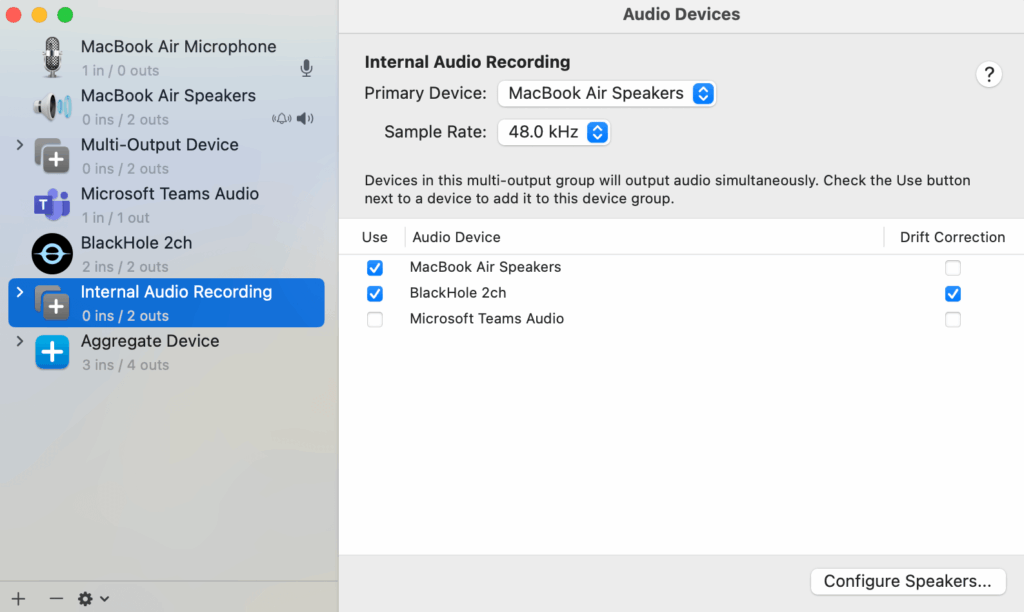
Step 2: Create a Multi-Output Device
- Open Audio MIDI Setup (Applications > Utilities).
- Click the + > Create Multi-Output Device.
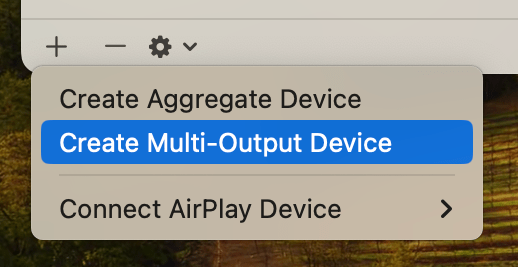
- Select both:
- Your usual audio output (e.g., MacBook Speakers)
- BlackHole 2ch
- Rename it to “Internal Audio Recording”.
Step 3: Set the Multi-Output as Default
Go to System Settings > Sound > Output, and select “Internal Audio Recording” as the output device.
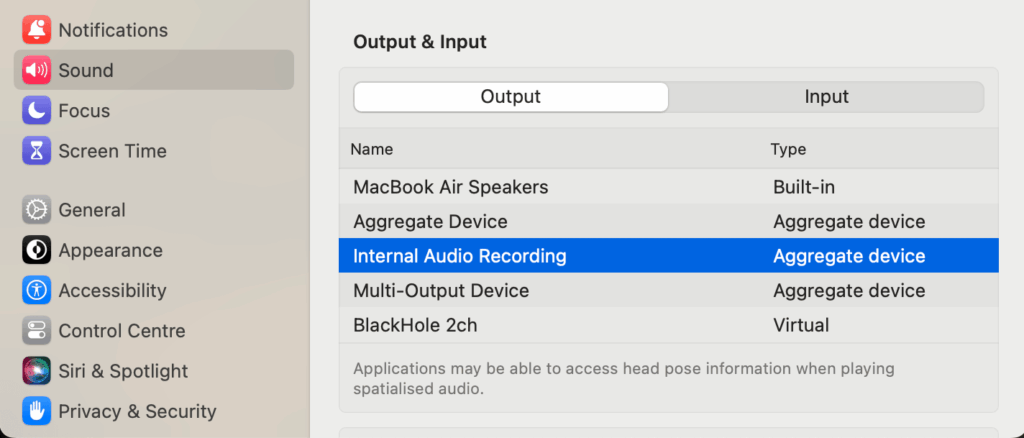
This sends your system sound through both your speakers and BlackHole for capture.
🎥 Step 4: Record Internal Audio while Screen Recording
You can now use QuickTime or OBS Studio to record your screen with internal audio.
Option A: QuickTime Player (Simple)

- Open QuickTime Player > File > New Screen Recording.
- Click the dropdown next to the record button.
- Select BlackHole 2ch as the microphone.
- Start recording—your internal audio will be captured!
Option B: OBS Studio
- Install OBS Studio for free.
- Add a Display Capture (for screen).
- Add an Audio Input Capture, select BlackHole 2ch.
- Start Recording.
✅ Now you’re capturing both screen and internal audio—no Soundflower required!
For a more polished experience, you may explore paid tools like Loopback and Audio Hijack as alternatives for recording internal audio on Mac. Loopback lets you visually route audio from specific apps, while Audio Hijack makes it easy to capture system or app sound. Both integrate well with screen recording tools like OBS or QuickTime and are ideal if you want more control without the hassle of manual setup.
Recording internal audio on Mac is easy with BlackHole. Whether you’re capturing YouTube audio for tutorials, recording app sounds for demos, saving Zoom calls (with consent), or making screencasts with synced video and audio, this method gets the job done. For more advanced control, consider Loopback or Audio Hijack.