Here’s what you can do if your Cloudflare Worker requests suddenly exceed usage expectations.
If you’re a Cloudflare Workers user, you may be familiar with a particular issue where your Workers’ requests have suddenly increased overnight, even though the analytics suggest no significant change in user traffic. This could be an indication of a bot-related attack.

Workers are free to use within a certain usage limit (usually 100,000 bundled requests for Workers and Pages Functions per day), after which they are chargeable as per Cloudflare’s pricing plans. So this type of unusual bot activity could incur unexpectedly high costs for the webmaster.
In this article, we’ll explore how to identify and stop such attacks before causing a significant debt on your Cloudflare account.
Note:By default, Cloudflare sends email alerts when your Workers’ requests are about to breach (usually at 75% and 90% usage) your plan’s allowed limit. Ensure you keep an eye on your Inbox for these alerts so that you can take prompt action during such events.
Step 1: Identify the specific Worker with the unusually high volume of requests
To begin with, you need to find which of the Workers you have configured is using up an unusually high volume of Worker requests. You can do that by following the below steps:
- Login to your Cloudflare Dashboard.
- Click on Workers & Pages from the left menu.
Here you can see all your Workers and their subsequent volume of requests consumed in the last 24 hours. By looking at this value, you should easily be able to identify the problematic Worker.
Now we need to analyze the Worker’s requests to determine the root cause of the high volume of requests.
Step 2: Log Worker requests to analyze and identify anomalies
Tip:Before proceeding further, ensure you have a custom subdomain configured and actively use it for all your Worker requests.
You can temporarily log your Worker requests to analyze them further. To do this, follow the steps below:
- Go to the Workers & Pages section of your Cloudflare Dashboard.
- Click on the problematic Worker you have identified in the previous tab.
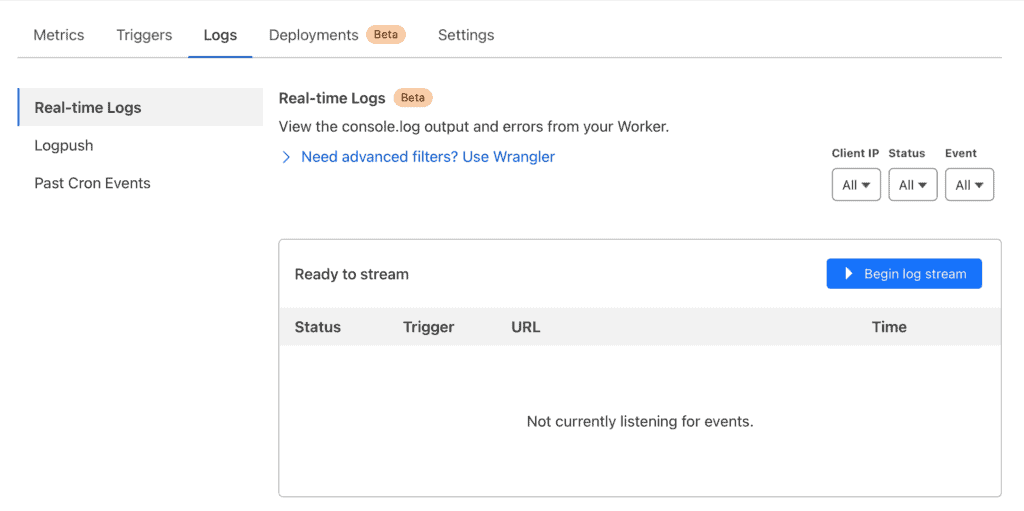
- Click on the Logs tab.
- Click on Begin log stream and wait for the logs to show live worker requests.
- When enough requests have populated, click the Pause log stream button.
You can scroll this log to see which URLs or resources engage your Worker.
Step 3: Identify the IP address(es) sending unusually high traffic your way
Next, you need to determine which IP addresses the requests are coming from. For this, do the following:
- Go to your Cloudflare Dashboard and select Websites from the left side.
- Select the domain corresponding to the custom subdomain configured for your Worker.
- Now, click on Security >> WAF.
- Click on Create rule. Here, you can write custom rules to flag your requests.
- In the “If incoming requests match…” section, set “Field” as Hostname, “Operator” as contains, and provide your custom domain/subdomain name (where your Worker is configured) in the “Value” column.
- In the “Then take action…” section, choose action as Managed Challenge.
- Click Save as Draft, and then Deploy.
This will now throw a Captcha to each of your Worker requests. And each time your rule is executed, it’ll be logged under the Events tab.
Note:You may also choose to Block instead of throwing a Managed Challenge (Captcha), but doing so might cause real visitors to be blocked from visiting your site. Using a Managed Challenge ensures visitors can access your website after solving a captcha.
Now, go to Security >> Events in the dashboard under your specific domain, and scroll down to the Activity log section. Here, you can filter all incoming requests flagged by “Managed Challenge” and note the IP address(es) and the Country from which the traffic spikes are coming. For bot-related attacks, these requests usually come from a single IP address or a specific set of IP addresses.
Step 4: Block traffic from the specific IP address(es)
Now that you’ve identified the rouge IP address(es) sending unwanted traffic to your website, it’s time to block/screen them through WAF filters. To do that, perform the following:
- Go to your Cloudflare Dashboard and select Websites from the left side.
- Select the domain corresponding to the custom subdomain configured for your Worker.
- Now, click on Security >> WAF.
- Click on Create rule.
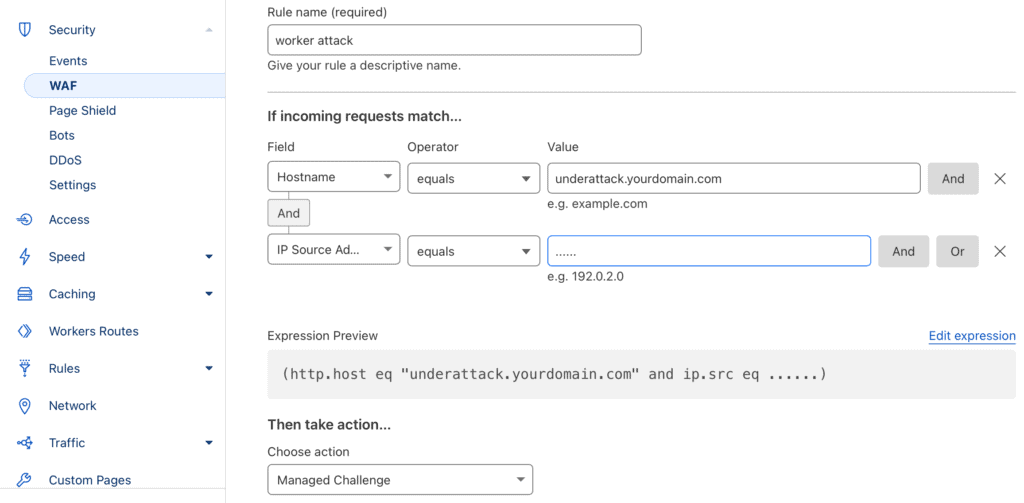
- In the “If incoming requests match…” section, set “Field” as Hostname, “Operator” as contains, and provide your custom domain name (where your Worker is configured) in the “Value” column.
- Click the And button to combine with another rule.
- For the second rule, set “Field” as Source IP Address, “Operator” as equals, and “Value” as the IP address(es) identified in the previous step (section).
- In the “Then take action…” section, choose action as Managed Challenge. You may alternatively choose the Block action if you know it won’t hamper your website’s or its visitors’ experience.
- Finally, click Save as Draft, and then Deploy.
If all goes well, you should be able to prevent any unwanted traffic from now on. These requests will be caught in your custom rule, blocking them from engaging your Worker unnecessarily.
So, now you know how to identify and stop unwanted spikes in your Cloudflare Workers’ usage.