Users generally like to personalize their smartphones with custom ringtones and text tones. But, on the iPhone, you can only change your ringtone or text tone to one of the predefined ones, by default.
What a lot of users may not know is you can in fact use custom text tones (and ringtones) on your iPhone, even though the option is not straightforward or intuitive.
In this article, we’ll explore how to add and use custom alert tones on the iPhone.
How to add a custom text tone on iPhone [No iTunes required]
The process to create and use a custom text tone on iPhone is quite similar to adding custom ringtones, with a minor modification to the steps. As usual, you’d need Apple’s GarageBand app for this, which is available for free on the App Store.
To make things easier, we’re also going to use a third-party free app called Ringtones Maker that has a more intuitive UI for casual users, rather than GarageBand’s more complex UI which is made for music pros.
Step 1: Make a custom text tone (without iTunes or Computer)
- Download and install Ringtones Maker and GarageBand on your iPhone.
- Copy or import the audio file which contains the text tone you want to add, to the Files app.
- Open the Ringtones Maker app.
- Tap on the “+” icon from the bottom of the screen.
- Select the source from which you want to create your text tone. For the Files app, tap More >> Import from File.
- Browse and select the audio file and then tap Done. Wait for it to be imported into Ringtone Maker.
- Tap on the little Arrow (>) on the right side of the imported file to reveal associated options.
- Select Clip. You’ll be able to edit your tone here.
- Scrub the Start and End points or use the controls to trim your text tone. You can also add Fade In and Fade Out effects.
- Tap Done from the top-right corner once you’re satisfied with your edit. A second M4R file will be now available in the app.
- Tap on the Arrow (>) next to the second file, and tap on Make. This brings up the Share menu.
- Select GarageBand in the Share menu. You’ll be redirected to the GarageBand app, and the text tone you just created, will be available as one of the projects.
- Tap and hold the most recent project by the name of the audio file you had imported earlier into the Ringtones Maker app, and select Share.
- Choose Ringtone.
- Change the name of the ringtone if required, and tap on Export from the top-right corner.
- After the export is completed, you’ll get a pop-up as Ringtone Export Successful. Here, tap on “Use sound as…”.
- Select Standard Text Tone.
Steps #16 and #17 are the most critical steps in this process. If you miss these steps, your custom audio snippet will only be available as a ringtone, but not a text tone.
Step 2: Use your custom audio clip as text tone on iPhone
Your custom clip should now be available as one of the Text Tones in the Sound Settings on your iPhone. So, to use it as a text tone, simply do the following:
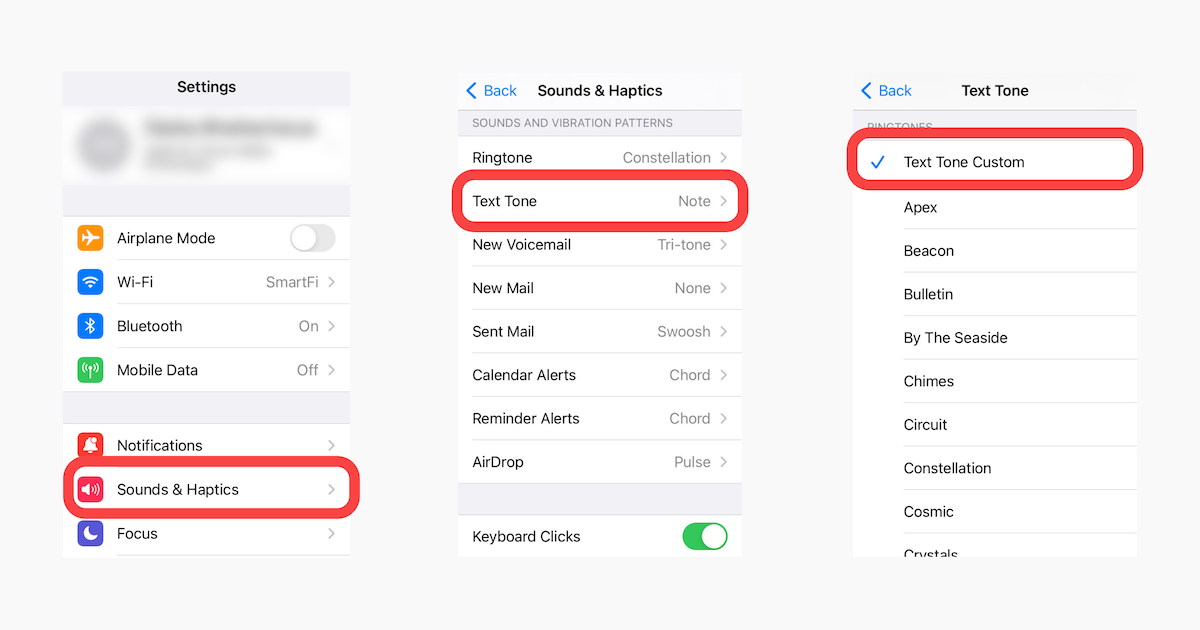
- Open the Settings app on your iPhone.
- Scroll down and tap Sounds & Haptics.
- Under the “Sounds and Vibration Patterns” section, tap on Text Tone.
- Scroll down to the “Ringtones” section and select your custom text tone.
The selected Text Tone alert will be applied to all incoming text messages and iMessages on your iPhone. If you want to select your custom text tone only for specific contacts instead, the next section will guide you to do the same.
Add custom text tone to a specific contact on iPhone
This section assumes you have already added a custom text tone to your iPhone that you can assign to a contact. If you just came into the article, we suggest you read the above section first to know how to create and add a custom text tone, and then come back here.
To assign your custom text tone only to specific contacts, follow the steps below.
- Open the Phone app on your iPhone.
- Go to the Contacts screen.
- Scroll or search for the Contact for which you want to add a custom text tone, and tap on the Contact to open their details.
- Tap on Edit from the top-right corner.
- Scroll down and tap on Text Tone.
- Scroll down to the “Ringtones” section and select your custom text tone.
- Finally, tap on Done from the top-right corner twice to confirm the change.
From now on, any texts from the particular contact will trigger the custom tone you’ve selected. To assign custom text tones to more contacts, follow the same above steps for those contacts.
So, that’s how you use a custom text tone for all or specific contacts on your iPhone.