If you have ever tried to record the screencast of your iPhone or iPad (perhaps for creating video demonstrations and tutorials), you might already be aware that there aren’t any global screen recording apps available on the App Store. If you want to install screen recording apps, it would usually require you to jailbreak your iOS device. But if you don’t want to jailbreak it, here are some screen recording solutions for you.
Record iOS screencast without jailbreak
There are primarily two ways to record an iOS screen. One way is to record using a computer. The other way is to record using apps from the iOS device itself.
Record iPhone, iPad screen with QuickTime
If you have a Mac running OS X Yosemite (10.10 +) and an iPhone or iPad with iOS 8 (or above), it’s quite easy to record on-screen activities of the iOS device with QuickTime Player.
- Connect your iOS device to your Mac using the Lightning connecter.
- Launch QuickTime Player on Mac and go to File >> New Movie Recording.
- In the new Movie Recording window, click on the downward arrow next to the Record button and select your iOS device from the Camera and Microphone sections. This will set up QuickTime Player to record audio and video from your iPhone or iPad. Optionally, you may also set the recording quality.
Note: At this stage, you should be able to preview the iOS device screen on QuickTime (without audio). This is good for providing live demonstrations, but it’s still not recording anything. - Click on the Record button to start recording. Now, you can perform the required actions (that you need to record) on your iPhone or iPad.
- When done, click on the Stop button (the same Record button) to stop recording.
- You can now export the recorded video by going to File >> Export and provide a suitable name and location to save it.
But this feature is not supported on older versions of Mac OS X and iOS. If you don’t use a Mac or don’t have the latest version of OS installed on your devices, check out the next section for third party desktop-based solutions.
Record iOS screencast using screen recording software
If you are a Windows user or do not have iOS 8 / OS X Yosemite installed on your devices, you can try some of the third party clients like Reflector, AirServer or X-Mirage, which allow you to screencast and record on-screen actions of connected iOS devices using Apple’s AirPlay feature. All these programs have desktop clients for both Mac and PC. Such programs are usually not available for free, but if you’re looking for a high-quality screen recording experience on your older Mac or Windows PC, these are just the ones you need.
Get AirServer, Reflector or X-Mirage.
Record iOS screen without computer – Screen recorder app
Any screen recorder for iPad and iPhone available on the App Store, will only allow you to record screen within the app. On the contrary, global iOS screen recorder apps are available on Cydia, for which you would usually require to jailbreak your device first.
But a few third party services allow you to install specific iOS apps that are not available on the App Store, without jailbreaking your device. Not all these services are reliable and apps downloaded from such services might stop working abruptly, as Apple keeps making frequent changes in order to prevent such side-loading activities.
Emu4iOS is a free service that allows users to install non-App Store apps on non-jailbroken iOS devices. However, Build Store is a bit more reliable compared to Emu4iOS and other similar services. The service charges you a yearly subscription fee of $9.99 per device. In return, they frequently update their repository to keep their apps active.
- Go to the Build Store website and sign up for a new account. You need to pay $9.99 for a yearly subscription.
- On your registered iOS device, open Safari and navigate to the iRec application page.
- Tap on the Install button. iOS will prompt for a confirmation to allow the installation. Just click on the OK button.
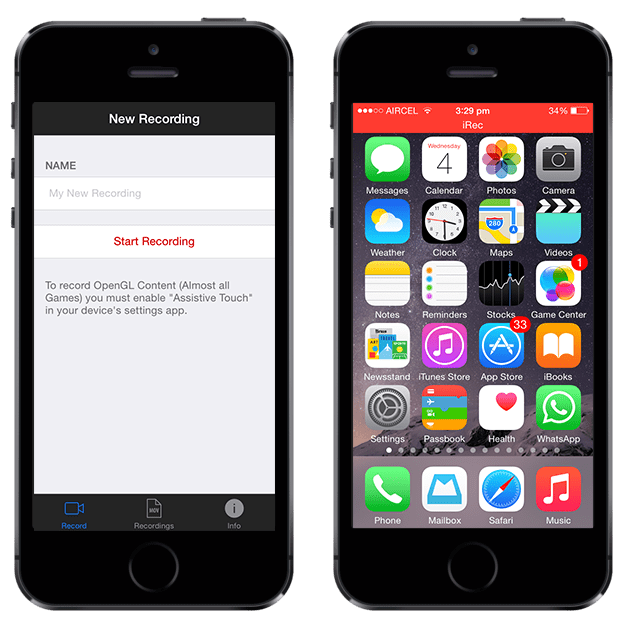
- Once iRec is installed, open the app and provide a suitable name for the recording.
- When ready, tap on Start Recording. The app will minimize at the top and allow you to record screen activities.
- When done recording, tap on the minimized banner on top of the screen and tap on Stop Recording. The recorded video shall now be available under Recordings tab.
Optionally, you can also export the video to Camera Roll location.
The recorded video might show a bit of lag and drop considerable number of frames. For more stable and reliable screen recording solutions, it is recommended to use a suitable desktop client.
You might also like:
>>Install jailbroken apps on iOS without jailbreak
If you found this article to be helpful, get in touch with us on Facebook. Tell us what tech-related problems have you faced that you couldn’t find a solution to. Who knows, we might be able to help you!