BlueStacks App Player has done a great job in porting Android Apps to Windows and Mac platforms. It has become quite popular in a short span of time. Users have put in a lot of queries to enable better support for the App Player. BlueStacks, still being a beta program lacks some important features (like extending the memory size, etc.) and many users have faced problems with these limitations. This article will help you to solve BlueStacks Storage (SD Card, accessing files, RAM) related problems.
BlueStacks insufficient memory Problem
We also found out about “insufficient memory (installation error: INSTALL_FAILED_INSUFFICIENT_STORAGE)” problems being faced by a lot of users. BlueStacks originally comes with about 2 Gigabytes of Internal Storage and about 2 Gigabytes of SD Card Storage. Some of the Android apps, especially HD games like Real Racing 3 consume about 1.5 Gigabytes or more. Point is, we want more memory inside BlueStacks.
Here, we are going to find out where BlueStacks stores the SD Card in computer and then we’ll replace this default SD Card with another one having custom size to increase storage space inside BlueStacks.
Increase BlueStacks internal/SD card/RAM storage
Plan of Action
Before moving any further, let’s explore the steps in short
- Locate the BlueStacks SD Card in computer.
- Create an empty drive image to act as a virtual SD Card.
- Mount the image as a hard drive and format it.
- Unmount and link the new SD Card with BlueStacks.
Bluestacks SD Card location on Windows
The SD Card of BlueStacks App Player is actually a file that resides on your computer. BlueStacks stores all SD Card data in that file. It’s like a virtual storage drive used by BlueStacks. This file can be found in the BlueStacks Program Data folder of your System Drive (C:\Program Data\BlueStacks\Android if Windows is installed in C Drive). The Program Data folder is hidden by default, so you might have to enable “Show Hidden Files” to access the folder.
After you enable display of hidden files, you should be able to see a Program Data folder in the root of your System (Windows installation) drive. Go to Program Data >> BlueStacks >> Android. Here, you can see a file named “SDCard.sparsefs” (although it looks like a folder). We will create a new SD Card here and link it with BlueStacks.
Creating the SD Card
You can use any image creator that is capable of creating an empty drive image. We have used DATA.IMG Maker for this purpose.
- Download and extract DATA.IMG Maker. (WinRAR required)
- Open Resize SD.bat. The application window titled TopoResize will be launched.
- Select create new and browse to your preferred location for saving the new SD Card image.
- Give a name to your SD Card file with the .fs extension (for example SDCard.fs) and click on Save.
- The slider sets the amount of space (in megabytes) you want to allocate for the new image. The maximum allowable value will vary depending on the amount of free disk space on the destination drive.
- Click on Create File. The program will ask you to select a file system. Select none.
- Click Ok and exit the application. Your unformatted SD Card image will be created in your chosen location.
Formatting the SD Card
The image file that you created is unformatted. We can mount the image as a virtual hard drive and format it manually. To mount the image, we have used an application called OSFMount.
- Download and install OSFMount.
- Launch the application.
- Click on Mount New button.
- Select source as Image file.
- Browse and select the newly created image.
- Assign a suitable drive letter to mount the image and set the drive type as Auto.
- Untick Read only drive option.
- Click on OK to mount the drive.
After the image mount is successful, you will notice a new empty hard disk drive with the same drive letter that you used for mounting the image. This is actually the mounted virtual drive.
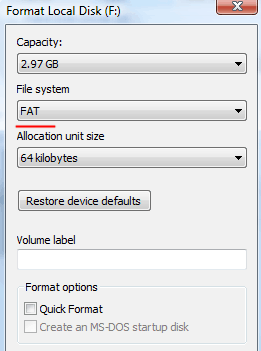
To format the drive just right click on the drive in My Computer and select Format. Select FAT as the file system and click on start.
After the format operation is complete, you should unmount the virtual drive from OSFMount.
Adding new SD Card to BlueStacks
Before you proceed further, first make sure that BlueStacks is not already running. Also, exit all background BlueStacks processes.
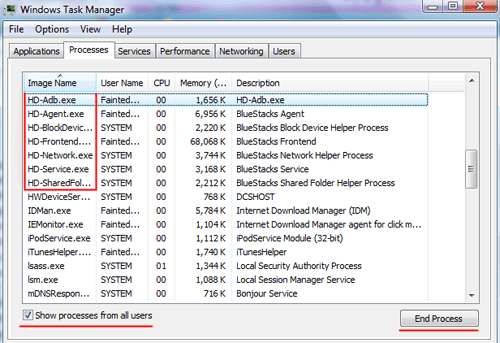
Open Task Manager >> Processes tab.
Check on Show Processes from all users option. This step is not required for Windows 8 users.
Locate and kill all processes beginning with “HD-“. To kill a process, right click on it and select “End Process”.
Now, we need to set our virtual drive image as a BlueStacks SD Card. For this, a small tweak in the registry is required.
Open the Registry Editor: Go to Start >> Run and type “regedit”. For Windows 8, just type “regedit” in the Start Screen and click on the result.
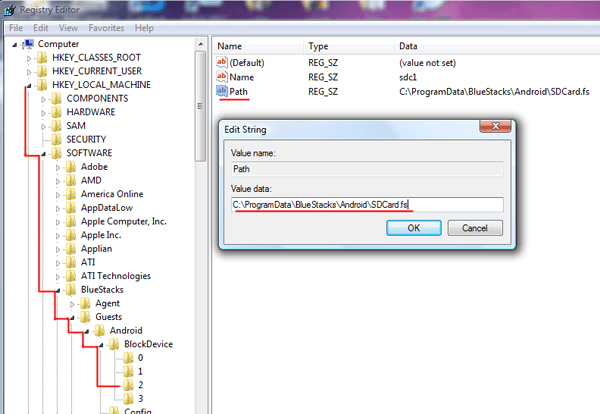
Go to HKEY_LOCAL_MACHINE\SOFTWARE\BlueStacks\Guests\Android\BlockDevice\2.
Double click on the Path String and modify its value to the full path of the image file.
For example, if your image file resides within BlueStacks Program Data folder, set the value of the Path String as C:\Program Data\BlueStacks\SDCard.fs.
Now you’re all set to launch the BlueStacks App Player. It will take some time to launch for the first time. Don’t worry, BlueStacks is initializing the newly found SD Card.
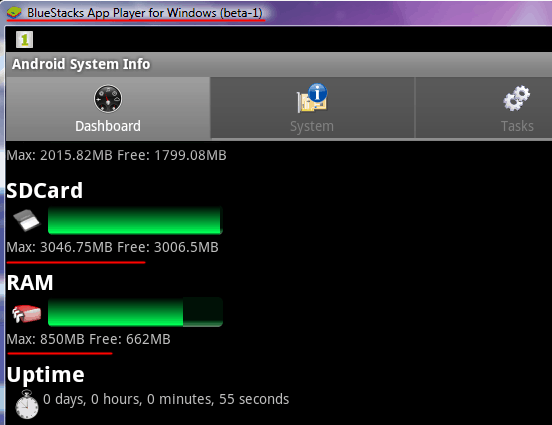
When the app finally launches, it will use the size of its new SD Card. To verify the new size, install an app that displays Android System Information. We have used Android System Info. The app should display the SD Card size equivalent to the size of the new image file we created.
Now, if you want to free up internal storage space in BlueStacks, install App2SD in BlueStacks and move all your apps to the SD Card.
Access BlueStacks SD card on Windows
You can now transfer files to BlueStacks SD Card from your computer and access these files inside BlueStacks. To do this, mount the SD Card image as a drive using OSFMount and transfer files to the mounted drive. After all file transfers are complete, make sure you dismount the image before running BlueStacks, otherwise the App Player might refuse to start.
Access Windows files from BlueStacks
How to increase BlueStacks RAM
Having increased the SD Card storage space, you may also want to increase RAM for Bluestacks. If your system has sufficient amount of RAM, you may allocate greater amount of RAM for the App Player. This can again be done with a simple modification in the registry.
- Close BlueStacks and all its background processes.
- Go to HKEY_LOCAL_MACHINE\SOFTWARE\BlueStacks\Guests\Android and double click on the Memory String.
- Choose the decimal mode and enter the value you want to allocate (in megabytes) for RAM.
- Close the Registry Editor and relaunch BlueStacks.
Use Smart System Info to check whether the updated RAM value works or not. If not, restarting Windows might solve the problem. We set the Memory value to 1024 (1 GB) and we were able to increase BlueStacks RAM to 850 MB.
And that’s all! Have a better experience with your Android apps on computer.