Sometimes, you might want to schedule messages on WhatsApp, either to greet someone on a special occasion (e.g., midnight on a friend’s birthday), or to automatically respond to incoming messages while you’re away (away messages).
Although it’d be great to have a message scheduling feature available on WhatsApp, it’s something that’s not yet natively supported. But that doesn’t mean you can schedule messages.
With third-party app support, it’s possible to schedule WhatsApp messages on both iOS and Android devices. In this post, we’ll explore some of the workarounds to schedule WhatsApp messages.
How to Schedule WhatsApp Messages
Here, we’ll navigate the steps to schedule WhatsApp messages on both iOS (iPhone) and Android platforms.
Send messages later on WhatsApp using Siri Shortcuts (iPhone)
Due to Apple’s App Store policy restrictions, third-party apps on iOS can’t control screen actions automatically. But if you know what to do, you can automate your iPhone to send a WhatsApp message to a specific contact on a predefined date and time.
The following steps will guide you to schedule WhatsApp messages on iPhone using the Shortcuts app.
- Install the Shortcuts app on your iPhone from the App Store, if not already done.
- Open the Shortcuts app, navigate to the Automation tab.
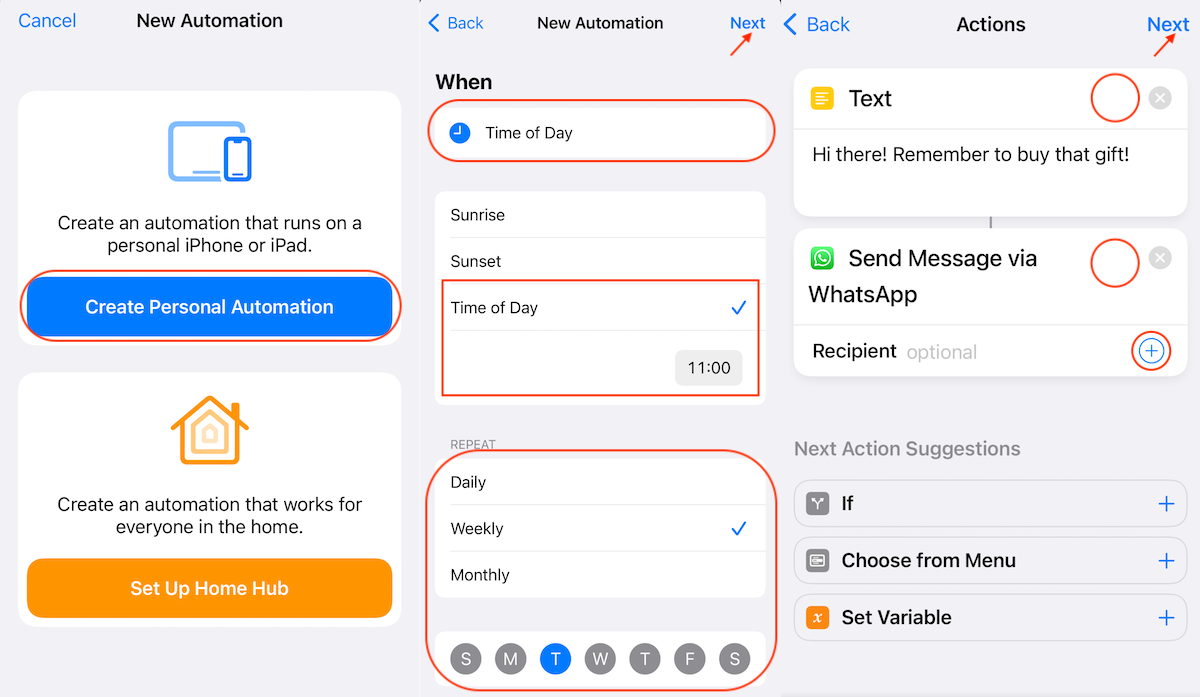
- Tap on the “+” icon in the top-right corner, and tap Create Personal Automation.
- Select Time of Day.
- Choose When you want to schedule the message, using the Time of Day and Repeat options. You can schedule the message to run Daily, Weekly, or Monthly, at a specific time of the day.
Note: You can currently schedule messages up to one month in advance using the automation. - Tap Next from the top-right corner.
- In the Actions screen, tap Add Action.
- Search for “Text”, and select the same action from the search results.
- In the Text action, add the content of the message that you want to schedule, and tap Done above the keyboard.
- Next, search “WhatsApp” in the search bar at the bottom, and tap the action labeled “Send Message via WhatsApp”.
- Tap the “+” button adjacent to the Recipient field. This will bring up your Contacts. Choose the contact and their corresponding WhatsApp registered phone number.
- Tap Next from the top-right corner. Here, you can preview the newly created automation.
- Tap Done from the top-right corner to finally save the Automation.
Your Automation is now ready to run. At the scheduled date and time, you’ll get a notification from Shortcuts prompting you to run the Automation. When you tap Run, it will open up the WhatsApp chat for your desired contact, with the desired message already typed and ready to be sent. Just tap the Send button to send the message to the recipient.
Note: Unfortunately, there is no known way to fully automate the process of sending the scheduled message to the intended recipient on iOS without any human intervention. What this essentially does is, iOS sends a reminder for sending the scheduled message, and then you can send it with a single tap, without having to type the message.
Send messages later on Whatsapp using third-party apps (Android)
On Android, we’ll use an app called SKEDit WhatsApp Automator, which is a third-party app available on the Play Store, similar to Shortcuts on iOS. Using SKEDit, you can set up a schedule to send custom WhatsApp messages to particular recipients, at a specific time and date.
The below steps will guide you to schedule WhatsApp messages on Android using SKEDit.
- Install the SKEDit app from the Play Store on your Android device.
- Open the app, and follow the on-screen instructions to allow Accessibility permissions for SKEDit. If you’re prompted to sign up or sign in, you may skip the process.
- Tap on the “+” button from the bottom-right corner. Select WhatsApp.
- From the available options, tap Add WhatsApp Recipient(s).
- Choose the WhatsApp Chat for which you want to schedule a message. You can choose multiple recipients one by one in the free version of the app.
- In the Message field, type the content of the message that you want to schedule.
- In the Schedule field, choose the date and time at which you want the message to be sent.
- Tap the tick (✓) from the top-right corner to save the schedule.
As per the schedule, on the desired date and time, SKEDit will trigger a notification. You can tap on Send Message from the notification, and the app will automate the process of opening WhatsApp, searching for the desired contact, and sending the desired message.
Note: In this method, you need to interact with the notification from SKEDit to trigger sending the scheduled message on WhatsApp. If you turn on the “Ask me before sending” toggle in the schedule settings, it’s possible to trigger and automate the entire process without manual intervention. But this is not recommended, as it requires you to remove your device passcode or pattern lock for the schedule to be triggered automatically.
The basic, free version of SKEDit allows you to schedule messages in the future by manually adding recipients. If you want advanced features like Repeat Schedules, contact groups, etc., you need to upgrade to the Pro version of the app.
Schedule WhatsApp messages on the web
You can also schedule WhatsApp messages via WhatsApp Web with the help of a Chrome extension, called Blueticks WhatsApp Scheduler. This extension logs you into WhatsApp Web, and adds some features within the web interface, on top of what WhatsApp already provides.
One of these features is Schedule Send, which can be found by clicking the new button adjacent to the message box. Follow the steps below to schedule a message to one of your contacts via WhatsApp Web.
- Install the Blueticks extension from the Chrome Web Store.
- Once installed, click on the extension from the menu in the top-right, and sign up for a free account, if not already done.
- Ensure you’re logged into your Blueticks account and launch WhatsApp Web.
- Follow the on-screen instructions to log in to WhatsApp Web in the Chrome browser.
- Once the web interface loads, select the chat for which you want to schedule a message and click on the Schedule button next to the mic (voice note) icon.
- In the custom menu that appears, choose the date and time when you want to send the message, and type your message in the space provided. You can also set up a recurring schedule by enabling the Custom recurrence checkbox, where you can set up a recurrence from once every minute to multiple times in a year.
- When done, click Schedule Send.
The message will be available, ready to be sent at the specific time you scheduled it. Before the message is sent, you can modify the message or schedule unlimited times, by clicking the edit icon from the top-right corner of the scheduled message.
A scheduled message appears in a blue bubble until it’s sent, and then it changes to green, the same as WhatsApp’s native color scheme.
One drawback of the web extension that we noticed, is that your scheduled messages won’t be sent unless WhatsApp Web is running on your computer, along with the extension installed.
So, if you need to ensure that WhatsApp Web is running on your computer in the same browser that you installed Blueticks on, just before the scheduled date and time. If you miss the scheduled time, your message will be sent immediately the next time you open WhatsApp Web.
The free version of Blueticks has all the basic scheduling features you’d need for occasionally scheduling WhatsApp messages. If you need bulk scheduling or other advanced features, you might need to subscribe to a Premium plan.
Set up automatic replies on WhatsApp
Scheduling messages is one part of the story. But if you want to automatically send a greeting note, or simply a placeholder message when someone messages you when you’re away (AFK), you can set up automatic replies for specific times on WhatsApp.
For this, you’ll need to install the WhatsApp Business app on your iPhone or Android device. You can create a WhatsApp Business account just like a normal WhatsApp account, without any restrictions. The below steps will guide you to send automatic replies using WhatsApp messages with WhatsApp Business.
- Install WhatsApp Business from the App Store or Play Store on your iPhone or Android device.
- Register and set up your WhatsApp Business account.
- Go to Settings from the bottom-right (iPhone) or the three dots in the top-right corner (Android), and tap Business tools.
- Tap Away Message, and enable the Send away message option.
- Tap on the edit button adjacent to the Away message option, and type your scheduled message.
- Tap Schedule and set the time frame by tapping on Custom Schedule, or choose from the given options.
- Go back and tap Recipients to add the contacts to whom you want to send the scheduled message.
- Tap Save to save your scheduled message.
That’s all. From now on, WhatsApp will send the saved message to the intended recipients, if they message you within the scheduled time frame. This works on the server side and doesn’t require any special permissions from your device.
To learn more about the away messages feature in WhatsApp Business, check out the official FAQ page from WhatsApp.
If you know of any other workaround to schedule WhatsApp messages, let us know in the comments below.