Windows and macOS offer limited options when it comes to native screencast features. On macOS, you can record the screen activity using QuickTime, but you can only select a single source for video and audio each. That means multi-stream capture (video from the screen and a webcam; audio from system sounds and mic) isn’t supported. On Windows, the Game Bar provides some screen recording features, though the capturing is limited only within the particular app window, and it doesn’t support all the apps.
There are sophisticated screen capture tools available for professionals, but those are usually meant for handling complex workflows, offer more customizations, involve steep learning curves, and come with a pro-level price tag.
But sometimes, all you need is a simple and easy-to-use screen capture utility with support for popular advanced features. In this article, we’re going to explore one such third-party, user-friendly screen capture utility called FonePaw Screen Recorder.
How to use FonePaw Screen Recorder to record video and audio
FonePaw Screen Recorder has a simple and easy UI with all the main features highlighted well. You can record video from your computer screen, webcam, or both. For audio, you can choose between system audio and/or microphone.
Depending on your OS, you may need to provide additional permissions or drivers provided by FonePaw, but you don’t need any other third-party tool to capture multi-stream video and audio.
The below steps will guide you to use FonePaw Screen Recorder. The steps are given specifically for the macOS version, but the steps should broadly be similar on Windows as well.
- Download and install FonePaw Screen Recorder for macOS or Windows from the official website.
- Launch the app.
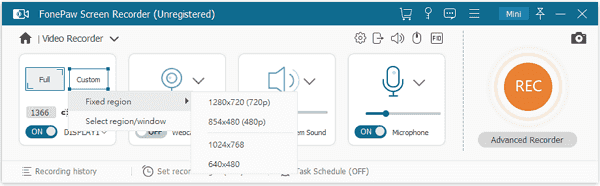
- You should see four basic options: Video Recorder, Webcam Recorder, Audio Recorder, and Screen Capture. Choose the preferred option. Video Recorder is the most versatile and allows recording from all of the available sources.
- In Video Recorder, you can choose between 4 different channels for recording. For screen recording, you can select either fullscreen capture or a custom area & resolution. For webcam recording, you can choose between the different connected webcams for your video source. For sound capture, you can select system sounds or other audio sources if available. For microphone capture, you can choose between different mics connected to your computer.
- You can toggle between one or more of the audio and video capture sources. If you’re capturing both the screen and webcam, you can resize and move the webcam window to a suitable position within the screen before you start capturing.
- When your setup is ready, hit the “Rec” button. The recording will start automatically after a 3-second countdown timer.
- While recording, you can pause, resume, or annotate the session from the recording bar. You can even hide the bar by hitting the minimize button. When the recording bar is minimized or hidden, you can use the preconfigured hotkeys to control the recording.
- When the desired recording is completed, you can stop the recording.
- Next, you will be able to preview the recorded content and also trim the beginning and end portions before you export the video. To trim the video, click on Clip, and then drag the left and right sliders to mark the start and end of the video, click Trim to confirm, and then click Save. Your recording will be exported to the predefined save location.
Note: You can configure the output folder, video format of the export, and other settings from the app’s preferences.
You can learn more about how to use the app in different situations by visiting the support articles available on the official website. For example, you can use FonePaw Screen Recorder to record a webinar session.
Features of FonePaw Screen Recording
Here are the features of FonePaw Screen Recorder at a glance:
- Record Screen, Webcam, System Audio, and Mic Audio individually or all at once.
- Take screenshots using the Screen Capture option, or capture them during a screen recording session.
- Annotate your recordings or screenshots by adding texts, shapes, or custom drawings.
- Customize the size of the screen recording area.
- Track mouse movements and clicks with a highlighted pointer.
- Export recordings in the output quality and format of your choice.
- Use hotkeys to invoke quick actions while recording.
- Preview and clip recordings before final export.
- Export recordings as GIF with custom frame rate.
FonePaw Screen Recorder Free vs. Paid versions

FonePaw Screen Recorder can be downloaded for free from the official FonePaw website. The free trial has the following limitations:
- Screen recordings are limited to a maximum duration of 3 minutes. Any extended recordings will automatically be trimmed to the first 3 minutes while exporting.
- Custom trimming of recorded clips is not possible.
- Microphone noise cancellation and other mic enhancements aren’t available.
If you want to bypass these limitations, you can consider upgrading to a paid license. Check out the product pricing page for more details.
If you are looking for a simple screencasting solution with multi-stream capture and other popular advanced features, you can check out the free trial of FonePaw Screen Recorder. If it suits your needs, you may consider upgrading to the paid version to get the most out of the software.