Have you ever been stuck in a situation where you have deleted an important file from your Android device? Or that you forgot your device password and got locked out? In these critical situations, you’d want to recover the deleted data, or in the second case, bypass your Android lock screen to regain access. If your device is damaged, or you might even want to extract data from it.
Even if your device is functioning as expected, you might still want to back it up from time to time, so that you can restore it when the situation demands you to perform a factory restore.
Although certain smartphone manufacturers provide companion apps to transfer data between mobile and computer, they only provide limited features. Data recovery, screen lock bypass, and other advanced data extraction features, are not usually supported.
But there are some third party PC software suites available on the Internet, which provide powerful data recovery and other advanced tools for Android devices, to help you restore your device and data in critical situations. iSkysoft Toolbox for Android is one such solution.
iSkysoft Toolbox brings together a suit of powerful tools to help you backup, restore, extract and recover data from a wide range of Android devices. It can also help you to root your Android phone, or unlock restrictions set by your carrier.
Prerequisites
Some of the features provided by iSkysoft Toolbox, like Data Backup & Restore, Data Extraction, Data Eraser and Screen Recorder, are available to all Android devices. However, a few of the advanced tools, are restricted only to a specific set of devices.
Below are the list of prerequisites for using the various features provided by the tool:
Turn on USB Debugging on Android
Required for: All features.
iSkysoft Toolbox uses Android Debug Bridge (ADB) at the backend to perform certain operations. For these to work, you need to turn on USB Debugging on your device. The procedure to enable USB Debugging varies slightly depending on the Android version and (in some cases) the manufacturer of the device. Here’s how to turn on USB debugging on different versions of Android:
- Android Version 2.3 or earlier: Go to Settings >> Applications >> Development, and check on the USB Debugging option
- Android Version 3.0 to 4.1: Open Settings >> Developer Options, and check on the USB Debugging option
- Android Version 4.2 and above: If Developer Options is hidden in the Settings menu, enable it by going to Settings >> About Phone and tap on the Build Number 7 times (“You are now a Developer” should be displayed). Now go back to Settings >> Developer Options, and turn on USB Debugging.
Rooting
Required for: Data Recovery
Features such as Data Recovery require the Android device to be rooted. If you already have a rooted device, Data Recovery should be supported on that. But if your device isn’t rooted, you can use the Toolbox’s Root module to do so.
As of this writing, more than 7000 different Android smartphone and tablet models are fully supported for rooting and other advanced operations.
Features specific to Samsung devices
Required for: Data Extraction, Lock Screen Removal and SIM Unlock
Certain features, such as the Data Extraction, Lock Screen Removal and SIM Unlock modules only work with certain Samsung phones and tablets only.
In the following section, each feature description accompanies its respective device compatibility list. Refer to the individual device compatibility lists to find out whether your device is supported for that particular functionality.
If all your required conditions are met, you are good to use iSkysoft Toolbox for Android.
Features of iSkysoft Toolbox for Android
The following set of features is available with iSkysoft Android Toolbox.
One Click Root for Android
Rooting an Android device may void its warranty, but it unlocks the restrictions imposed by device manufacturers and cellular carriers, to give more control of your device. Rooting your device may enable you to uninstall factory apps, apply system level customizations, tweak your device to run faster, and do much more. Even iSkysoft Toolbox includes some powerful utilities, that works only when the device is rooted.
But the rooting process usually involves some command line batch programs, and varies for different devices, which might be inconvenient for the average user. iSkysoft Toolbox introduces a simple rooting process that is compatible with more than 7000 different Android smartphones and tablets.
Device Compatibility for Android Root: The list of compatible devices for rooting is available here.
The below steps will guide you to root your Android device with iSkySoft Android Toolbox:
- Connect your Android smartphone or tablet via USB to your computer.
- Turn on USB Debugging on your device (refer previous section).
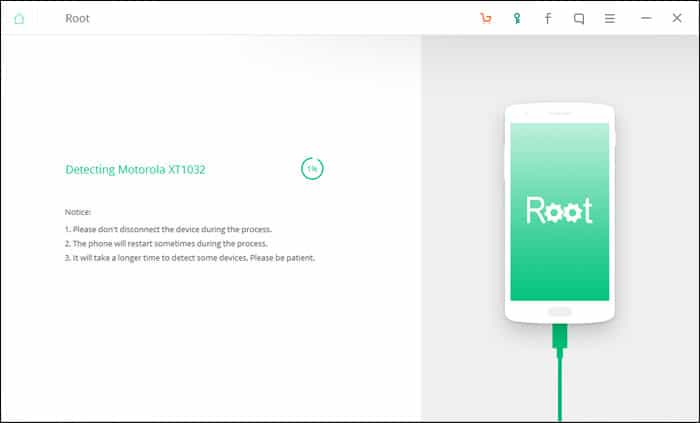
- Install and launch iSkysoft Toolbox on your computer and click on the Root module. Wait for the Android device to be detected.
- If there is a popup on your device asking you to Allow USB Debugging, tap OK to continue. Toolbox will not try to determine the root status of your device, and find a proper package to root it, if unrooted.
- When a suitable package has been found, Toolbox will notify that your device is ready for rooting. Click on Root Now button to continue. The Android device will now be rooted.
If you don’t see the button, your device may not be supported for device root using iSkysoft Toolbox.
Recover deleted data from Android – Data Recovery
If you have accidentally deleted or lost data from your Android device, the Android Data Recovery tool will help you recover the same. The recovery tool is fairly simple to use, but may take more time depending on the make and model of the particular device.
Device Compatibility for Data Recovery: The list of Data Recovery compatible devices is available in iSkysoft’s official site. Scroll down to the Supported Devices section to learn more.
Note: For best results, it is recommended to stop using your device as soon as you realize that data has been accidentally deleted or lost. Any activity (opening apps, moving files, etc.) may overwrite the deleted data, which might render it unrecoverable.
Here is what you need to do, in order to recover data from your Android device using iSkysoft Toolbox:
- Connect your Android smartphone or tablet to your computer via USB.
- Turn on USB Debugging on your device (refer previous section).
- Install and launch iSkysoft Toolbox on your computer and click on the Data Recovery module. Wait for the Android device to be detected.
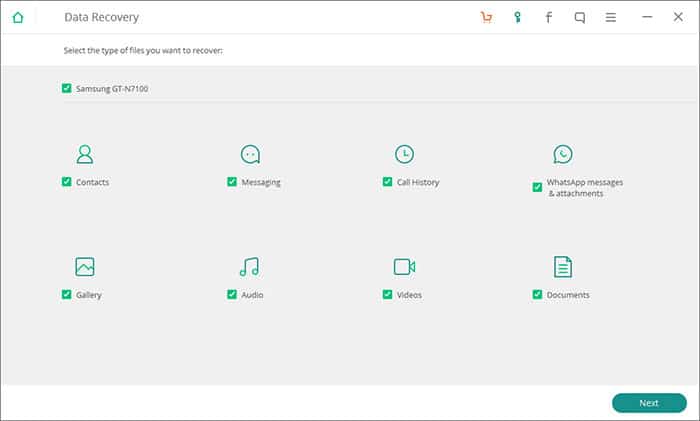
- Select the types of files (Contacts, Messages, Call History, WhatsApp Chats, Photos, Music, Videos, Documents, etc.) that you want to recover from your device, and click on Next.
- Choose a suitable scanning mode. You can choose between scanning only for deleted files or for all files. If either of the options doesn’t recover your file, try scanning in Advanced Mode.
- After scanning has been completed, preview the recovered files and select the ones that you want to save.
- Finally, click on the Recover button and save the selected files in a particular location on your computer.
Note: Data Recovery requires your Android device to be rooted. If you have an unrooted device, the software will automatically prompt you to root it. For this, you may need to purchase the Root module separately, if you haven’t already purchased the full suite yet.
You can use the same Data Recovery tool to recover lost or accidentally deleted data from external SD (or microSD) cards. For this, you need to mount the SD card on your computer with the help of an SD Card Reader. If you use an Android device to mount the card, ensure it is connected in SD card mode (and not in MTP mode).
Once the SD card is connected, launch the iSkysoft Data Recovery module and select the option Android SD Card Data Recovery from the bottom of the screen. Hence, follow the steps, similar to the above tutorial to recover lost data from the external SD card.
Retrieve data from Android with broken screen – Data Extraction
In certain cases, when your Android device is unresponsive or damaged, iSkysoft Data Extraction tool can help you extract valuable data from your device.
Note: The Data Extraction module currently works only on certain Samsung phones and tablets, and may not be compatible with your device.
Device Compatibility for Data Extraction: Samsung Galaxy Note 3, Note 4, Note 4 Edge, Note 5, Note 5 DUOS, Note 8, Note II; Samsung Galaxy Tab 2 7, Tab Pro 10.1, Tab Pro 8.4, Tab S 8.4, Tab2 10.1; Samsung Galaxy S3, S4, S4 Active, S4 LTE-A, S4 Mini, S5, S5 Duos, S6, S6 Edge, S6 Edge Plus.
The below steps will guide you to extract data from your damaged or unresponsive Android smartphone or tablet:
- Connect your Android smartphone or tablet to your computer via USB.
- Install and launch iSkysoft Toolbox on your computer and click on Data Extraction (Damaged Device) module. Wait for the Android device to be detected.
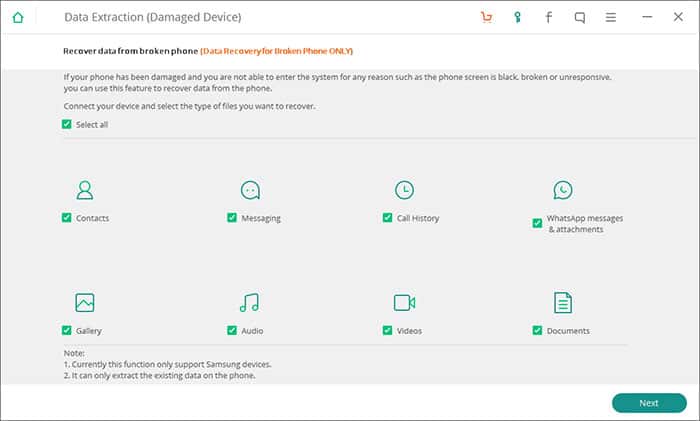
- Select the types of files (Contacts, Messages, Call History, WhatsApp Chats, Photos, Music, Videos, Documents, etc.) that you want to extract, and click on Next.
- Select the appropriate option that defines the state of your device: “Touch doesn’t work or cannot access the phone” or “Black/broken screen”.
- In the following screen, choose your device name and model number, and click Next.
- A prompt will ask you to confirm the chosen device name and model number, click Confirm to proceed.
- Now you need to enter Download Mode on your Android device. For that, you need to power off the device, then press and hold the Volume Down + Home Button + Power Button simultaneously, and finally press Volume Up button. You should now be in Download Mode.
- Now go back to iSkysoft Data Extraction tool and click on Start to download the recovery package.
- Now, preview the files in the recovery package and select the ones you want to keep.
- Finally, click on Recover button to save the selected files to your computer.
Android Data Backup & Restore
Android Data Backup & Restore tool from iSkysoft helps you to backup data from your Android device, and restore them later on the same device, or even to a different Android device.

Device Compatibility for Data Backup & Restore: Backup & Restore module is supported for all Android devices.
The below steps will guide you to backup data from your Android device:
- Connect your Android smartphone or tablet (from which you want to create a backup) via USB to your computer.
- Turn on USB Debugging on your device (refer previous section).
- Install and launch iSkysoft Toolbox on your computer and click on the Data Backup & Restore module. Wait for the Android device to be detected. If there is a popup on your device asking you to Allow USB Debugging, tap OK to continue.
- Click on the Backup button and choose the contents (Contacts, Messages, Call History, WhatsApp Chats, Photos, Music, Videos, Documents, etc.) of your backup file. If you want to backup all the supported contents, check on the Select All option.
- Click on the Backup button at the bottom to start the backup process. Depending on the size of the backup, the time taken to complete the backup might vary from a few seconds to several minutes.
- Once the backup is completed, you can preview its contents by clicking on “View the backup” button.
Note: If you want the Data Backup to include App Data as well, you need a rooted Android device.
Once you have a data backup on your computer, you can restore the same to any Android device. The following steps will guide you to restore data from a backup to the same device or to a different Android device:
- Connect the Android smartphone or tablet (to which you want to restore data) via USB to your computer.
- Turn on USB Debugging on your device (refer previous section).
- Install and launch iSkysoft Toolbox on your computer and click on the Data Backup & Restore module. Wait for the Android device to be detected.
- Click on the Restore button to view the files from your previous backups. By default, the app shows you files from the latest backup, but you can also select a different backup from the dropdown on the top left corner.
- Now, check on the items you want to restore and click on the Restore button at the bottom, to copy the selected files to the connected Android device.
Bypass Android lock screen – Lock Screen Removal
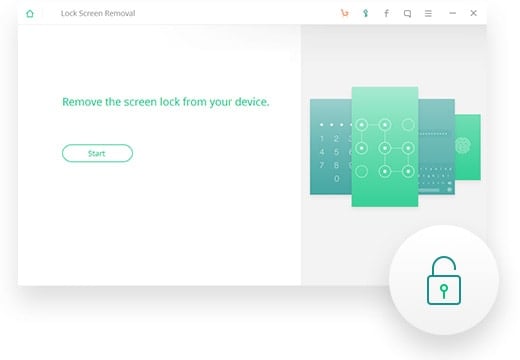
If you’re locked out of your device and have forgotten the correct Passcode, Pattern or PIN, iSkysoft Android Lock Screen Removal module will help you bypass the lock screen without any loss of data.
Note: The Android Lock Screen Removal module currently works only on certain Samsung phones and tablets, and may not be compatible with your device.
Device Compatibility for Lock Screen Removal: The full list of supported devices is available here.
The following steps will guide you to remove lock screen from your device:
- Connect your Android smartphone or tablet via USB to your computer.
- Turn on USB Debugging on your device (refer previous section).
- Install and launch iSkysoft Toolbox on your computer and click on the Android Lock Screen Removal module. Wait for the Android device to be detected. If there is a popup on your device asking you to Allow USB Debugging, tap OK to continue.
- Once the device is connected, check on the ‘I agree with the warning and am ready to proceed’ box and click on the Start Button.
- Switch to Download Mode on your Android device. Power it off, then press and hold the Volume Down + Home Button + Power Button simultaneously, followed by the pressing the Volume Up button to enter Download Mode.
- Back to the iSkysoft Toolbox screen, click on the Start button to proceed further. The appropriate recovery package will now be downloaded.
After the recovery package has been downloaded, Toolbox will remove the lock screen on your device without any data loss. You’ll be able to access the device without having to enter any Passcode, PIN or Pattern.
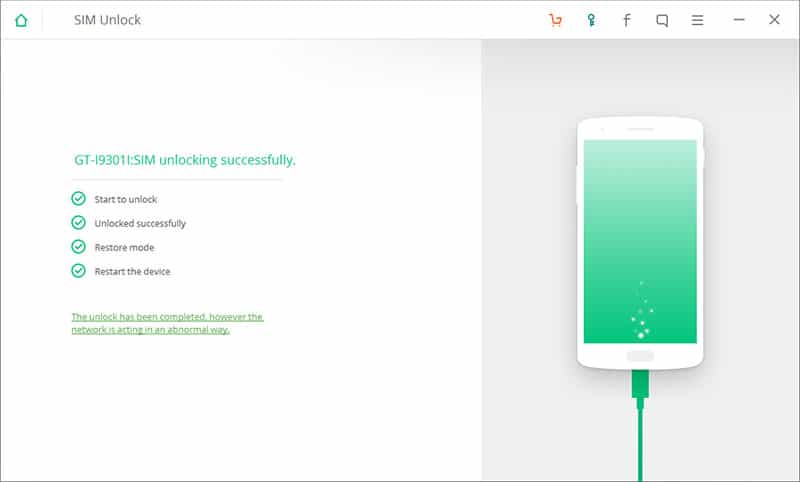
Remove carrier lock from Android – SIM Unlock
If you’ve purchased your smartphone on a contract from a cellular service, you might want to SIM-unlock your device so that you can use it with other carriers. Android SIM Unlock utility of iSkysoft Toolbox makes it possible.
Note: Android SIM Unlock only works with certain Samsung smartphones and tablets, namely the Samsung Galaxy S-Series and Note Series devices.
Device Compatibility for SIM Unlock: The full list of supported devices are available here.
The following steps will guide you to SIM-unlock supported Samsung devices:
- Connect your Android smartphone or tablet via USB to your computer.
- Turn on USB Debugging on your device (refer previous section).
- Install and launch iSkysoft Toolbox on your computer and click on the SIM Unlock module. Wait for the Android device to be detected. If there is a popup on your device asking you to Allow USB Debugging, tap OK to continue.
- When your device is detected, click on the Next button.
- Now, depending on the device, you might be asked to enter an appropriate code in your phone’s dialer. Alternatively, if you just see an Unlock button, click on it and wait for your device to be SIM-Unlocked (Root Required).
- If you’re prompted to enter a code in the dialer, input *#0808#, ##3424# or *#9090# on your phone’s dialer to enter USB Settings or Diagnostic or Service Mode respectively.
- In USB Settings Mode, choose DM + MODEM + ADB option; in Diagnostic Mode option, choose UART[*]; in Service Mode, choose CDMA MODEM option.
- Now click on the Unlock button and wait for the SIM Unlock utility to unlock your device.
- Once the device is unlocked, you have to set it back to normal mode. For that, input *#0808#, ##3424# or *#9090# to enter USB Settings or Diagnostic or Service Mode respectively. Ensure that you use the same code that you used earlier.
- Now revert back the respective setting to what it was earlier. That is, choose MTP + ADB in USB Settings Mode, USB[*] in Diagnostic Mode, or PDA in Service Mode.
- Click on the Next button to get your device back to normal mode.
You have now successfully SIM-Unlocked your Android phone.
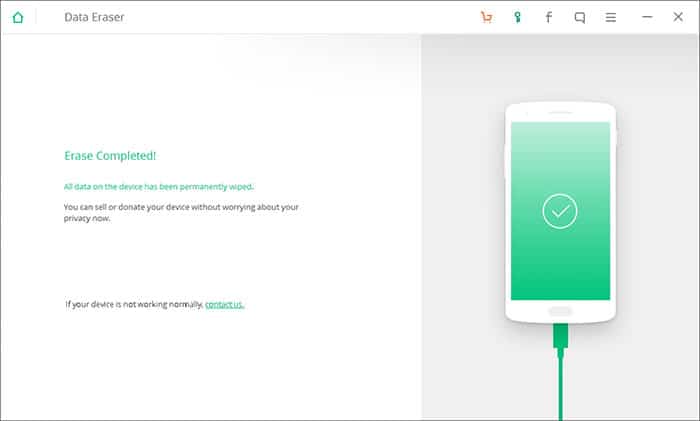
Permanently delete data from Android – Data Eraser
If you’re planning to give up your Android smartphone to someone else, you’d like to ensure that there is no trace of your activities on that smartphone. It’s an important step, as the device could be retaining vital pieces of personal information. Android Data Eraser ensures that your device is as good as brand new, with no data left behind that could potentially be used to identify the user.
Note: Data wiped from an Android device using Data Eraser utility, is completely unrecoverable.
Device Compatibility for Data Eraser: Data Eraser module is supported for all Android devices.
The below steps will guide you to erase all data from your Android smartphone, using Android Data Eraser utility of iSkysoft Toolbox for Android:
- Connect your Android smartphone or tablet via USB to your computer.
- Turn on USB Debugging on your device (refer previous section).
- Install and launch iSkysoft Toolbox on your computer and click on the Data Eraser module. Wait for the Android device to be detected. If there is a popup on your device asking you to Allow USB Debugging, tap OK to continue.
- When the device is connected, click on the Erase All Data button.
- In the next step, you need to type “delete” in the provided textbox to confirm the erase operation, and click on Erase Now button.
- iSkysoft Toolbox will start erasing the data on your device. Wait for the process to be completed.
- When the process is completed, you will be prompted to perform a Factory Reset. This step is important to wipe all system data and settings completely from the device.
Your Android device is now a new device with no prior data associated with its previous user.
Mirror & Record Android screen on PC – Screen Recorder
Screen Recorder is a handy tool if you want to create a video demonstration on your device, or mirror a gameplay on the device to a larger (computer) screen. Most Android devices don’t include any screen recorder app for capturing the on-screen activities.
Fortunately, the Android Screen Recorder module in iSkysoft Android Toolbox allows you to mirror and record an Android device’s screen on your computer, take screenshots from Android device using computer, and reply to messages on Android from your computer. What’s more, during mirror or recording phase, you can even interact with the Android device on your computer using the mouse pointer or the keyboard.
Device Compatibility for Screen Recorder: Screen Recorder module is supported for all Android devices.
The following steps will guide you to mirror and record the screen of your Android device on your computer:
- Connect your Android smartphone or tablet via USB to your computer.
- Turn on USB Debugging on your device (refer previous section).
- Install and launch iSkysoft Toolbox on your computer and click on the Screen Recorder module. Wait for the Android device to be detected. If there is a popup on your device asking you to Allow USB Debugging, tap OK to continue.
- Once the Android device is detected by the tool, it will automatically start mirroring the screen. You can now control your Android device from PC using the mouse pointer or the computer keyboard. (Note: You need to Allow Firewall access to the Screen Recorder program.)
- To record the screen of your Android device, click on the Camcorder icon on the right control panel.
- You may get a popup prompting you to allow screen recording. Click on the OK button to continue.
- Once you’ve finished recording, click on the Stop Recording button (same as the start button).
The recorded video will be saved to your computer on the desktop.
When mirroring the screen, you can reply to messages, and interact with notifications on your Android device, right from your computer using the keyboard and mouse. If you want to take a screenshot of your device on your computer, click on the Camera icon on the right control panel. The screenshot will be saved to your computer on Desktop.
iSkysoft Toolbox for Android is an all-in-one data recovery and restore solution for your Android device. However, some of its key functionalities require the device to be rooted and a few others are supported for only a specific set of devices. If you want to use the advanced features, have a supported device, and don’t mind rooting it, these tools may be worth investing for.
iSkysoft Toolbox for Android is only available to Windows users. Each of the tools included in the iSkysoft Toolbox Suite can be tried for free and then purchased individually. The price of Android tools ranges between $19.95 to $49.95.
We have already provided the list of supported devices and prerequisites for each of the modules. If you still have doubts, do confirm with the product support team before making a purchase.
If you are looking for similar data and system recovery solutions for iOS devices, check out iSkysoft Toolbox for iOS.