iOS devices, like all others, are susceptible to software issues from time to time. Your iPhone might get stuck in a boot loop (Apple logo), Recovery mode, or Device Firmware Upgrade (DFU) mode. In such situations, there are different recommended ways to bring your device back to normal mode. Mostly, they involve restoring your device from a prior backup using iTunes on a Mac or Windows PC. But, if you don’t have a recent backup saved on your computer, you tend to lose important data.
Moreover, even when your device is working expectedly, the closed nature of the Apple ecosystem makes it difficult to backup, restore and transfer certain app-specific data, which is otherwise relatively easy on other platforms. For example, backing up chats from certain instant messaging apps, such as WhatsApp, Kik, Viber, etc., has been a challenging feat, ever since iOS (version 8.3 and above) started restricting app sandbox access to only the ones with iTunes File Sharing enabled .
Now, at this point, it might seem that jailbreak is the only solution to recover app-specific data, or fix iOS system issues without losing data. But there are still a few data and system recovery solutions available, which enable such advanced backup, restore, and recovery options for non-jailbroken iOS devices. iSkysoft Toolbox for iOS is one such solution.
iSkysoft Toolbox for iOS brings a powerful set of utilities, which can be helpful in data-critical situations. The app is available for both Windows and Mac, and includes tools for iOS system recovery (without data loss), lost or deleted data recovery, and a backup & restore utility that supports more than 20 different types of data, including app-specific selective backup for WhatsApp, Kik, Viber and LINE.
These tools work well with all iPhone, iPad and iPod Touch models, and don’t require you to jailbreak your device.
Prerequisite
Prevent automatic sync on iTunes: iSkysoft Toolbox requires iTunes to be installed on your computer in order to access your iPhone, iPad or iPod Touch. But to avoid conflict with iSkysoft Toolbox, you need to disable automatic sync in iTunes. For this, launch iTunes and open Preferences from the application menu. In the Devices tab, check on the “Prevent iPods, iPhones, and iPads from syncing automatically” option.
Once this is set up, you’re good to use the iSkysoft Toolbox for iOS. In the following section, we’ll explore the various tools offered by the software, and when they are most useful.
Note: The iSkysoft Toolbox for iOS includes a Screen Recorder feature, which is only available in the Windows version of the software.
Features of iSkysoft Toolbox for iOS
The following are the set of modules included in iSkysoft Toolbox for iOS.
Recover deleted files – iOS Data Recovery
Sometimes, you might accidentally have deleted or lost an important file, and want to get it back. But once the file is deleted, there is no official way to get it back from the device, unless you have a previous backup of it. Fortunately, tools like iSkysoft Toolbox can help you recover certain types of data (more than 20 different types, actually), even when you don’t have a previous backup available.
Note: For best results, it is recommended to stop using your device as soon as you realize that data has been accidentally deleted or lost, if you don’t have a prior backup of it. Any activity (opening apps, moving files, etc.) may overwrite the deleted data, which might render it unrecoverable.
There are 2 different ways that you can recover lost or deleted data from your iPhone, iPad and iPod Touch using the Data Recovery module of iSkysoft Toolbox for iOS:
- Recover data directly from the iOS device
- Recover data from an iTunes or iCloud backup
The following steps will guide you to recover lost or deleted data from iPhone, iPad or iPod Touch:
- Connect your iPhone, iPad or iPod Touch to your computer via USB.
- If not already done, tap on “Trust this Computer” on your device to accept the connection.
- Install and launch iSkysoft Toolbox for iOS on your computer and click on the Data Recovery module. If you use encrypted backups in iTunes, you may be required to enter your backup password.
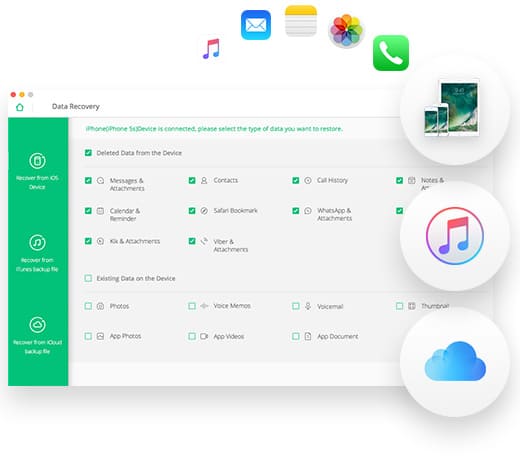
- By default, the “Recover from iOS device” option will be selected. Here you can choose whether you want to recover deleted data from the device (Messages & Attachments, Contacts, Call History, Notes & Attachments, Calendar & Reminder, Safari Bookmark, WhatsApp & Attachments, etc.), or extract existing data on your device (Photos, Voice Memos, Voicemail, App Document, etc.).
- Select the items that you want to recover, and click on Start Scan.
- Once the scan is completed, you can choose the type of data on the left and preview the recoverable data on the right. If there’s a lot of data, use the Filter and Search options to narrow down the content.
- Now, select the items that you want to recover, and click on the “Restore to Device” (if you want to save selected data to device) or “Export to Mac / PC” (if you want to save selected data to computer) as applicable.
If you want to recover specific data from an iTunes or iCloud backup, iSkysoft Toolbox also lets you do that. The below steps will guide you to recover data from an iTunes or iCloud backup:
- Connect your iPhone, iPad or iPod Touch to your computer via USB.
- If not already done, tap on “Trust this Computer” on your device to accept the connection.
- Install and launch iSkysoft Toolbox for iOS on your computer and click on the Data Recovery module.
- If you want to extract data from an iTunes backup, select “Recover from iTunes Backup file”. If you use encrypted backups in iTunes, you may be required to enter your backup password. Alternatively, if your backup is available in iCloud, choose “Recover from iCloud Backup file”. In this case, you need to sign in to iCloud from iSkysoft Toolbox.
- The list of available backups will automatically be displayed on screen. Choose the backup that contains the specific data that you want to recover. If it’s an iCloud backup that you want to extract data from, “Download” the appropriate backup file.
- For iCloud backups, next you have to select the types of files that you want to scan. Choose the appropriate file types and click on Next. If you’re recovering from iTunes backup, you can skip this step.
- Next, you can preview and select the specific data that you want to recover, and then click on Export to Mac / PC, followed by an appropriate option, to save your selected files.
Fix iPhone stuck on Apple logo, Recovery mode – iOS System Recovery
The Data Recovery module will help you to recover lost or deleted data. But what if your iOS device is not able to boot into the OS properly? When your iPhone, iPad or iPod Touch, is stuck in a boot loop (Apple logo), Recovery or DFU mode, iTunes gives you the option to Repair or Restore your device. The Repair option can ideally revert your iOS device back to normal state, without any loss of data. But, in most cases, Restore is the only possible option, which wipes out all existing data and provides a fresh installation of the OS.
![]()
iSkysoft Toolbox for iOS helps to fix iOS System issues and restore your device back to working condition, without any loss of data. The System Recovery module is useful in all three issues mentioned above (i.e., stuck in Apple logo, Recovery Mode or DFU mode). It provides an easy step by step solution to fix the errors and restore the device back to normal, without losing any data.
The following steps will guide you to fix iOS System issues using iSkysoft Toolbox for iOS:
- Connect your iPhone, iPad or iPod Touch to your computer via USB.
- Install and launch iSkysoft Toolbox for iOS on your computer and click on the System Recovery module.
- The device will automatically be identified. Click on the Start button to initiate the recovery process.
- The tool will automatically detect your device and offer the latest available firmware for download. Click on the Download button to download the firmware. Once the firmware has been downloaded, it will automatically proceed to repair your device.
When the repair process is completed, your iPhone, iPad or iPod Touch will be back to normal state without losing any data.
Selective Data Backup & Restore for iOS
Apple already supports backup and restore operations for iOS devices using iTunes or iCloud. And it’s perfect for taking whole backups of your iPhone, iPad or iPod Touch. But, if you need to backup or restore only certain items and not the whole device (selective backup), iTunes doesn’t provide a suitable solution. iSkysoft Data Backup & Restore utility helps to create selective backups, and also restore selectively from existing backups.
The following steps will guide you to create a selective backup of your iOS device:
- Connect your iPhone, iPad or iPod Touch to your computer via USB.
- If not already done, tap on “Trust this Computer” on your device to accept the connection.
- Install and launch iSkysoft Toolbox for iOS on your computer and click on the Data Backup & Restore module. If you use encrypted backups in iTunes, you may be required to enter your backup password.
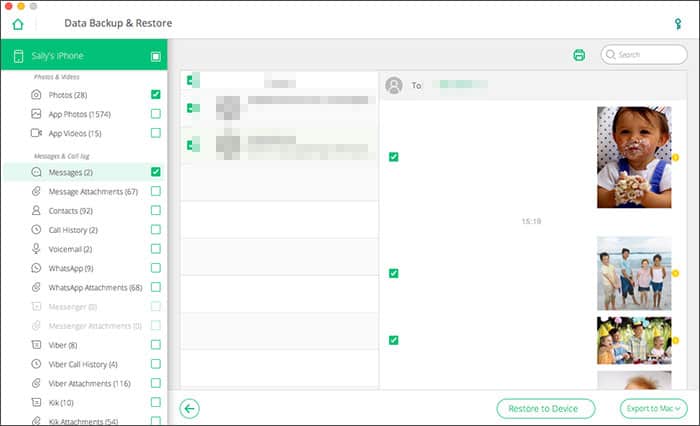
- Next, the software will display the different types of data (Messages & Attachments, Contacts, Call History, Notes & Attachments, Calendar & Reminder, Safari Bookmark, WhatsApp & Attachments, Photos, Voice Memos, Voicemail, App Document, etc.) that it can back up. Select the desired file types and click on the Backup button.
- Once the backup process is completed, you can preview the contents of the backup. Alternatively, you can extract the data to your computer, by clicking on “Export to Mac / PC”. Alternatively, you can selectively restore the backed up data back to your iPhone, iPad or iPod Touch, by clicking on “Restore to Device” button.
Note: Even though you may only select certain items for backup or restore, iSkysoft Toolbox will internally create a full device backup and then retain only the items that you selected. So, you need to have the minimum free space required for creating the full backup. Once the selected items are retrieved, iSkysoft Toolbox will automatically delete the complete backup. [Applicable for selective data backups as well as WhatsApp, Kik, Viber and LINE backups.]
WhatsApp (iPhone) Transfer, Backup & Restore
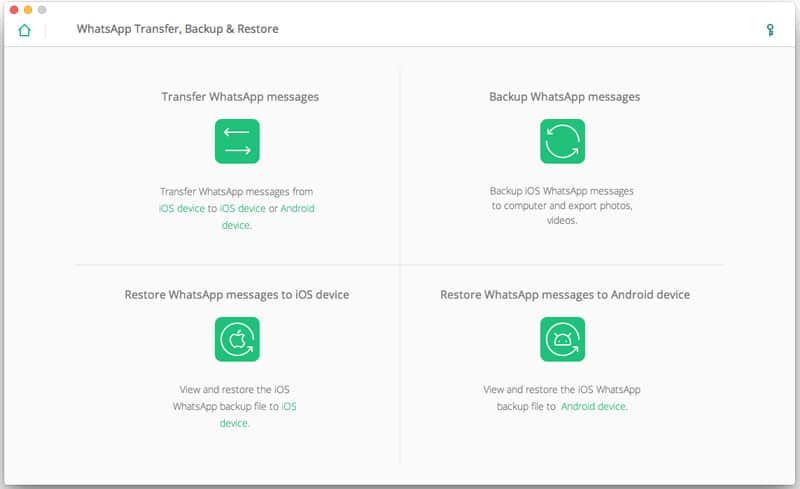
The WhatsApp Transfer, Backup & Restore module of iSkysoft Toolbox is a powerful utility to manage WhatsApp chats & attachments on your iOS device. It supports backing up messages from an iOS device, restoring WhatsApp backups to an iOS or Android device, or transfer of WhatsApp chats between different devices (iOS to iOS or iOS to Android).
The following steps will guide you to backup WhatsApp chats from an iOS device to computer:
- Connect your iPhone, iPad or iPod Touch to your computer via USB.
- If not already done, tap on “Trust this Computer” on your device to accept the connection.
- Install and launch iSkysoft Toolbox for iOS on your computer and click on the WhatsApp Transfer, Backup & Restore module. If you use encrypted backups in iTunes, you may be required to enter your backup password.
- On the next screen, choose “Backup WhatsApp Messages”.
Once your iOS device is detected, click on the Backup button. iSkysoft Toolbox will start creating the backup. - Once the backup is done, click on “View It” >> View to access the backup.
- Select “WhatsApp” or “WhatsApp Attachments” to view your chats and shared media files.
- Choose the items you want to backup, and click on “Export to Mac / PC” or “Restore to Device” as desired.
Now, if you have a previous backup contain WhatsApp chats and attachments, you can restore them back to your iOS or Android device using iSkysoft Toolbox. The following steps will guide you through the process.
- Connect your iOS or Android device to your computer via USB.
- If it is an Android Device, ensure that USB Debugging is turned on and that USB Debugging is allowed on the device. If it is an iOS device, “Trust this Computer” on your device if not already done, and turn off “Find My iPhone” from iOS Settings >> iCloud.
- Install and launch iSkysoft Toolbox for iOS on your computer and click on the WhatsApp Transfer, Backup & Restore module. If you use encrypted backups in iTunes, you may be required to enter your backup password.
- On the next screen, choose “Restore WhatsApp messages to iOS device” or “Restore WhatsApp messages to Android device”, as required.
- If you want to restore all the messages on your device, click on the Restore button and wait for the operation to complete. Alternatively, click the “To view the previous backup file” option to restore WhatsApp data selectively (click on View >> Select chats >> Restore to Device).
- The app will ask you to confirm the restore operation. Click OK to continue.
- Once the operation is completed, uninstall and reinstall WhatsApp on your iOS or Android device.
- Launch WhatsApp, and restore the backup when prompted.
Your WhatsApp chats will now be restored on your iPhone, iPad, iPod Touch or Android device.
Note: By default, the software will consider the latest backup for the restore operation. If you want to select a different backup, click on the “To view the previous backup file” option instead of the Restore button, and choose the appropriate backup.
Instead of separately backing up and restoring messages, you can directly transfer WhatsApp chats from an iOS device to another iOS or Android device. The following steps will guide you through the process.
- Install and launch iSkysoft Toolbox for iOS on your computer and click on the WhatsApp Transfer, Backup & Restore module. If you use encrypted backups in iTunes, you may be required to enter your backup password.
- On the next screen, select “Transfer WhatsApp Messages”.
- Connect an iPhone, iPad or iPod Touch as the source device, and another iOS or Android device as the target device.
- For iOS devices, ensure “Trust this Computer” is allowed and “Find My iPhone” is turned off in iOS Settings >> iCloud. For Android devices, ensure that USB Debugging is turned on and that USB Debugging is allowed on the device.
- Once both the devices are detected, click on the Transfer button and click OK on the confirmation prompt. The transfer process will be initiated.
- After the transfer has been completed, uninstall and reinstall WhatsApp on the target iOS or Android device.
- Launch WhatsApp on the target device, and restore the backup when prompted.
Backup and Restore messages from Kik, Viber and LINE
In addition to WhatsApp, iSkysoft Toolbox also allows you to backup and restore data from IM apps like Kik, Viber and LINE. The steps are similar for backing up and restoring chats and other content from these apps, it’s just that you need to launch the appropriate module from the launch screen.
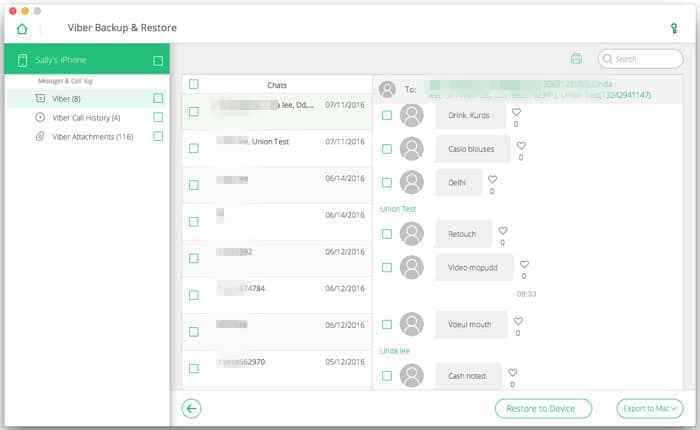
The following steps will guide you to backup messages and data from Kik, Viber and LINE:
- Connect your iPhone, iPad or iPod Touch to your computer via USB.
- If not already done, tap on “Trust this Computer” on your device to accept the connection.
- Install and launch iSkysoft Toolbox for iOS on your computer and click on the appropriate Backup & Restore module (Kik, Viber and LINE). If you use encrypted backups in iTunes, you may be required to enter your backup password.
- Once the iOS device is detected, click on the Backup button to initiate backup. Once completed, click on the View It button, and “View” the appropriate backup file.
- In the preview screen, select the appropriate contents (Kik + Kik Attachments or Viber + Viber Call History + Viber Attachments, or Line + Line Attachments), and click on “Export to Mac / PC” or “Restore to Device” as desired.
Similarly, if you want to restore Kik, Viber or LINE messages from a previous Backup, do the following:
- Connect your iPhone, iPad or iPod Touch to your computer via USB.
- If not already done, tap on “Trust this Computer” on your device to accept the connection. Also, turn off “Find My iPhone” from iOS Settings >> iCloud.
- Install and launch iSkysoft Toolbox for iOS on your computer and click on the appropriate Backup & Restore module (Kik, Viber and LINE). If you use encrypted backups in iTunes, you may be required to enter your backup password.
- Once the iOS device is detected, click on the Restore button, followed by OK to confirm the operation.
The Kid, Viber or LINE messages will be restored to your device.
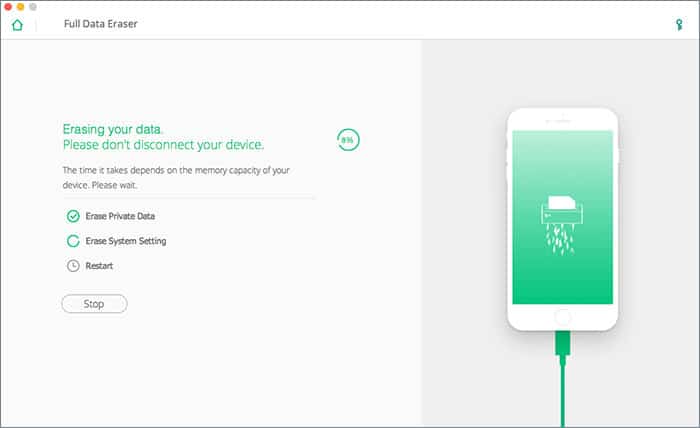
iOS Full Data Eraser
If you’re permanently handing over your iPhone, iPad or iPod Touch, you wouldn’t want the device to retain any of your apps, settings or other personal data. iSkysoft Full Data Eraser utility completely wipes data from iOS devices and leaves a fresh device, with no trace of its previous user.
Note: Data wiped from an iOS device using Full Data Eraser utility, is completely unrecoverable.
The following steps will guide you to completely wipe your iOS device:
- Connect your iPhone, iPad or iPod Touch to your computer via USB.
- If not already done, tap on “Trust this Computer” on your device to accept the connection.
- Install and launch iSkysoft Toolbox for iOS on your computer and click on the Full Data Eraser module.
- Once the device is detected, click on the Erase button.
- Enter the word “delete” in the space provided, to confirm the erase operation, and click on the Delete button.
- iSkysoft Toolbox will start erasing the data on your device. Once completed, you’ll get a confirmation that all data has been deleted.
The iOS device is now safe to be handed over to another person, and they can start using it just like a new device.
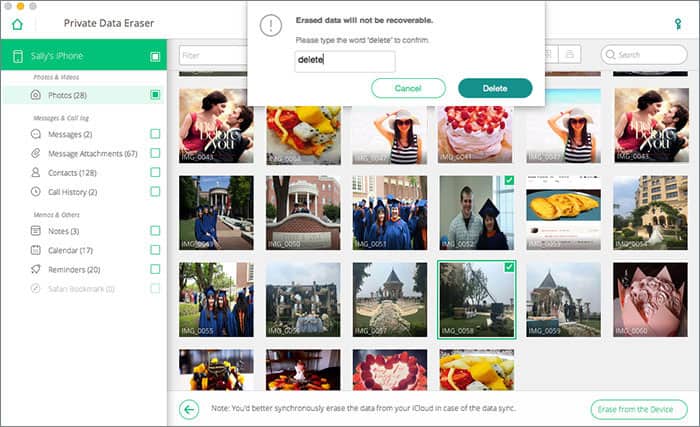
iOS Private Data Eraser
Sometimes, you might want just want to erase certain private data from your iPhone, iPad or iPod Touch, instead of erasing the entire device. With iSkysoft Toolbox for iOS, you can permanently erase Photos, iMessage conversations, Contacts, Call history, Notes, Calendar, Reminders and Safari Bookmarks.
Note: Data wiped from an iOS device using Private Data Eraser utility, is completely unrecoverable.
The following steps will guide you to wipe your private data from your iOS device:
- Connect your iPhone, iPad or iPod Touch to your computer via USB.
- If not already done, tap on “Trust this Computer” on your device to accept the connection.
- Install and launch iSkysoft Toolbox for iOS on your computer and click on the Private Data Eraser module.
- On the next screen, click on the Scan button to find private data available on your device.
- Once the scan is completed, select the specific items that you want to erase, and then click on Erase from the Device button.
- Finally, enter the word “delete” in the space provided, to confirm the erase operation, and click on the Delete button.
- iSkysoft Toolbox will start erasing the data on your device. Once completed, you’ll get a confirmation that the selected data has been deleted.
Your private data has been wiped from your iOS device.
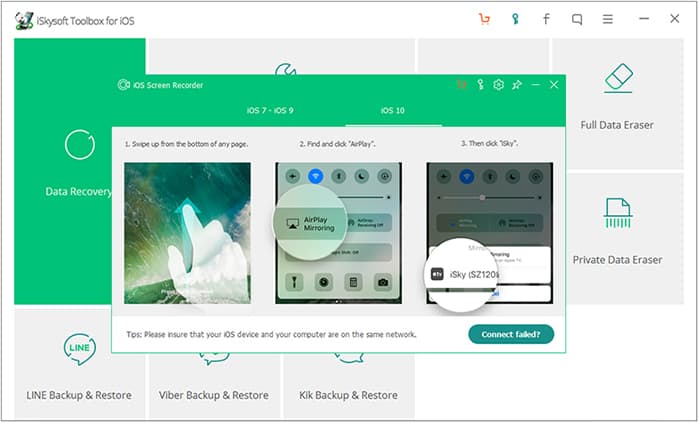
iOS Screen Recorder
The Windows version of the software includes an additional Screen Recorder utility, which can be used to mirror the screen of your iPhone, iPad or iPod Touch on a larger display (computer) and also record the same. For this, the software utilizes Apple’s home-grown AirPlay mode.
In order for AirPlay to work properly, do ensure the following:
- The iOS device and the computer (to which you wish to mirror) are connected to the same WiFi network.
- The Screen Recorder utility is allowed to communicate through Windows Firewall.
- The Bonjour service is running.
Provided all three conditions are satisfied, you should be able to mirror the iOS screen on your computer.
The following steps will guide you to mirror and record iPhone, iPad, or iPod Touch screen on computer:
- Connect your iOS device and computer to the same WiFi network.
- Install and launch iSkysoft Toolbox for iOS on your computer and click on the Screen Recorder module.
- Now, unlock your iOS device, swipe up from the bottom to reveal the Control Center and select AirPlay Mirroring >> iSky(<PC Name>). If you’re using an earlier version of iOS, tap on AirPlay >> Choose iSky(<PC Name>) and enable “Mirroring”. Your iOS device screen should successfully mirror on the Screen Recorder utility on your computer.
- To record the screen, click on the red button, and click it again to stop recording.
The recording will be available in MP4 format on your Desktop.
iSkysoft Toolbox is a must-have recovery solution for fixing iOS System issues, if you don’t want to lose any data. But it also brings along selective data backup, restore, and recovery, which could be more useful compared to iTunes in certain situations. However, we recommend you to stick with iTunes, if you want to perform full backup and restore operations.
Each of the utilities (also called modules) in the iSkysoft Toolbox for iOS are available for free trial, and can be purchased individually, as per your requirement. The price varies of these modules ranges between $29.95 to $79.95, based on the functionality they achieve.
If you are looking for similar data recovery solutions for Android devices, check out iSkysoft Toolbox for Android.