Sometimes, you might want to change the default program or app used to open a particular type of file than the one determined by the operating system. Fortunately, both macOS and Windows give you the provision to set or change default programs.
In this article, we’ll explore the steps to change default apps or programs for various file types in macOS and Windows.
How to Change Default Apps in macOS
Change app-file association for a single file
The below steps will guide you to open a file using a non-default app on Mac.
- Using Finder, browse to the file that you want to open using a different app than the default program.
- Right-click on the file and choose Open With.
- Choose the desired app from the list of installed apps. If it’s not on the list, choose “Other…”, then browse and select the desired app, and click Open.
The file will open using the app you just selected. However, this does not change the default app for all files of the particular file type.
Change Default App for all files
To change the default app for all files of a particular file type or extension, do the following:
- Using Finder, browse to the file that you want to open using a different app than the default program.
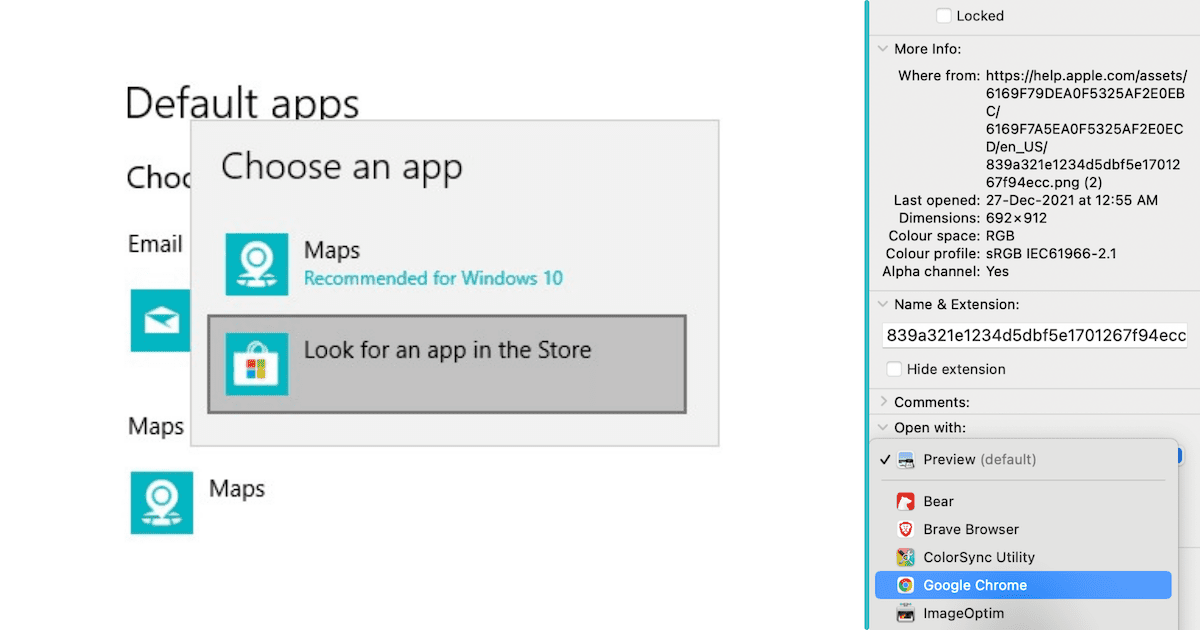
- Right-click on the file and choose Get Info.
- Under the “Open with:” section, choose the desired app from the list of installed apps. If it’s not on the list, choose “Other…”, then browse and select the desired app, and click Add.
- Click on Change All… to update the file association for all files of this type.
Note: If you don’t find a suitable app for opening a particular file type, you can either download a compatible app from the Mac App Store or search for it online and install the respective DMG. Ensure that you learn more about the app or specific file type you’re trying to open before you install any such app.
The default app for the filetype is now changed. To open any file of this type with the desired app from now, just double-click on the file.
How to Change Default Programs in Windows
Similar to macOS, you can also change file associations for specific file types on Windows 10, Windows 11, etc., either for single files or all files of a particular type.
Change file association with an app for a single file
The below steps will guide you to choose a non-default app or program while opening a file on Windows 10, Windows 11, etc.
- Open File Explorer and browse the file that you want to open using a non-default application.
- Right-click on the file and choose Open with.
- Choose from the list of suggested applications. If the desired app is not on the list, select Choose another app and select one from the installed programs.
- Click on OK to confirm.
The file will open using the desired app.
Note: After Step #3 above, if you want to change the file association for all files of the specific file type, you can select the checkbox that says “Always use this app to open .[file extension] files”.
Change the Default Program for all files of a specific type
There are two ways to change the file association and set a different default app for all files of a specific file type.
Option 1: Right-click on a file >> Open with >> Choose another app, select the desired app, check the box that says “Always use this app to open .[file extension] files”.
Option 2: Choose file associations from Settings >> Apps >> Default apps.
Option 1 is already elaborated in the previous section. Below, we’ll guide you through the steps for Option 2.
- Press the Windows + X keys and choose Settings from the menu. Alternatively, you can search for and open Settings from the Windows Search Bar.
- Go to Apps >> Default apps.
- Scroll down to the bottom and select Choose Default Apps by File Type.
- Scroll through the list of file types and the respective default apps to open the specific type of file. If a particular file type doesn’t have a default app associated with it, there would be a Plus button instead.
- Select the file type for which you want to set or change the default app. Then, click on the specific app, or click on the Plus button and select the desired app.
Note: For specific file types, you might not find a compatible app to associate with them. In such cases, you might want to search for a compatible app on the Microsoft Store or download a suitable app from the web. In either case, ensure to learn more about the file type or the app you’re trying to install, before actually installing any app.
Once the file association has been set, you can simply open a file of the specific file type by double-clicking it. The file should open using the desired application associated with it.
If you want to reset the app-file associations to Microsoft-recommended defaults, you can go back to Settings >> Apps >> Default apps, then scroll down and click the Reset button below the phrase “Reset to the Microsoft Recommended Defaults”.
So, this is how you can set or change default apps for specific file types on macOS and Windows. If you want to know about changing default apps for iOS or Android, check out our dedicated article.