PCs are usually prone to frequent system failures, mostly because of corrupted or missing system files. In such cases, sometimes the only way to recover the system is to format the hard disk, or at least, the system partition. But formatting can be quite a hectic task, as it requires a full clean up of the partition and re installation of the OS and applications. You also would require all the necessary installation media and it could literally take ages to set up all your required software programs with the preferred configuration settings.
If you’re using an OEM powered Windows PC, there is a good chance that it shipped with system recovery software. OEM-supplied recovery software usually keeps a backup of your system in its factory state. So, in case of a system failure, this backup may be used to restore the PC. A system backup is usually provided as a set of DVDs (Recovery Set) or within the computer’s hard disk (Recovery Partition). System recovery is a more convenient solution compared to the manual installation process, as it usually requires lesser time and provides a ready-to-use system, complete with pre-installed OS, drivers and third-party applications.
However, OEM-supplied recovery software can only recover the OS along with its default set of applications. It usually doesn’t let you to create a custom backup, so your preferred applications and settings cannot be recovered with this option. Additionally, OEM based Recovery Partitions may get corrupted or deleted due to several reasons. For example: an HP laptop initially running Windows 8 was upgraded to Windows 8.1. Unfortunately, the recovery partition got corrupted after the upgrade operation.
And if the Recovery Partition is lost, there’s no way to get it back as the software won’t let you to create a new one. Hence, the OEM recovery feature becomes useless.
Some OEMs do allow you to save the factory backup on external media, like DVD or USB drive. But then again, these backups are usually huge in size and need multiple DVDs to store them. Also there are more to worry about like, damage of optical drive, damage to disc, etc. – and these are only some of the issues with DVD backups.
Recovery operations need to be performed in a different environment outside the OS where the system drive can be formatted and restored from the system backup. Some of the system backup utilities create the recovery environment in the primary hard disk, and can be accessed via boot menu. Other utilities may create the recovery environment within external media, and require you to boot from that.
In this tutorial, we’ll focus on solutions that allow us to create custom backups anytime and do not require any external media to boot into recovery.
Many Windows versions natively provide backup utilities. Depending on the OS and its version, these tools may allow you to create a File Backup, System Backup or provide both options together. These backup solutions may either create its recovery environment within the primary hard disk or depend on the Windows Installation media to boot into recovery mode. If your OS natively supports System Backup, you can use the native System Backup utility. Otherwise, some third party system backup utilities provide a viable alternative.
Generally, you will find the native System Backup option available on all versions of Windows 7 and Windows 8. In Windows Vista, only Business, Enterprise and Ultimate versions of the OS provide the Complete PC Backup functionality; while Windows XP lacks the system backup feature completely.
So, if your Windows version supports System Backup natively, the following section will provide a step-by-step guide to set up System Recovery. Other users may skip this section and move on to the section on third party backup solutions.
Native System Recovery Solutions for Windows
System Recovery in Windows 8
Windows 8 has its own recovery environment for performing system recovery operations. The OS lets you to create an image of your system drive and save it to your hard disk. Depending on your hardware manufacturer, you may not require an external media to enter into recovery mode.
Create a system backup on Windows 8
Open Control Panel >> System and Security >> File History.
On the left pane, click on System Image. A new window will open up. Here you can choose the location in which to store your backup. Choose one of the following:
- On a hard disk: If you wish to keep the backup image on your hard drive, you may choose this option. If you save it on your primary disk, Windows will warn you that the selected drive is on the same physical disk as the one you’re backing up. So it’s always a good idea to store a copy of your backups on a separate disk, and another one in a non system partition of your primary hard disk. This will ensure that your backup remains unharmed even in case of a hard disk failure.
- On one or more DVDs: You may also store the backup on a set of DVDs.
- On a network location: You may also store your backups on a network location. However, recovery from a network location might be slow and also prone to other issues.
For creating an independent recovery method, it’s best to use the first option.
Click Next and then click Start backup.
Wait for the process to complete as Windows saves the backup on the selected location.
Now that the system image has been created, you can use it to restore your PC any time.
Optionally, you can also set up a USB recovery drive to enter into recovery mode in case the default PC recovery environment is inaccessible.
To set up a recovery drive, go to Control Panel >> System and Security >> File History.
On the left pane, click on Recovery >> Create a recovery drive.
Click Yes on the UAC prompt, if it appears.
Follow the instructions given in the Recovery Wizard and complete the process.
Restore backup on Windows 8
If the PC is able to boot into Windows, swipe from the left to reveal the Charms bar and click on Settings >> Change PC Settings. Go to Update and Recovery >> Recovery >> Advanced Startup.
If your PC is not able to boot into the OS, check if your manufacturer provides any System Recovery option in boot menu. The boot menu can be generally accessed by pressing the Del/Esc/F8/F11 key repeatedly at startup. If there isn’t any such option, a recovery drive or Windows 8 Installation DVD might be required to access the recovery environment.
Once you are inside the recovery environment, choose your keyboard language (if asked) and click on Troubleshoot on the next screen.
Choose Advanced options >> System Image Recovery.
Next, Windows will search for available system images on your local disks. Choose the relevant image follow the wizard to complete the recovery process.
Restart your system. The PC will be reverted back to the state it was backed up in.
System Recovery in Windows 7
If you own a Windows 7 PC, follow these steps to create a system image and recover your computer using it.
Create a system backup on Windows 7
Go to Control Panel >> System and Maintenance >> Backup and Restore
In the left pane, click on Create a system image, and choose the location of your backup.
Follow the steps in the wizard to complete the process.
Provide the Administrator password if Windows asks for it. For more details check out the official Windows page.
Restore backup on Windows 7
Once the system image has been created, the following steps will guide you to restore the PC from the system image.
If you are able to boot into Windows, you can perform recovery from a system image via the Control Panel.
Go to Control Panel and search for the term “recovery”.
Click on Recovery and go to Advanced recovery methods.
Select “Use a system image you created earlier to recover your computer”, and then follow the steps as per the wizard.
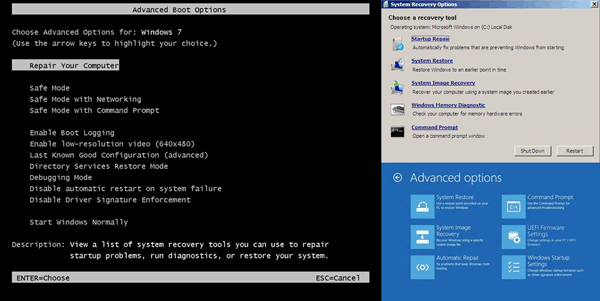
If your computer is not able to boot into Windows, one good alternative is to try out the Advanced Boot Options. If you have a suitable backup available, you may be able to see the Repair Your Computer option under this section.
Press the Del/Esc/F8/F11 key repeatedly at startup to access Advanced Boot Options.
Select Repair Your Computer and hit Enter.
In System Recovery Options, click System Image Recovery, and then follow the on-screen instructions. For more informations, refer to the official page.
System Recovery in Windows Vista (Ultimate, Business and Enterprise)
Follow the steps below to perform system backup and restore operations in Windows Vista.
Create a system backup on Windows Vista
Go to Control Panel >> System and Maintenance >> Backup and Restore Center.
Click “Back up computer”, and then follow the steps in the wizard. If you are prompted for an administrator password or confirmation, type the password or provide confirmation. Check the official Windows page for additional information.
Restore backup on Windows Vista
Press the Del/Esc/F8/F11 key repeatedly at startup to access Advanced Boot Options.
On the Advanced Boot Options menu, use the arrow keys to highlight Repair Your Computer, and then press ENTER.
Select a keyboard layout, and then click Next.
Select a user name and type the password, and then click OK.
In System Recovery Options, click Windows Complete PC Restore, and then follow the instructions in the recovery wizard.
If you own a Windows version prior to Vista (like XP or ME) or a version of Vista without System Backup options, there is a good third party backup and recovery utility available for you too. But of course, this utility also works with the later Windows versions.
Third Party System Backup & Recovery Software
Though a lot of third party system backup utilities are available for Windows, most of them use external media to access the recovery environment. However, a few backup utilities, like Acronis True Image, provide the option to create the recovery environment on the hard disk, which is a good third party alternative to the “Repair Your Computer” found natively in Windows.
Acronis True Image
Acronis True Image is one of the best system backup solutions available for PCs. It allows you to fully backup your system and also periodically maintain them by scheduled incremental and differential backups.
To recover a backup, you may create a typical rescue disk. But Acronis True Image can also help you recover directly from your hard disk. The software creates a boot entry for the recovery environment in the system boot menu. This allows you to recover your PC even if your Operating System fails to load.
Create a System Backup using Acronis True Image
- Open Acronis True Image after installing it on your computer.
- On the Getting Started tab, click on Backup System.
- On the next screen, select the drive you want to back up on the left side. Choose your OS drive to make a system backup.
- On the right side, choose the location in which you want to store the backup.
Note: If it’s an external storage media, you can choose whether to make it bootable or not. - In the Settings sections, choose an appropriate to schedule backup operations.
- Finally, click on Back up now and wait until the process completes.
Restore your system using Acronis True Image
Once you have backed up the system, you need to make sure that you can recover your computer in the event of a system failure. For this, you need to activate Acronis Startup Recovery option.
- Launch Acronis True Image.
- Go to Tools and Utilities >> Acronis Startup Recovery Manager.
- Click on Activate. On successful activation, a suitable notification appears and the same option changes to Deactivate.
- Now reboot your computer and press F11 key to enter the Acronis Boot Menu.
- In the Acronis Recovery Environment, click OK on the initial screen.
- Choose True Image from the Acronis True Image boot menu.
- Click on the Recovery tab on the left pane.
- Click on Refresh Backups to automatically scan for backup images stored on your computer. You may also manually browse it using the Browse for backup option.
- Click on the Recovery menu on top of the screen select Disk and Partition Recovery from the drop down.
- When the Recovery Wizard opens, choose the appropriate backup image and click Next.
- Select Recover whole disks and partitions in the next screen to perform a system recovery.
- Next, choose the elements you want to recover from the image (Partitions, Master Boot Record, etc.) Selecting the primary Windows partition is enough to restore your system. You may review and modify partition specific settings.
- Finally click on Proceed when you are ready.
Depending on the size of your backup, it may take from 15 minutes to about an hour to fully restore your system.
When Recovery is completed, a notification will be shown as Recovery Operation Successful. Restart your system and boot into the Windows environment that was previously backed up.
Acronis True Image is a paid software which is also available as a free trial. But Acronis also partners with popular hard disk manufacturing brands like Seagate and WD, and releases free versions of the software built specifically for them. If your hard disk manufacture is either of them, you may download and use Acronis True Image for free – but only on the specific hardware. Acronis for Seagate hard disks is available for download as DiscWizard. For WD hard disks, Acronis True Image is available as Acronis True Image WD Edition.
Acronis True Image is a one stop standalone system recovery option available for Windows PCs. However, you might have compatibility issues while creating Startup Recovery options (boot entry) using Acronis on Windows 8/8.1. This is because, Windows 8 comes with an integrated Secure Boot (UEFI/EFI) option which is not compatible with the GNU Linux boot environment provided by Acronis.
Thus, without depending on any external media, the methods mentioned above will get your PC back to a functional state in the event of system failure. Share your thoughts on this topic by providing your valuable comments.